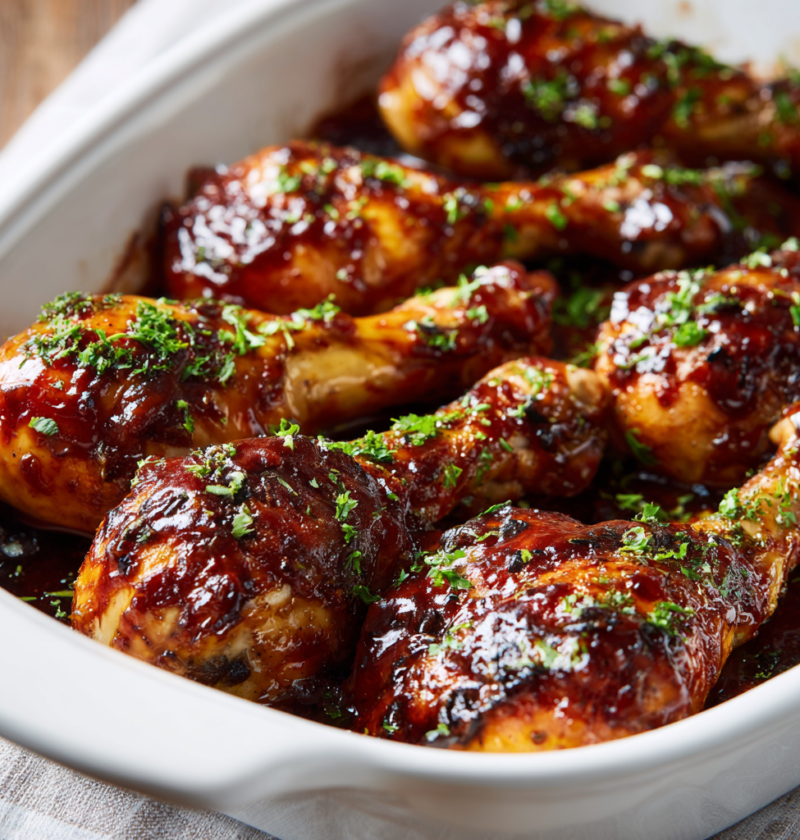
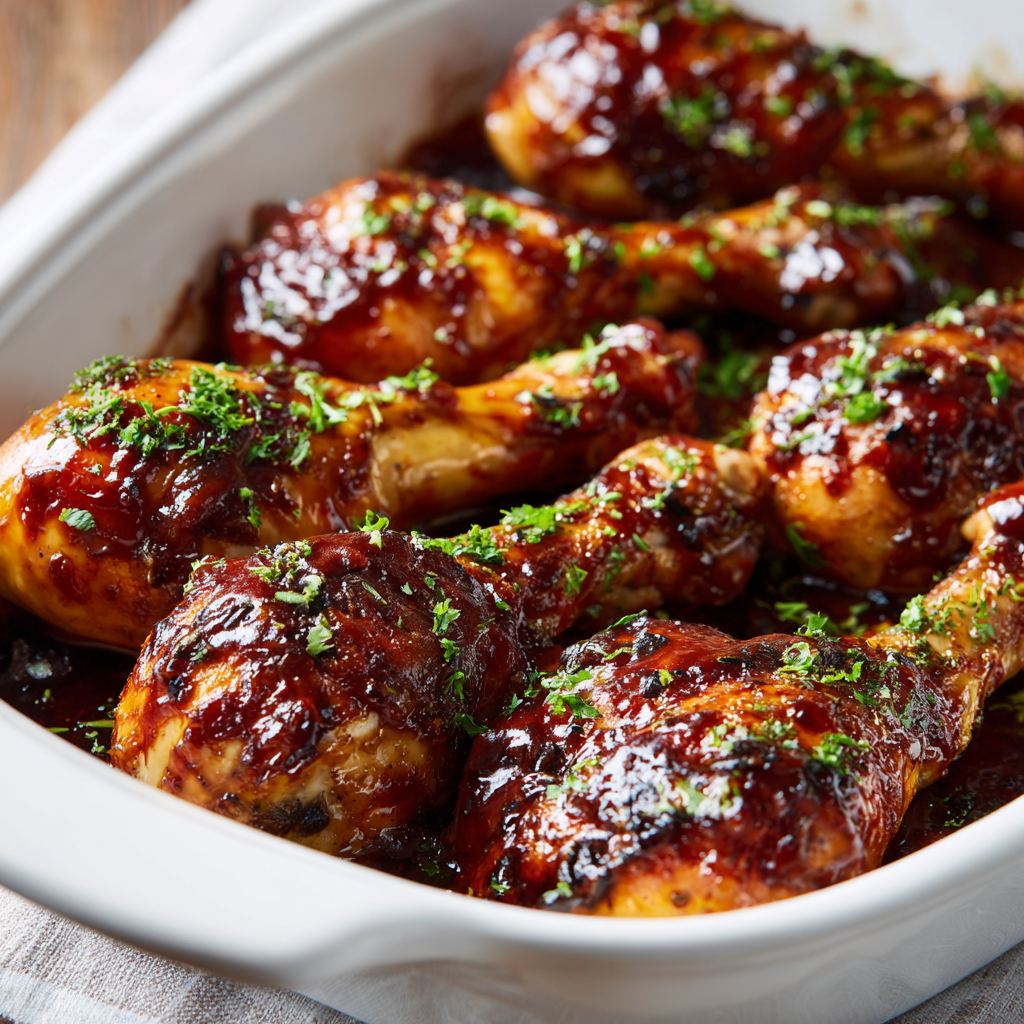
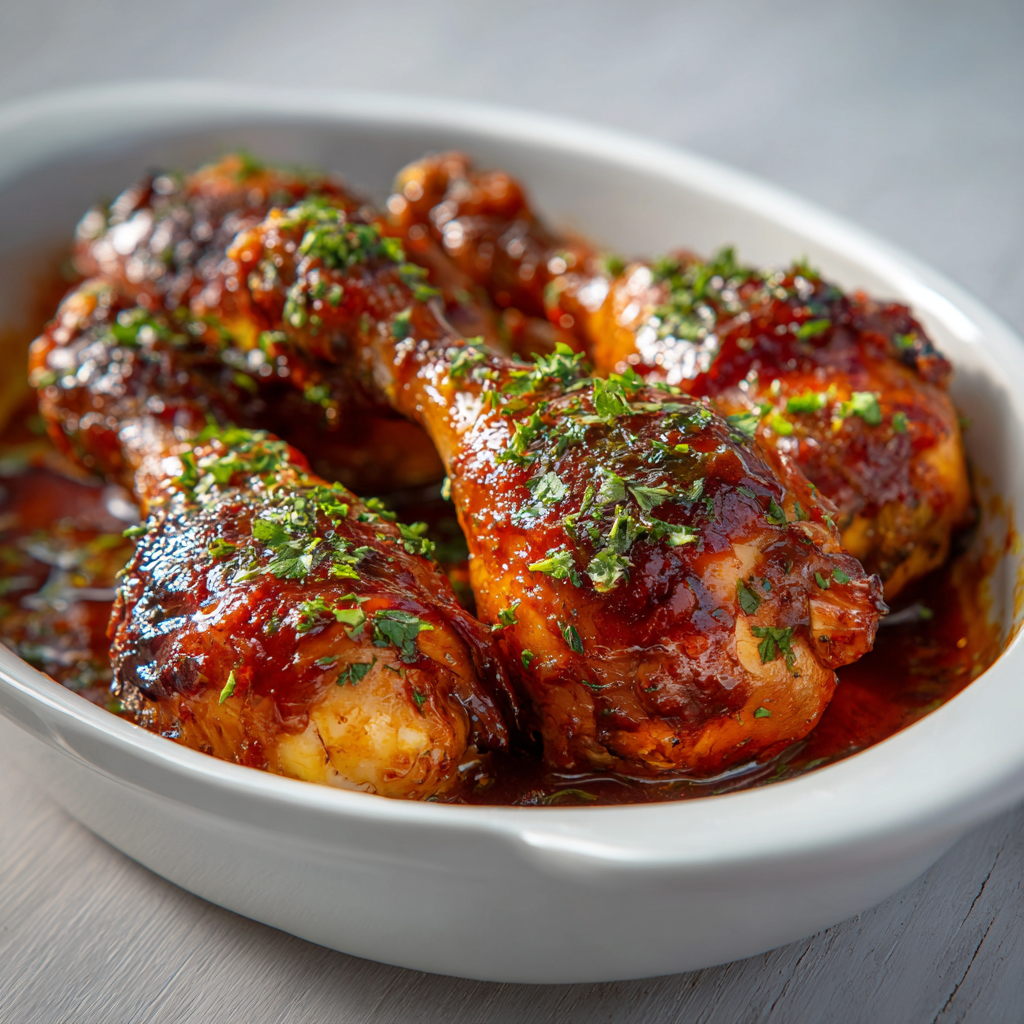
There’s something utterly satisfying about biting into sticky, caramelized chicken drumsticks glazed with tangy barbecue sauce that clings to every inch of tender, juicy meat. First time I baked a batch of these chicken drumsticks instead of grilling them, I was amazed at how the oven method created equally incredible results without the hassle of monitoring charcoal or dealing with outdoor equipment. The magic of this recipe lies in its simplicity: quality drumsticks, a flavorful glaze, and the dry heat of the oven working together to create crispy skin on the outside while keeping the meat incredibly moist and tender on the inside. Additionally, this recipe proves that impressive, restaurant-quality results don’t require fancy techniques or hard-to-find ingredients; just straightforward cooking methods and quality seasonings transform humble chicken drumsticks into something that disappears faster than you can replenish the platter. Whether you’re preparing a casual family dinner, hosting a backyard gathering, meal prepping for the week, or creating finger-food appetizers for a party, these baked BBQ chicken drumsticks deliver maximum flavor and satisfaction with minimal effort and cleanup.
Ingredients
This recipe makes 4 to 6 servings.
• 3 pounds chicken drumsticks (about 12-16 pieces) • 1.5 cups barbecue sauce (store-bought or homemade) • 3 tablespoons unsalted butter, melted • 2 tablespoons olive oil • 1/4 cup honey • 2 tablespoons apple cider vinegar • 1 tablespoon Dijon mustard • 1 tablespoon soy sauce • 1 teaspoon Worcestershire sauce • 4 cloves fresh garlic, minced • 1 teaspoon kosher salt • 1/2 teaspoon black pepper • 1 teaspoon garlic powder • 1 teaspoon onion powder • 1/2 teaspoon smoked paprika • 1/4 teaspoon cayenne pepper (optional, for heat) • 1/4 teaspoon ground ginger • 2 bay leaves • 1 tablespoon fresh lemon juice • 3 tablespoons fresh parsley, finely chopped • 2 tablespoons fresh chives, finely chopped (optional) • Zest of 1 lime
Step-by-Step Instructions
Preparing Your Ingredients and Workspace
- Preheat your oven to 400°F (200°C) and allow at least 15 minutes for it to reach full temperature.
- Line a large baking sheet with aluminum foil for easy cleanup, or lightly grease it with cooking spray or oil.
- Pat the chicken drumsticks completely dry using paper towels, ensuring every surface is moisture-free for optimal browning and crispy skin.
- In a small bowl, whisk together the melted butter, olive oil, honey, apple cider vinegar, Dijon mustard, soy sauce, and Worcestershire sauce until completely combined.
- Stir in the minced garlic, then add the kosher salt, black pepper, garlic powder, onion powder, smoked paprika, cayenne pepper, and ground ginger.
- Mix this marinade thoroughly until all ingredients are evenly distributed and fully incorporated.
Marinating the Drumsticks
- Place the dried chicken drumsticks in a large bowl or zip-top bag, ensuring they’re in a single layer or at least loosely arranged.
- Pour about two-thirds of the marinade mixture over the drumsticks, reserving the remaining third for basting during cooking.
- Toss the drumsticks gently but thoroughly, ensuring each piece is completely coated with the marinade.
- Cover the bowl with plastic wrap or seal the zip-top bag, then refrigerate for at least 30 minutes—for deeper flavor, marinate up to 4 hours.
- If using a zip-top bag, turn it occasionally during marinating to ensure even coating and flavor distribution.
Arranging for Baking
- Remove the drumsticks from the refrigerator about 15 minutes before cooking to bring them closer to room temperature.
- Arrange the marinated drumsticks on the prepared baking sheet in a single layer, spacing them about 2 inches apart.
- Discard the used marinade from the bowl or bag, as it’s been in contact with raw chicken and isn’t safe to reuse.
- Scatter the bay leaves among the drumsticks, which will infuse subtle flavor throughout the dish during baking.
Initial Baking Phase
- Transfer the baking sheet to the preheated oven and bake for 25 minutes without disturbing the drumsticks.
- After 25 minutes, remove the sheet from the oven and check that the chicken is beginning to brown—the skin should start showing golden color.
- If the drumsticks aren’t browning sufficiently, increase the oven temperature to 425°F for the remaining cooking time.
Adding the Barbecue Glaze
- In a small saucepan over low heat, combine the barbecue sauce with the reserved marinade mixture, stirring gently until completely blended.
- Add the fresh lemon juice to the barbecue sauce mixture, stirring to incorporate and creating a perfectly balanced glaze.
- Taste the glaze and adjust seasonings as needed, adding more salt, pepper, or lemon juice to achieve the desired flavor balance.
- Remove the baking sheet from the oven and brush the barbecue glaze generously over each drumstick, ensuring complete coverage.
- Return the baking sheet to the oven and continue baking for another 15-20 minutes until the glaze is caramelized and bubbly.
- At the 15-minute mark, remove the sheet and brush with additional glaze for an even richer, more flavorful coating.
- Check the internal temperature by inserting an instant-read thermometer into the thickest part of the drumstick without touching bone—it should read 165°F (74°C).
Final Touches and Presentation
- Once fully cooked and caramelized, remove from the oven and let the drumsticks rest on the baking sheet for 3-4 minutes.
- Transfer the drumsticks to a serving platter, arranging them attractively.
- Sprinkle the fresh parsley and chives over the drumsticks just before serving for brightness and visual appeal.
- Add a generous sprinkle of lime zest over the entire platter, which provides a subtle citrus note that complements the rich barbecue sauce beautifully.
Serving and Storing Tips
How to Serve These Delicious Drumsticks
These baked BBQ chicken drumsticks are perfect as a main course served alongside classic barbecue sides that complement the smoky, savory flavors beautifully. However, you might consider serving them as appetizers at parties or gatherings, where guests can pick them up and enjoy them with their hands. Next, traditional sides like creamy coleslaw, baked beans, cornbread, and mac and cheese pair wonderfully with these drumsticks for a complete barbecue experience. Additionally, roasted corn, grilled vegetables, or a fresh garden salad provide lighter options if you prefer something less heavy alongside your main dish. For a casual family dinner, serve with simple sides like french fries, sweet potato fries, or garlic mashed potatoes for maximum satisfaction. You could also pair these with a chilled lemonade, iced tea, or cold beer for beverages that complement the rich, tangy flavors perfectly.
Storing Your Leftovers Properly
Store any leftover chicken drumsticks in an airtight container in the refrigerator for up to 3 days, keeping the meat and sauce completely separated to prevent sogginess. To reheat, place the drumsticks on a baking sheet, cover loosely with foil, and warm at 350°F for 15 minutes until heated through—this gentle method prevents the meat from drying out excessively. Alternatively, microwave individual portions on a microwave-safe plate for 1-2 minutes, though the oven method produces noticeably better results for texture and crust. For freezing, let the drumsticks cool completely before transferring to a freezer-safe container or zip-top bag for up to 2 months. Thaw frozen drumsticks overnight in the refrigerator and reheat gently using either the oven or microwave method, adding a splash of water or additional barbecue sauce to restore moisture.
Helpful Tips and Tricks
Ingredient Substitutions and Variations
If you don’t have apple cider vinegar, substitute with white vinegar or rice vinegar in equal amounts, though apple cider provides the most authentic barbecue flavor. Swap the honey for maple syrup or brown sugar dissolved in a touch of water for different sweetness profiles and depth. For a spicier version, increase the cayenne pepper to 1/2 teaspoon or add hot sauce to the glaze for additional heat and complexity. Fresh herbs can be replaced with dried herbs at half the quantity, though fresh parsley and chives provide noticeably more vibrant flavor and visual appeal. Consider adding pineapple juice to the glaze for a tropical twist, or incorporate liquid smoke for deeper, more authentic barbecue flavor. For a Asian-inspired variation, use soy sauce as the base and add ginger and sesame oil for completely different yet equally delicious results.
Common Mistakes to Avoid
Many home cooks skip patting the drumsticks dry, which prevents proper browning and crispy skin—moisture is the enemy of caramelization. Don’t apply the barbecue glaze too early; this can cause burning rather than proper caramelization, so wait until the last 20-25 minutes of cooking. Another mistake is overcrowding the baking sheet, which causes steaming rather than proper browning; give each piece adequate space for air circulation. Skipping the initial dry bake is problematic, as this develops a proper crust before adding the sauce—rushing to glaze immediately results in sticky, soggy chicken. Finally, opening the oven door constantly disrupts the cooking process and causes temperature fluctuations that affect browning and cooking time.
Time-Saving Strategies
Prepare the marinade the night before and store it in the refrigerator, then simply marinate the drumsticks the morning of cooking for deeper flavor without adding time. Use store-bought barbecue sauce instead of making your own, which cuts down on prep time while maintaining delicious results. Consider marinating the drumsticks in the morning for just 30 minutes, which provides adequate flavor without requiring overnight preparation. Another useful tip is arranging the drumsticks on the baking sheet and refrigerating them the night before, so you only need to pop them in the oven when ready to cook. If time is really tight, skip the marinating step entirely and simply brush the drumsticks with the glaze mixture before baking, though marinating adds noticeably more flavor.
Chef Tips for Perfect Results
The secret to perfectly caramelized, sticky drumsticks is applying the glaze in stages rather than all at once; this allows multiple layers to build up and create a deeply flavored crust. Always use an instant-read thermometer to check doneness rather than relying on visual cues alone; this ensures perfectly cooked, moist meat without guessing.
Frequently Asked Questions
Can I use chicken wings instead of drumsticks? Absolutely—wings work beautifully with this recipe; reduce baking time to 35-40 minutes total, checking temperature frequently since they’re smaller and cook faster.
How do I prevent the glaze from burning? Apply the glaze during the final 20-25 minutes of cooking and watch carefully; if browning too quickly, cover loosely with foil for the remaining time.
Can I marinate the drumsticks overnight? Yes, marinate for up to 24 hours in the refrigerator for deeper flavor; any longer and the vinegar can make the meat mushy.
What if I want to grill these instead of baking? Absolutely—marinate as directed, then grill over medium heat for 25-30 minutes, basting with glaze during the final 10 minutes.
How can I make the sauce spicier? Increase the cayenne pepper to 1/2 teaspoon, add hot sauce to the glaze, or stir in diced jalapeños for fresh heat.
Conclusion
This baked BBQ chicken drumsticks recipe represents the perfect intersection of casual comfort and impressive presentation, delivering restaurant-quality barbecue flavor without requiring a grill, charcoal, or outdoor cooking equipment. Moreover, the combination of tender, juicy meat and caramelized, tangy-sweet glaze creates a flavor profile that appeals to virtually everyone, making this ideal for family gatherings and party menus. The beauty of this recipe lies in its adaptability; you can easily customize the glaze to match your preferences, dietary needs, or available ingredients without compromising the fundamental excellence. Additionally, this recipe proves that shortcuts and smart techniques don’t diminish quality; using store-bought barbecue sauce doesn’t prevent you from creating genuinely impressive, crave-worthy results. I genuinely believe this will become a regular rotation in your cooking repertoire because it’s easy enough for busy weeknights, impressive enough for entertaining guests, and delicious enough that you’ll find yourself making it again and again. The magic of these drumsticks lies in their simplicity and reliability; you always know exactly what you’re getting, and everyone consistently loves them.
Did you love this recipe? Please save it, pin it, and share it with your friends and family! Your support means everything to us and motivates us to keep creating more delicious, easy recipes for you to enjoy. Let us know in the comments how your baked BBQ chicken drumsticks turned out—we’d absolutely love to hear about your experience and any creative variations or flavor combinations you made to make them your own!