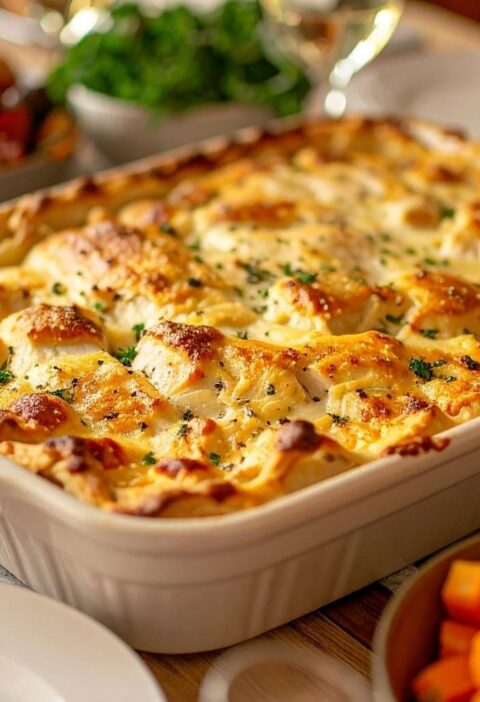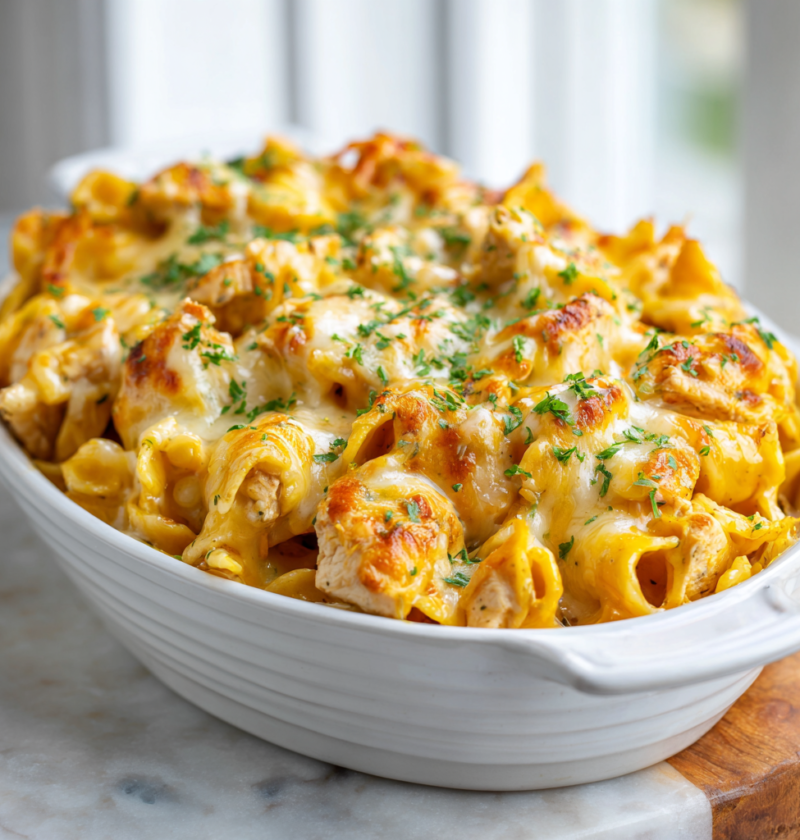
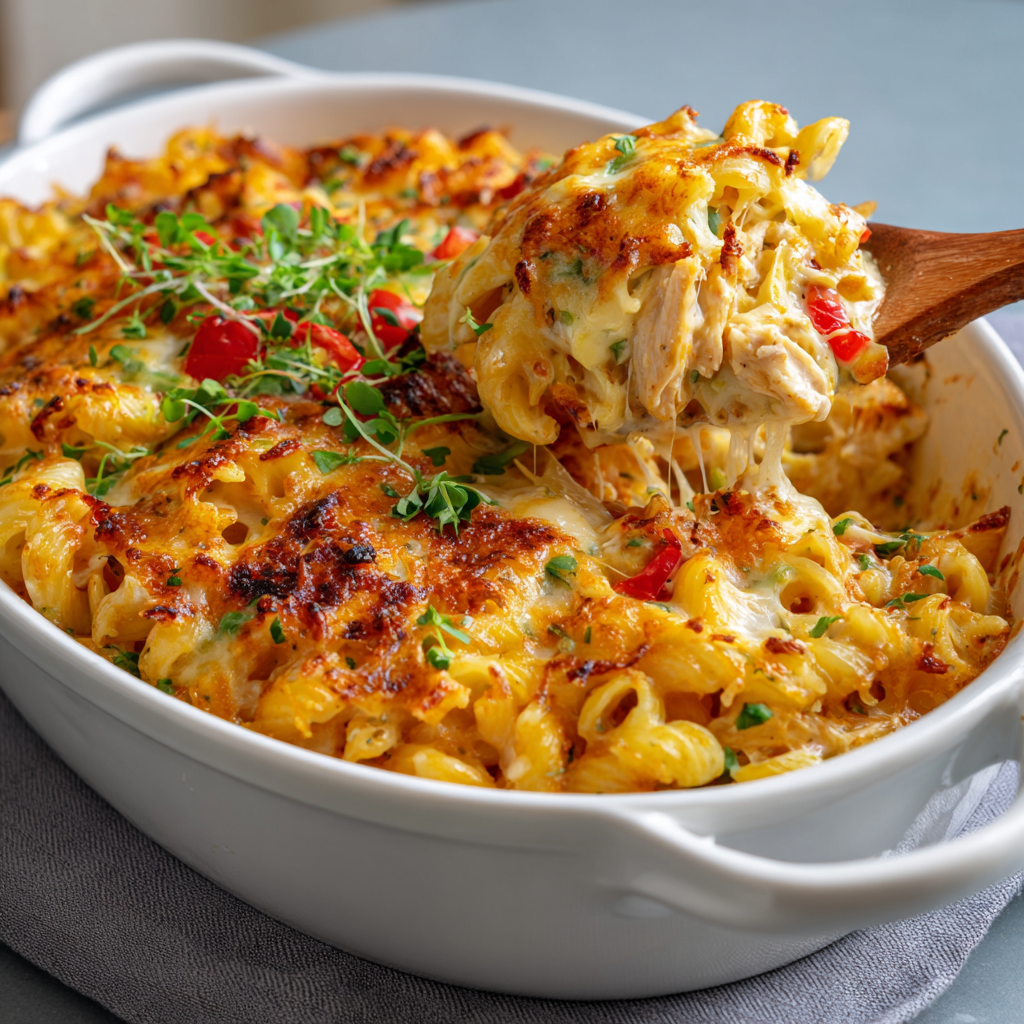
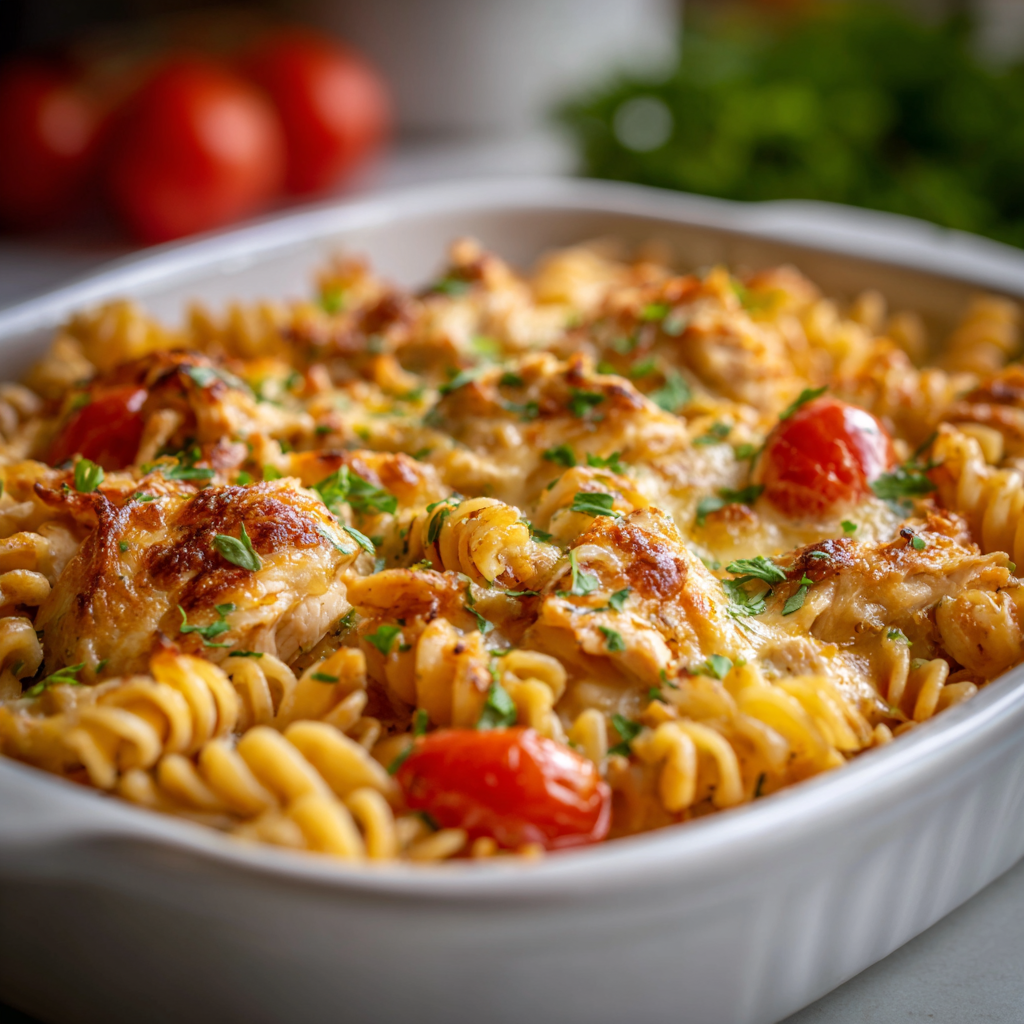
There’s something absolutely irresistible about pulling a bubbling, golden casserole from the oven filled with tender pasta, succulent chicken, and multiple layers of melted cheese that create pure comfort in every single bite. First time I made cheesy chicken pasta bake from scratch using proper techniques instead of relying on canned soup or boxed versions, I understood immediately why this one-dish wonder has become a beloved staple in kitchens everywhere—it’s the ultimate expression of cheesy, creamy, comforting satisfaction. The beauty of this classic dish lies in its remarkable versatility combined with incredibly impressive results: quality chicken, tender pasta, a silky cheese sauce, and golden melted cheese layer together to create something genuinely greater than the sum of its parts. Additionally, this recipe proves that restaurant-quality baked pasta doesn’t require hours of preparation or complicated techniques; straightforward cooking methods combined with quality ingredients create results that taste far more impressive than the minimal effort involved. Whether you’re cooking for a hungry family, meal prepping for busy weeks ahead, hosting casual dinner parties, or simply craving something warm and deeply satisfying, this cheesy chicken pasta bake delivers pure comfort that reminds you exactly why this dish has remained beloved for generations.
Ingredients
This recipe makes 6 servings.
• 1 pound pasta (penne, rigatoni, or rotini) • 1.5 pounds boneless, skinless chicken breasts or thighs • 4 tablespoons unsalted butter, divided • 2 tablespoons olive oil • 1 medium yellow onion, diced • 5 cloves fresh garlic, minced • 8 ounces mushrooms (cremini or button), sliced • 2 medium carrots, peeled and diced • 1 cup frozen peas • 3 tablespoons all-purpose flour • 2 cups chicken broth • 1 cup heavy cream or half-and-half • 1/2 cup sour cream or Greek yogurt • 1 cup grated Parmesan cheese, divided • 2 cups shredded sharp cheddar cheese, divided • 1 cup shredded mozzarella cheese, divided • 1/4 cup cream cheese (optional, for extra richness) • 1 teaspoon kosher salt • 1/2 teaspoon black pepper • 1/2 teaspoon garlic powder • 1/4 teaspoon white pepper (optional) • 1/2 teaspoon Italian seasoning • 1/4 teaspoon thyme (fresh or dried) • 1/4 teaspoon nutmeg (just a pinch) • 2 bay leaves • 1 tablespoon fresh lemon juice • 1 teaspoon Dijon mustard • 1/2 teaspoon honey (optional, for balance) • 1/4 cup fresh parsley, finely chopped • 2 tablespoons fresh chives, finely chopped (optional) • 1/2 cup panko breadcrumbs (optional, for topping) • 2 tablespoons melted butter (optional, for breadcrumb topping) • Zest of 1 lemon
Step-by-Step Instructions
Preparing Your Ingredients and Workspace
- Preheat your oven to 375°F (190°C) and allow at least 15 minutes for it to reach full temperature.
- Lightly butter a 9×13-inch baking dish, ensuring the bottom and sides are completely coated.
- Bring a large pot of salted water to a rolling boil for cooking the pasta.
- If using panko breadcrumb topping, combine the panko with melted butter in a small bowl, mixing thoroughly and setting aside.
- Pat the chicken breasts or thighs completely dry using paper towels, ensuring every surface is moisture-free.
- Cut each chicken piece into bite-sized chunks, ensuring uniform sizes so they cook evenly throughout.
Cooking the Pasta
- Add the pasta to the boiling water and cook according to package directions until just al dente—usually 8-10 minutes.
- Drain the pasta thoroughly and set aside momentarily while you prepare the creamy chicken sauce.
- Don’t rinse the pasta—the starch helps the sauce adhere better to the noodles and creates a creamier finished dish.
Seasoning and Browning the Chicken
- In a small bowl, combine the kosher salt, black pepper, garlic powder, white pepper, Italian seasoning, and thyme.
- Season the chicken pieces generously with the spice mixture, distributing it evenly across all surfaces.
- Heat 2 tablespoons of butter and 2 tablespoons of olive oil in a large skillet over medium-high heat until the butter foams.
- Add the seasoned chicken pieces to the hot skillet, working in batches if necessary to avoid overcrowding.
- Cook the chicken for about 4-5 minutes without moving it around, allowing it to develop a light golden color.
- Stir the chicken and cook for another 3-4 minutes until mostly cooked through but still slightly pink in the center.
- Transfer the browned chicken to a clean plate, being careful not to overcook it—it will continue cooking in the sauce.
Building the Vegetable and Flavor Base
- Add the remaining 2 tablespoons of butter to the same skillet, allowing it to melt and coat the bottom evenly.
- Add the sliced mushrooms to the butter and sauté for about 5-6 minutes, stirring occasionally until they release moisture and brown lightly.
- Stir in the diced onion and cook for another 3-4 minutes, stirring occasionally until it becomes soft and translucent.
- Add the minced garlic and cook for approximately 1 minute until fragrant and light golden, being careful not to burn it.
- Add the diced carrots to the skillet, stirring gently to combine with the vegetable base.
- Cook the carrots for about 2-3 minutes, allowing them to begin softening slightly.
Creating the Cheese Sauce
- Sprinkle the flour over the vegetables and stir thoroughly, coating everything and creating a thick paste.
- Cook this flour mixture for about 1-2 minutes, stirring constantly, which helps eliminate the raw flour taste while creating a roux base.
- Gradually pour in the chicken broth while stirring constantly to prevent lumps from forming in the sauce.
- Continue stirring until the sauce is completely smooth and beginning to thicken, which typically takes 2-3 minutes.
- Add the bay leaves and stir gently to distribute them evenly throughout the sauce.
- Reduce the heat to medium-low and allow the sauce to simmer gently for about 2 minutes.
- Taste the sauce and adjust seasonings with additional salt and pepper as needed for proper balance.
- Remove the skillet from the heat—this is absolutely crucial, as high heat can cause sour cream to curdle.
- Pour in the heavy cream and sour cream, stirring gently to incorporate and creating a luxurious base.
- If using cream cheese, add it now and stir thoroughly until completely melted and incorporated.
- Add half of the Parmesan cheese, half of the cheddar cheese, and half of the mozzarella cheese, stirring until completely melted.
- Add the Dijon mustard and fresh lemon juice, stirring gently to incorporate and creating perfectly balanced flavors.
- Just a tiny pinch of nutmeg should be added, stirring carefully—this adds sophisticated depth without being obvious.
- If the sauce seems slightly too acidic, add the honey—just 1/2 teaspoon helps balance beautifully without sweetness.
- Taste the sauce and make any necessary adjustments to seasonings before adding the chicken and pasta.
- Remove and discard the bay leaves from the sauce.
Bringing Everything Together
- Return the browned chicken pieces to the skillet, stirring gently to coat them evenly with the creamy sauce.
- Fold in the frozen peas, stirring carefully to distribute them evenly throughout.
- Add the cooked pasta to the skillet, tossing gently but thoroughly to combine everything evenly.
- If the mixture seems too thick, add a splash of chicken broth at a time while stirring until you reach your desired consistency.
- The casserole should be creamy but not soupy—there should be enough sauce to coat everything without excess liquid.
Assembling the Baked Pasta
- Transfer the entire mixture to the prepared baking dish, spreading it evenly across the bottom.
- Sprinkle the remaining cheddar cheese evenly over the top of the casserole.
- Sprinkle the remaining mozzarella cheese over the cheddar, creating a generous cheese topping.
- Sprinkle the remaining Parmesan cheese evenly over all the other cheeses.
- If using panko breadcrumb topping, sprinkle it evenly over the cheese, creating an even, textured layer.
Baking to Perfection
- Transfer the baking dish to the preheated oven and bake for 25-30 minutes until the top is golden brown and bubbling.
- The cheese should be completely melted and bubbly, and the breadcrumb topping should be golden and crispy if using.
- If not browning sufficiently after 25 minutes, increase the oven temperature to 425°F for the final 2-3 minutes.
- Watch carefully during this time to prevent burning—the top should be golden, not blackened.
- Remove from the oven and let rest for 5 minutes before serving, allowing the casserole to set slightly.
Final Presentation
- Sprinkle additional fresh parsley and chives over the top just before serving for brightness and visual appeal.
- Add a light sprinkle of lemon zest over the entire casserole, providing subtle brightness that complements the rich, cheesy flavors beautifully.
Serving and Storing Tips
How to Serve This Ultimate Comfort Dish
This cheesy chicken pasta bake is essentially a complete meal on its own, requiring nothing more than perhaps a simple side salad or crusty bread for a completely satisfying dinner. However, if you want to round out the table, consider serving a fresh green salad dressed in light vinaigrette to cut through the richness and add brightness. Next, roasted vegetables like asparagus, green beans, or roasted broccoli provide wonderful textural contrast and additional nutrition without overwhelming the creamy, cheesy flavors. Additionally, steamed vegetables tossed with a touch of garlic and olive oil work beautifully alongside the baked pasta for a more balanced meal. For a more casual approach, serve with crusty bread or dinner rolls for soaking up any flavorful juices from the casserole. A light white wine like Pinot Grigio or even a crisp beer pairs beautifully with the rich, creamy cheese sauce and comforting pasta.
Storing Your Leftovers Properly
Store any leftover cheesy chicken pasta bake in an airtight container in the refrigerator for up to 4 days, keeping it completely covered to prevent drying out. To reheat, place portions in a baking dish, cover loosely with foil, and warm at 350°F for 15-20 minutes until heated through—this gentle method prevents the pasta from becoming mushy. Alternatively, microwave individual portions in a microwave-safe container for 1-2 minutes, stirring halfway through, though the oven method produces noticeably superior results. For freezing, let the baked pasta cool completely before covering tightly with plastic wrap and foil for up to 3 months. Thaw frozen pasta bake overnight in the refrigerator and reheat gently in the oven at 350°F for 25-30 minutes until completely warmed through.
Helpful Tips and Tricks
Ingredient Substitutions and Variations
If you don’t have sharp cheddar, use mild cheddar, Gruyère, or Fontina for different flavor profiles and melting qualities. Swap the pasta shape—any pasta works beautifully, though shapes like penne and rigatoni trap sauce nicely. For a lighter version, use half-and-half instead of heavy cream and reduce the cheese amounts by 1/4 cup. Fresh herbs can be replaced with dried herbs at one-third to one-half the quantity, though fresh herbs provide noticeably more vibrant flavor. Consider adding sun-dried tomatoes, roasted red peppers, spinach, or caramelized onions to the casserole for additional flavor complexity. For a spicier version, add a pinch of cayenne pepper or hot sauce to the cheese sauce for extra heat and depth.
Common Mistakes to Avoid
Many home cooks cook the pasta until completely soft before combining with sauce, which results in mushy pasta since it continues cooking—always cook to al dente. Don’t skip making the roux with flour; this creates the proper sauce consistency and prevents the dish from being too thin. Another common mistake is adding sour cream while the sauce is too hot, which can cause curdling—always remove from heat first. Adding cheese while the sauce is too hot can cause it to become grainy rather than smooth—remove from heat before adding cheese. Finally, overfilling the baking dish can cause the mixture to bubble over during baking—fill only three-quarters full.
Time-Saving Strategies
Prepare the cheese sauce completely the day before and refrigerate it, then cook the pasta and chicken and combine when ready to bake. Use pre-cooked rotisserie chicken instead of cooking fresh chicken, which saves significant time. Pre-cut vegetables from the grocery store save time on busy evenings, though fresh vegetables provide better texture. Another useful tip is cooking the pasta while the sauce is being prepared, which streamlines the overall cooking process. Consider making a double batch of baked pasta and freezing half for future quick meals with minimal cooking.
Chef Tips for Perfect Results
The absolute secret to an incredibly creamy, flavorful casserole is browning the chicken and vegetables properly to develop deep flavors, making a proper roux-based sauce, and not overmixing the pasta—fold gently to prevent breaking the noodles. Always cook the pasta to just al dente, as it continues cooking in the oven and will become overcooked if you start with fully cooked pasta.
Frequently Asked Questions
Can I use different types of chicken? Absolutely—ground chicken, shredded rotisserie chicken, or chicken thighs work beautifully; just adjust cooking time based on your choice.
What if my casserole is too thick or too thin? Add chicken broth for a thinner consistency or reduce liquid next time; the casserole should be creamy but not soupy.
Can I prepare this completely ahead of time? Yes, assemble completely and refrigerate up to 24 hours before baking; add 5-10 extra minutes to baking time if starting cold.
How do I prevent the top from burning while the inside finishes cooking? Cover loosely with foil for the first 15-20 minutes, then remove to allow the cheese to brown for the final 5-10 minutes.
Can I use Greek yogurt instead of sour cream? Absolutely—use equal amounts and the casserole will be equally delicious, though Greek yogurt is slightly tangier in flavor.
Conclusion
This cheesy chicken pasta bake recipe represents the perfect balance of classic comfort food and accessible home cooking, delivering authentic results that taste exactly like the most delicious, indulgent versions served at family tables everywhere. Moreover, the combination of tender chicken, tender pasta, silky cheese sauce, and melted cheese creates a complete meal that satisfies everyone at the table while providing genuine comfort and satisfaction. The magic of this dish lies in respecting proper technique: browning the chicken for deep flavor development, building a proper roux-based sauce, and carefully layering ingredients so they cook together harmoniously. Additionally, this recipe is incredibly adaptable, allowing you to customize it with different proteins, vegetables, or cheese combinations without compromising the fundamental excellence of this beloved classic. I genuinely believe this will become a beloved staple in your cooking rotation because it’s simple enough for weeknight family dinners, impressive enough for casual entertaining, and so delicious that you’ll make it again and again. The combination of savory chicken, tender pasta, creamy cheese sauce, and luxurious melted cheese creates a complete meal that tastes like pure comfort and pure satisfaction in every single bite.
Did you love this recipe? Please save it, pin it, and share it with your friends and family! Your support means the world to us and motivates us to keep creating more delicious, easy recipes for you to enjoy. Let us know in the comments how your cheesy chicken pasta bake turned out—we’d absolutely love to hear about your experience and any creative variations you tried to make this ultimate comfort dish your own!