There’s nothing quite like the joy of transforming simple sugar cookies into edible works of art that capture the spirit of the season. First, Christmas cookie decorating represents far more than just applying frosting and sprinkles—it’s a creative expression, a cherished tradition, and an opportunity to infuse personality into every bite. The moment you begin decorating your first batch of cookies, you’ll discover that this activity engages both the artistic and whimsical sides of your personality simultaneously. What makes cookie decorating truly special is how it transforms your kitchen into a creative studio where imagination reigns supreme and mistakes become happy accidents. Additionally, the process invites family members of all ages to gather around the table, collaborate, and create memories that last far longer than the cookies themselves. Furthermore, finished decorative cookies become gifts that carry personal meaning and homemade love that no store-bought present could replicate. Whether you’re a perfectionist seeking gallery-quality presentation or a playful baker embracing beautiful imperfection, this guide celebrates every decorating approach and skill level. From beginners exploring basic techniques to experienced decorators pushing artistic boundaries, there’s something within these pages to inspire your next batch.
Essential Tools and Supplies for Cookie Decoration
Success in cookie decorating begins with understanding what tools and supplies make the process easier and more enjoyable. Next, gather your materials before beginning so everything remains within arm’s reach of your workspace. This preparation prevents frustration and allows smooth transitions between different decorating techniques. Additionally, quality tools don’t need to be expensive; many craft stores offer affordable options that deliver professional results.
Frosting Application Tools
Piping bags are essential for detailed work, allowing you to apply frosting with precision and control that spreading with a knife cannot match. Meanwhile, piping bag tips in various shapes create different effects—round tips for outlines and dots, star tips for textured areas, and flat tips for bold strokes. Subsequently, disposable piping bags work beautifully and eliminate cleanup, though reusable bags are eco-friendly alternatives. Furthermore, some decorators prefer squeeze bottles with fine tips for thinner lines and smaller details.
Offset spatulas provide excellent control when spreading frosting across larger cookie areas, creating smooth surfaces or intentional texture. Additionally, regular dinner knives work fine for simpler decorating, though offset versions truly elevate the process. Meanwhile, small brushes help paint details with food coloring, water, or edible shimmer dust for artistic effects.
Decorative Elements and Embellishments
Sprinkles transform cookies from plain to festive with minimal effort, available in countless colors, shapes, and sizes. Next, pearl dust creates metallic finishes that catch light beautifully, while edible glitter adds glamorous shimmer. Additionally, nonpareils and pearl beads provide dimension and interest through varied textures. Meanwhile, dragées (metallic balls) create elegant accents perfect for sophisticated designs.
Edible markers allow freehand drawing directly on frosting, enabling detailed artistic expression and personal messages. Subsequently, food coloring gels in concentrated forms allow tinting frosting to any desired shade without thinning it with water. Furthermore, fondant pieces pre-made in holiday shapes eliminate the need for advanced piping skills while delivering impressive results.
Foundation Frosting Techniques
Creating a proper frosting base ensures that all subsequent decorative elements adhere properly and present beautifully. First, royal icing is the gold standard for cookie decorating because it dries hard, creating professional-looking finished results. However, buttercream frosting offers richer flavor and easier application for those less concerned with absolute precision.
Royal Icing Mastery
Royal icing begins with egg whites or powdered egg whites whisked with powdered sugar until thick and glossy. Next, adjust consistency by adding water drop by drop—thicker consistency works for piping details, while thinner consistency creates smooth, fluid coverage. Additionally, divide your batch into bowls and tint different portions to various colors before applying.
The proper consistency makes all the difference in cookie decorating success. First, test by lifting the beaters; the mixture should form stiff peaks that don’t collapse. Subsequently, if you need thinner icing for flooding, add water gradually until it reaches honey-like consistency. Furthermore, thicker icing holds its shape for piping outlines and dimensional details without spreading uncontrollably.
Buttercream Frosting Variations
Buttercream offers easier application because it doesn’t require egg whites and provides richer, more familiar flavor. Next, beat softened butter with powdered sugar until light and fluffy, then add milk or cream for desired consistency. Additionally, this frosting works beautifully for textured effects and rustic-style cookies that embrace imperfection beautifully.
The versatility of buttercream means you can create endless variations matching your flavor preferences perfectly. Meanwhile, adding vanilla, almond extract, or peppermint transforms the basic recipe into something personalized and special. Subsequently, experimenting with different flavorings creates signature buttercream that becomes your decorating trademark.
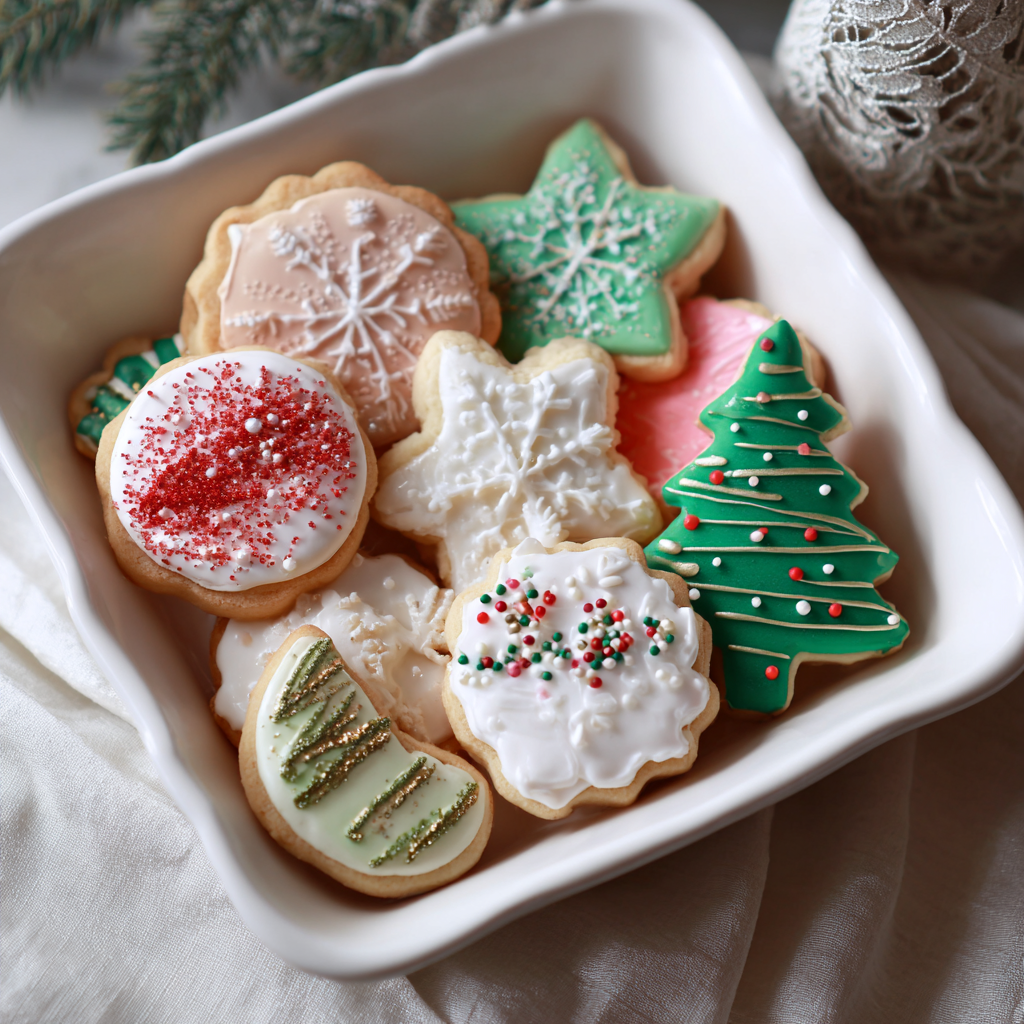
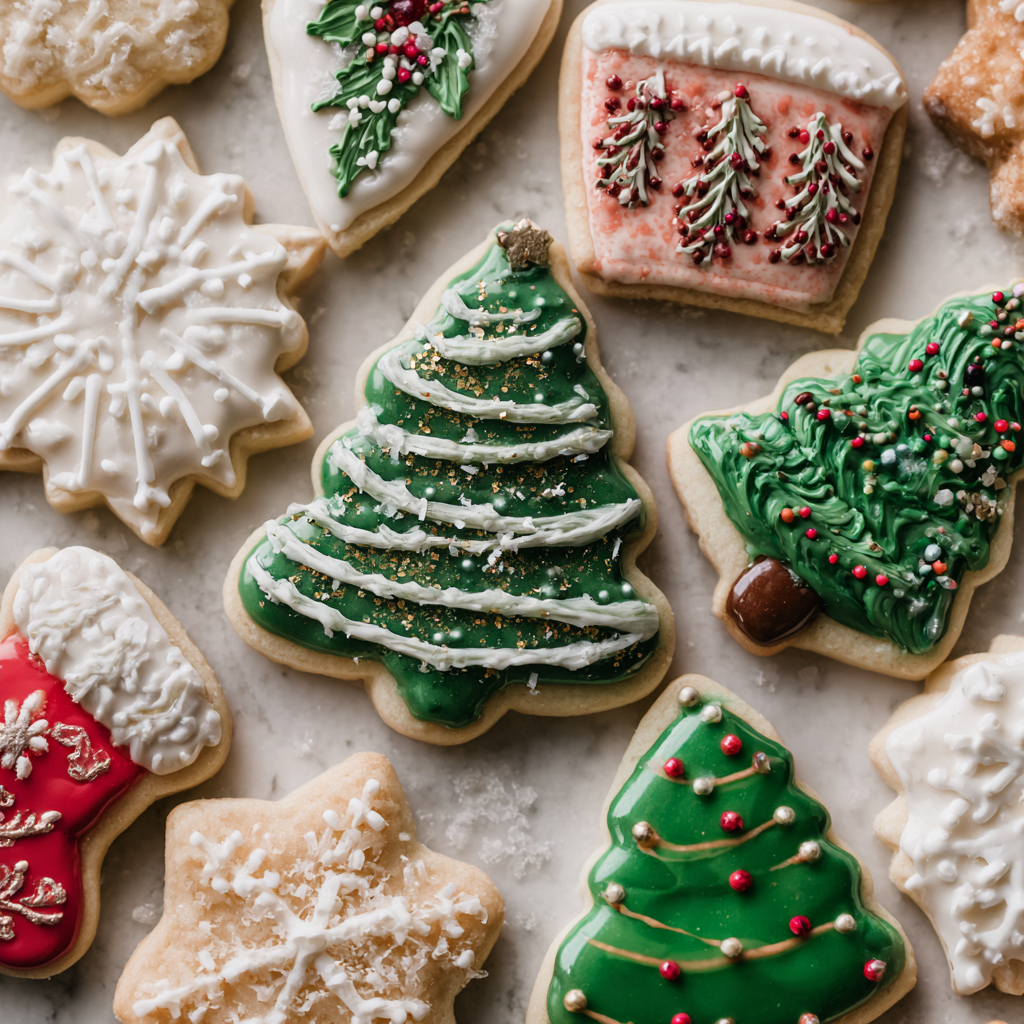
Classic Christmas Cookie Decorating Designs
Understanding foundational designs provides building blocks for more complex creations as your confidence grows. Next, these classic approaches work for various cookie shapes and skill levels, making them perfect starting points.
Candy Cane Striped Cookies
Create this iconic design by piping red and white stripes across round cookies using contrasting colored icing. First, pipe thin white stripes in parallel lines, then pipe red stripes between them for authentic candy cane appearance. Subsequently, add a small piped bow at the top using thin green or gold icing for festive finishing touches. Additionally, this design works on various cookie shapes including rectangles, ovals, and traditional round cookies.
Gingerbread People with Personality
Decorate gingerbread people with button details, facial features, and clothing that gives each cookie individual personality. Next, use thick piping to create button lines down the center, then add dots for eyes using a toothpick dipped in contrasting frosting. Meanwhile, piping lines for mouths, cheeks, and simple clothing patterns creates charming character. Furthermore, different buttons, facial expressions, and outfit details make each cookie unique and personalized.
Snowflake Elegance
Snowflakes showcase intricate piping skills while remaining achievable for beginners through careful planning. First, sketch snowflake designs lightly on cookies using toothpicks before piping begins. Subsequently, pipe delicate lines radiating from the center, creating eight-pointed symmetry that characterizes beautiful snowflakes. Additionally, adding pearl dust or white edible glitter while frosting remains wet creates magical sparkle reminiscent of genuine snow.
Holly and Berry Simplicity
Create holly leaf designs using piping bags fitted with leaf tips, positioning three leaves to form a triangular cluster. Next, pipe small red berries between the leaves using round piping tips or simply dots of thick frosting. Additionally, this timeless design translates beautifully to various cookie shapes and requires minimal piping experience. Meanwhile, the results look sophisticated and festive despite straightforward technique.
Christmas Tree Artistry
Transform round or tree-shaped cookies into festive evergreens by building layered triangles of piped frosting. First, pipe a base layer of green frosting triangles, then add progressively smaller triangles above, creating dimensional tree effect. Subsequently, add colorful frosting dots to represent ornaments scattered throughout the tree. Furthermore, a brown piped trunk completes the design with simple elegance.
Advanced Decorating Techniques for Experienced Decorators
Once comfortable with basic designs, exploring advanced techniques elevates your cookie art to gallery-quality presentation. Next, these methods require patience and practice but deliver genuinely stunning results that impress everyone.

Flooding and Wet-on-Wet Technique
Flooding involves filling large areas with thinned royal icing poured within piped outlines, creating smooth, glossy surfaces. First, pipe outlines using thicker royal icing, then fill the interior with thinner consistency icing poured slowly from the corner. Subsequently, immediately add complementary colors by piping thin lines of contrasting icing into the wet flooding and dragging a toothpick through them to create feathered patterns. Additionally, this technique creates stunning backgrounds for additional piped details.
The wet-on-wet method transforms flooded bases into intricate designs through strategic color manipulation. Next, while the flooded base remains wet, pipe details directly onto it allowing colors to blend naturally. Meanwhile, dragging toothpicks or brushes through wet icing creates feathering effects impossible to achieve on dry frosting. Furthermore, this approach rewards experimentation because the fluidity of wet icing creates organic, beautiful results even when techniques aren’t perfect.
Dimensional Piping and Layer Building
Create depth through multiple piping layers, allowing each to dry before adding subsequent details. First, establish a base frosting layer and allow it to set, then pipe dimensional elements above the dried base. Subsequently, this technique creates lifelike texture and shadow effects that make cookies appear three-dimensional. Additionally, practicing with simple elements like piped flowers, bows, or dimensional dots builds skills for more elaborate designs.
The patience required for layer-by-layer building pays dividends in the final results. Next, resist the urge to rush the process; allowing adequate drying time prevents frosting layers from sliding or distorting. Meanwhile, some decorators use small fans to accelerate drying, making the overall process faster without sacrificing quality. Furthermore, investing time in proper technique demonstrates respect for your artistic effort and ensures the best possible presentation.
Painting with Food Coloring
Food coloring mixed with water or alcohol creates paint consistency allowing artistic painting directly on frosting. First, dilute gel food coloring with small amounts of water or vodka (which evaporates faster) until paint-like consistency develops. Subsequently, use small brushes to paint details, shading, and gradients directly on cookies. Additionally, this technique works beautifully for adding depth to existing designs or creating entirely new artwork.
The painting approach opens possibilities for incredibly detailed work including realistic flowers, wildlife, scenic landscapes, and portrait-style designs. Next, practicing with simple designs before attempting complex artwork builds confidence and skill. Meanwhile, some decorators photograph cookies before painting as reference for desired designs. Furthermore, even minor imperfections in painting create charm and character that enhances rather than detracts from the final result.
Seasonal and Thematic Decorating Ideas
Understanding seasonal variations ensures your cookie designs remain fresh and relevant throughout the holiday season. Next, these themed approaches celebrate specific holidays and traditions while allowing personal creative interpretation.
Classic Christmas Red and Green
Combine traditional red and green icing to create unmistakably festive cookies celebrating Christmas origins. First, use red for poinsettia flowers, holly berries, candy canes, and ribbon bows. Subsequently, use green for holly leaves, Christmas trees, wreaths, and evergreen boughs. Additionally, gold or silver accents add elegance and sophistication to traditional color palettes.
The versatility of red and green means endless design possibilities remain within this classic color scheme. Meanwhile, adding metallics transforms basic red and green into something more elevated and gift-worthy. Furthermore, these colors work beautifully on white or cream-colored frosting bases, creating strong visual contrast.
Elegant Metallic and Neutral Palette
Create sophisticated designs using gold, silver, and copper metallics combined with cream, white, or pale gray bases. First, apply metallic dusts to frosting while wet for subtle shimmer effects. Subsequently, use metallic markers for fine details and outlines that catch light beautifully. Additionally, this palette appeals to adults seeking upscale presentation suitable for holiday entertaining.
The neutral approach offers elegance and refinement that transcends specific holiday associations, making cookies appropriate for any winter celebration. Next, combining metallics with minimal color creates modern aesthetic that photographs beautifully. Meanwhile, these designs work especially well for cookies gifted to business associates or served at sophisticated gatherings.
Whimsical and Playful Designs
Celebrate the childlike joy of the season through bright colors, silly expressions, and intentionally imperfect characters. First, embrace asymmetrical eyes, off-center mouths, and wobbly outlines as charming rather than mistakes. Subsequently, mix colors boldly without concern for traditional holiday palettes. Additionally, this approach celebrates creativity over perfection and invites everyone to participate without fear of judgment.
The playful aesthetic encourages family participation because results automatically feel charming regardless of skill level. Next, these cookies create genuine joy and laughter when revealed, often becoming cherished memories more than perfectly executed designs. Meanwhile, the permission to be imperfect removes anxiety that sometimes prevents people from attempting creative projects.
Troubleshooting Common Decorating Challenges
Understanding how to address common issues ensures success even when problems arise during the decorating process. Next, these solutions prevent frustration and often yield surprisingly beautiful results.
Frosting Consistency Issues
Frosting that’s too thick resists piping and creates jagged lines rather than smooth presentations. First, add milk or water drop by drop until consistency becomes workable, stirring thoroughly between additions. Subsequently, warming slightly thick frosting over a double boiler softens it without adding moisture. Additionally, if frosting becomes too thin, simply sift in more powdered sugar and mix thoroughly.
The consistency sweet spot requires experimentation because different piping tips, frosting types, and environmental conditions affect behavior. Next, keeping a damp cloth nearby allows quick hand wiping between adjustments. Meanwhile, testing consistency on parchment paper before applying to cookies prevents waste of finished decorations.
Color Bleeding and Running
Colors that bleed into each other create muddy appearance rather than distinct designs. First, ensure outlined frosting is completely dry before flooding with different colored icing inside. Subsequently, use thicker icing for outlines that create true barriers preventing color migration. Additionally, allowing adequate drying time between color applications prevents unintended mixing.
The bleeding issue typically resolves through patience and proper technique rather than complicated solutions. Next, setting cookies in a cool environment (but not refrigerator, which creates condensation) accelerates drying. Meanwhile, some decorators use small fans to circulate air and speed the drying process. Furthermore, understanding that some color mixing creates beautiful effects removes pressure for absolute perfection.
Cookies Breaking or Crumbling
Delicate decorating becomes frustrating if cookies crumble or break during handling. First, ensure cookies bake completely and cool fully before decorating begins. Subsequently, store cookies in airtight containers between baking and decorating to maintain structural integrity. Additionally, handle cookies by their edges rather than frosted surfaces to prevent accidental damage.
The crumbling issue often indicates cookies may have overbaked slightly or don’t possess adequate structural integrity for decorating. Next, slightly softer cookies often decorate more successfully than extra-crispy varieties. Meanwhile, some decorators allow cookies to age a day or two before decorating, claiming this improves structural stability.
Sprinkles Sliding Off
Sprinkles applied to dry frosting fall off easily rather than adhering permanently. First, add sprinkles while frosting remains wet or tacky, allowing them to set into the frosting as it dries. Subsequently, if sprinkles must be added to dry frosting, brush a thin layer of water or egg white onto the surface before sprinkling. Additionally, pearl dust creates permanent finish when applied to wet frosting and remains adhered to dried surfaces.
The adhesion issue becomes non-issue when frosting remains appropriately moist at the moment of sprinkle application. Next, planning your decorating timeline to apply sprinkles early prevents this common frustration. Meanwhile, understanding which embellishments require wet frosting for adhesion allows proper sequencing of decoration steps.
Creating Cookie Decorating Stations and Parties
Transforming cookie decorating into a social event multiplies the joy and creates cherished memories beyond the cookies themselves. Next, organized stations and simple supplies allow multiple people to participate simultaneously.
Setting Up Decorating Stations
Arrange separate stations for different decorating techniques, allowing people to move between them and try various approaches. First, dedicate one station to frosting application with piping bags, tips, and spreaders. Subsequently, create a sprinkles and embellishment station with various decorative elements in small bowls. Additionally, establish a painting station with brushes, food coloring, and water for artistic touches.
The station approach prevents bottlenecks and allows simultaneous participation regardless of how many people attend. Next, labeling each station with simple instructions helps beginners understand available techniques without feeling overwhelmed. Meanwhile, displaying finished examples from each station inspires participants and demonstrates possibilities.
Coordinating Supply Organization
Organize supplies by decorating technique rather than by type, grouping everything needed for each approach in accessible containers. First, gather all piping bags, tips, and frosting colors for piping together. Subsequently, place all sprinkles, pearls, and embellishments in one area with small spoons for application. Additionally, keep brushes, food coloring, and painting supplies together in clearly labeled containers.
The organized approach prevents searching for supplies and keeps the creative energy flowing without interruption. Next, having duplicate supplies prevents conflicts when multiple people want the same frosting color simultaneously. Meanwhile, labeling containers helps cleanup at the end because returning items becomes straightforward.
Managing Frosting Preparation
Prepare frosting batches in advance so decorators begin with ready-to-use supplies rather than waiting for preparation. First, divide frosting into bowls and tint to desired colors hours before the event begins. Subsequently, store tinted frosting in airtight containers covered with plastic wrap to prevent drying and discoloration. Additionally, preparing more frosting than necessary prevents mid-party shortages that interrupt creative flow.
The advance preparation demonstrates respect for participants’ time and creates smoother overall experience. Next, keeping backup frosting in reserve allows quick replenishment when colors run low. Meanwhile, some decorators heat frosting slightly if it stiffens overnight, bringing it back to proper consistency without thinning.
Photographing Your Cookie Creations
Capturing beautiful images of decorated cookies ensures your artistic effort receives proper documentation and sharing potential. Next, simple photography techniques elevate cookie images from casual snapshots to gallery-worthy presentations.
Lighting Considerations
Natural lighting creates the most flattering photographs, positioning cookies near windows receiving bright but indirect light. First, avoid harsh direct sunlight that creates unflattering shadows and washes out colors. Subsequently, use white poster board or foam core as reflective surfaces to bounce light into shadowed areas. Additionally, photographing on overcast days provides consistent, diffused light that flattens and softens harsh shadows.
The lighting approach directly impacts how clearly details appear in finished photos and how appetizing cookies appear to viewers. Next, experimenting with different lighting angles reveals which works best for your specific decorating style. Meanwhile, artificial lighting requires careful positioning but allows consistent results regardless of time of day or weather.
Composition and Styling
Arrange cookies to showcase decorative details, avoiding cluttered compositions that obscure individual designs. First, position cookies at slight angles rather than flat, allowing light to catch frosting details. Subsequently, include supporting elements like fresh greenery, cinnamon sticks, or holiday props that add context without overwhelming. Additionally, negative space draws attention to cookies themselves rather than competing elements.
The composition approach applies photography fundamentals to food styling, creating images that entice viewers. Next, photographing single cookies against simple backgrounds emphasizes decorative details better than large group shots. Meanwhile, including hands decorating cookies or placing cookies on festive plates tells a complete story beyond just the finished product.
Post-Processing Enhancement
Simple editing using free applications like Lightroom or Snapseed enhances colors and improves overall image quality. First, adjust brightness to ensure cookies remain the focal point rather than disappearing into dark backgrounds. Subsequently, increase saturation slightly to make colors more vibrant and appetizing. Additionally, sharpening brings decorative details into focus and creates crispness that suggests fresh, homemade quality.
The minimal editing respects the actual appearance while enhancing what already exists in the photograph. Next, avoiding extreme filters or unrealistic edits maintains authenticity and honesty in food photography. Meanwhile, consistent editing style across your entire cookie collection creates cohesive visual presentation.
Gift-Wrapping and Presentation Ideas
Beautifully presented cookies make impressive gifts that demonstrate care and consideration beyond the cookies themselves. Next, thoughtful packaging transforms homemade treats into something genuinely special and memorable.
Simple Packaging Solutions
Clear cellophane bags tied with ribbon create elegant presentation while protecting cookies and allowing decorative details to shine. First, layer tissue paper or parchment paper inside bags before adding cookies to prevent sticking and add visual interest. Subsequently, tie bags with coordinating ribbons, twine, or bows that complement your cookie designs. Additionally, including a handwritten tag with cookie flavor and decorating date creates personal touch.
The clear packaging solution balances protection with presentation, making cookies visible while preventing damage during transport. Next, choosing ribbons coordinating with cookie colors creates unified aesthetic. Meanwhile, tissue paper in contrasting colors adds visual interest and protects cookies from direct contact with bag surfaces.
Custom Box Creation
Create custom boxes by decorating kraft boxes with stamps, stickers, markers, or printed labels matching your cookie theme. First, line boxes with tissue paper or parchment creating cushioned base. Subsequently, arrange cookies attractively inside, ensuring none touch the lid. Additionally, including printed recipe cards allows recipients to recreate your cookies if desired.
The custom box approach transforms packaging into additional artistic expression beyond the cookies themselves. Next, personalized boxes become keepsakes treasured by recipients long after cookies are consumed. Meanwhile, including care instructions ensures cookies remain fresh and delicious until consumption.
Assembly Line Efficiency
When preparing multiple cookie gifts, organize an assembly line where each step occurs in sequence. First, arrange all cookies in a row, then apply similar packaging steps to batches rather than completing individual gifts. Subsequently, this approach prevents repetitive motion injuries and accelerates overall process. Additionally, the rhythm of assembly line work becomes meditative and enjoyable.
The efficient approach allows preparing numerous gifts without feeling overwhelming or time-consuming. Next, involving family members in assembly line work transforms gift preparation into social activity. Meanwhile, completing multiple gifts simultaneously creates psychological sense of accomplishment.
Helpful Tips for Decorating Success
Understanding key principles improves results regardless of skill level or decorating style preferences. Next, these essential tips address common challenges and unlock decorating potential.
Timing and Preparation
Prepare all supplies, cookies, and frosting before beginning decoration rather than scrambling mid-project. First, organize your workspace ergonomically so everything remains within arm’s reach without excessive reaching. Subsequently, ensuring cookies cool completely prevents frosting melting and sliding off. Additionally, allowing adequate time prevents rushing which introduces mistakes and frustration.
The preparation approach transforms decorating from chaotic to enjoyable, allowing creative flow without interruption. Next, setting realistic timelines prevents over-commitment and maintains quality focus. Meanwhile, preparing supplies evening before decoration day allows earlier morning start.
Respecting Your Skill Level
Beginners should embrace simple designs celebrating imperfection rather than attempting advanced techniques immediately. First, master basic piping and application before exploring complicated methods requiring extensive practice. Subsequently, completing simple designs beautifully impresses more than attempting advanced techniques with middling results. Additionally, skill develops through repeated practice on progressively more complex designs over time.
The gradual approach prevents discouragement and builds genuine confidence through demonstrated success. Next, celebrating small accomplishments maintains enthusiasm and motivation for continued improvement. Meanwhile, recognizing that professional decorators spent years developing skills removes pressure for immediate expertise.
Embracing Happy Accidents
Mistakes often create beautiful, unexpected results when approached with flexibility rather than frustration. First, accept that some color mixing creates interesting effects improving rather than detracting from designs. Subsequently, piping line imperfections contribute to rustic charm and handmade character. Additionally, asymmetrical features create personality and uniqueness impossible to achieve through perfection.
The mindset shift transforms challenges into opportunities for creative problem-solving and happy discoveries. Next, photographing unexpected results often reveals beauty you didn’t immediately notice. Meanwhile, inviting others to admire “happy accidents” shifts perspective and builds appreciation for imperfection.
Conclusion
Your Christmas cookie decorating journey awaits, ready to transform simple sugar cookies into edible art that captures your unique creativity and personality. This comprehensive guide celebrates every decorating approach from basic to advanced, ensuring everyone finds techniques and designs matching their vision. Through thoughtful preparation, quality supplies, and patient practice, you’ll create cookies that impress both visually and in taste. Embrace the joy of the process, celebrate each creation regardless of perfection, and remember that homemade cookies decorated with love represent the truest holiday spirit.
Did you love these Christmas Cookie Decorating Ideas? Please save this guide to your collection, pin it to your Pinterest board, and share it with friends and family who want to create beautiful, decorated cookies that become cherished holiday traditions. Your support means everything and encourages us to keep creating more inspiring guides that transform your kitchen into a creative haven and strengthen the joy you share with loved ones!