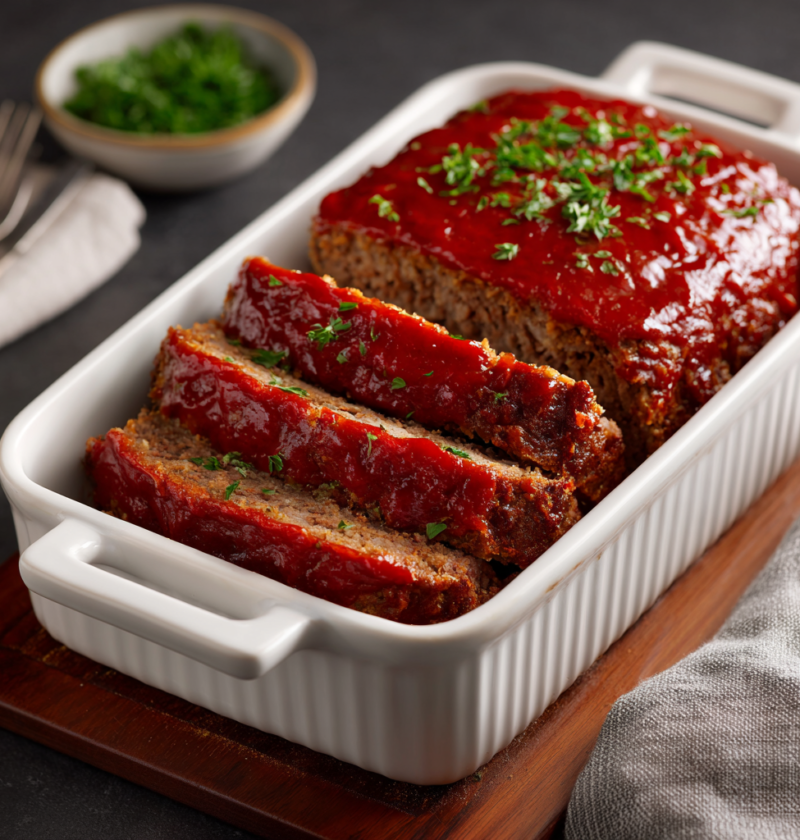
There’s something undeniably comforting about slicing into a homemade meatloaf topped with a glossy, tangy glaze and discovering a juicy, flavorful interior that tastes infinitely better than any store-bought frozen version. First time I made meatloaf from scratch using proper techniques instead of relying on boxed mixes or canned sauces, I understood immediately why this humble dish has remained a beloved American classic for generations. The beauty of a truly exceptional meatloaf lies in understanding the importance of quality ingredients, proper binding, and careful flavor balance: tender meat that stays impossibly juicy, a flavorful binder that holds everything together perfectly, and a glaze that adds depth without overwhelming the delicate balance. Additionally, this recipe proves that classic comfort food doesn’t need to be boring or heavy; proper technique and quality ingredients create something genuinely extraordinary that feels warm, welcoming, and deeply satisfying. Whether you’re cooking a family dinner that brings everyone to the table, preparing meals for the week ahead, entertaining guests who appreciate genuine home cooking, or simply craving something warm and absolutely delicious, this classic meatloaf delivers reliable, consistent results that remind you exactly why this dish has remained a dinner table staple for over a century.
Ingredients
This recipe makes 6 to 8 servings.
• 2 pounds ground beef (80/20 blend) • 1 cup panko breadcrumbs • 1/4 cup whole milk • 2 large eggs • 1 medium yellow onion, finely minced • 4 cloves fresh garlic, minced • 1/2 cup ketchup, divided • 2 tablespoons Worcestershire sauce • 2 tablespoons apple cider vinegar or balsamic vinegar • 1 tablespoon Dijon mustard • 1 teaspoon kosher salt • 1/2 teaspoon black pepper • 1/2 teaspoon garlic powder • 1/4 teaspoon onion powder • 1/4 teaspoon paprika • 1/4 teaspoon cayenne pepper (optional) • 1 tablespoon brown sugar • 1 teaspoon fresh thyme leaves (or 1/2 teaspoon dried) • 1 tablespoon fresh parsley, finely chopped • 2 tablespoons olive oil for the pan • 1/4 cup beef broth or water (for adding moisture while baking)
For the Glaze:
• 1/4 cup ketchup • 2 tablespoons brown sugar • 1 tablespoon apple cider vinegar or balsamic vinegar • 1 tablespoon Worcestershire sauce • 1/2 teaspoon Dijon mustard • 1/4 teaspoon garlic powder
Step-by-Step Instructions
Preparing Your Ingredients
- Preheat your oven to 350°F (175°C) and allow at least 15 minutes for it to reach full temperature.
- Line a baking sheet with aluminum foil for easy cleanup, or lightly grease a loaf pan with cooking spray.
- In a small bowl, combine the panko breadcrumbs with the whole milk, stirring gently until the breadcrumbs are completely saturated and forming a paste-like mixture.
- Allow this breadcrumb mixture to sit for about 2 minutes, allowing the milk to fully absorb and create a proper binder.
- In another bowl, whisk together the eggs until completely combined.
- Finely mince the onion and garlic, ensuring they’re small enough to distribute evenly throughout the meatloaf without large chunks.
- In a small bowl, whisk together 1/2 cup of ketchup, Worcestershire sauce, apple cider vinegar, Dijon mustard, brown sugar, and fresh thyme until combined.
- Taste this mixture and adjust seasonings as needed—it should taste flavorful and tangy.
Combining the Meatloaf Mixture
- Place the ground beef in a large bowl, breaking it into smaller pieces but not overworking the meat.
- Add the breadcrumb and milk mixture to the beef, using your hands to gently incorporate it throughout the meat.
- Add the whisked eggs, minced onion, minced garlic, and the ketchup mixture to the bowl.
- Sprinkle the kosher salt, black pepper, garlic powder, onion powder, paprika, and cayenne pepper evenly over the mixture.
- Using your hands, gently combine all the ingredients until just mixed—overworking the meat creates a dense, tough meatloaf rather than tender texture.
- Mix until the ingredients are evenly distributed, then stop mixing immediately to avoid toughening the meat.
- The mixture should hold together when squeezed but shouldn’t be compressed or packed tightly.
Shaping and Placing in the Pan
- If using a loaf pan, lightly grease it with olive oil and pack the meatloaf mixture gently into the pan.
- If using a baking sheet, shape the mixture into a loaf approximately 9 inches long, 5 inches wide, and 3 inches tall.
- Create a slight depression down the center of the meatloaf using your thumb or the back of a spoon—this allows heat to penetrate more evenly.
- Drizzle the olive oil around the edges of the meatloaf, which helps with browning and prevents sticking.
Preparing the Glaze
- In a small bowl, whisk together the ketchup, brown sugar, apple cider vinegar, Worcestershire sauce, Dijon mustard, and garlic powder until completely combined.
- Taste the glaze and adjust seasonings as needed—it should taste tangy, sweet, and slightly savory in perfect balance.
- Set the glaze aside momentarily, as you’ll apply it partway through baking.
Initial Baking and Adding Moisture
- Place the meatloaf in the preheated oven and bake for 25-30 minutes until the top is beginning to brown lightly.
- After 25 minutes, carefully pour the beef broth or water around the edges of the meatloaf—this keeps the meat moist during final cooking.
- Insert an instant-read thermometer into the center of the meatloaf to check the temperature.
Applying the Glaze and Final Baking
- Remove the meatloaf from the oven and generously spread the prepared glaze over the top surface.
- Use a spatula or spoon to spread the glaze evenly, creating a thick coating that will caramelize and become glossy.
- Return the meatloaf to the oven and bake for another 15-20 minutes until the glaze is bubbly and caramelized.
- At the 15-minute mark, check the internal temperature using an instant-read thermometer inserted into the center—it should read 160°F (71°C).
- If the glaze is browning too quickly while the internal temperature is still rising, cover the meatloaf loosely with foil for the remaining time.
- Once the internal temperature reaches 160°F and the glaze is glossy and caramelized, remove from the oven.
Resting and Final Presentation
- Let the meatloaf rest on the baking sheet or in the pan for 5-10 minutes before slicing—this allows the juices to redistribute throughout the meat.
- Transfer the meatloaf to a serving platter if desired, or simply slice directly in the pan.
- Using a sharp, warm knife, cut the meatloaf into thick slices of about 1 inch each.
- Arrange the slices on a serving platter, allowing the glaze to drip down the sides creating an attractive presentation.
- Spoon any remaining pan drippings over the slices for added moisture and flavor.
Serving and Storing Tips
How to Serve This Classic American Dish
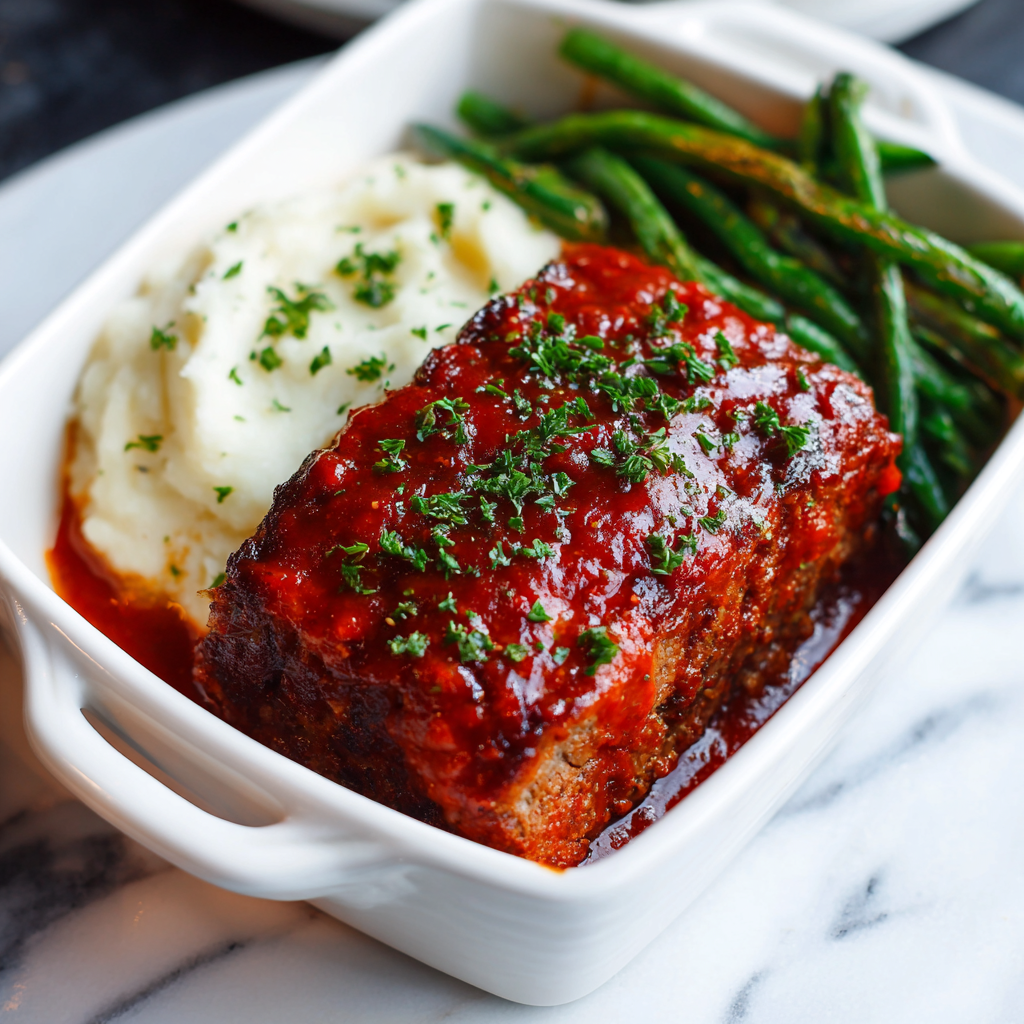
This classic meatloaf is excellent served with mashed potatoes and gravy, making it the ultimate comfort food combination that feels complete and satisfying. However, if you prefer different accompaniments, consider pairing it with roasted potatoes, sweet potato fries, or creamy polenta for different textures and flavors. Next, classic vegetable sides like steamed green beans, roasted carrots, sautéed spinach, or roasted Brussels sprouts provide wonderful textural contrast and add nutrition. Additionally, a simple green salad dressed in light vinaigrette works beautifully alongside meatloaf for cutting through the richness and adding freshness. For a more casual presentation, serve meatloaf sandwiches with leftover slices on bread with additional ketchup and pickles. A crisp red wine like Cabernet Sauvignon or even a cold beer pairs beautifully with the savory, tangy meatloaf flavors.
Storing Your Leftovers Properly
Store any leftover meatloaf in an airtight container in the refrigerator for up to 3 days, keeping it completely covered to prevent drying out. To reheat, place slices on a baking sheet, cover loosely with foil, and warm at 350°F for 15 minutes until heated through—this gentle method prevents the meatloaf from becoming dry. Alternatively, microwave individual portions in a microwave-safe container for 1-2 minutes, stirring halfway through, though the oven method produces noticeably better results. For freezing, let the cooked meatloaf cool completely before wrapping tightly with plastic wrap and foil or transferring to a freezer-safe container for up to 2 months. Thaw frozen meatloaf overnight in the refrigerator and reheat gently using the oven method at 350°F for 20-25 minutes until completely warmed through.
Helpful Tips and Tricks
Ingredient Substitutions and Variations
If you don’t have panko breadcrumbs, substitute with regular breadcrumbs, crushed saltine crackers, or oatmeal—the ratio remains the same. Swap ground beef for ground turkey, ground pork, or a combination for different flavor profiles and leaner meat options. For a mixture variation, combine ground beef with ground pork for added tenderness and richness without changing cooking methods. Fresh herbs can be replaced with dried herbs at half the quantity, though fresh herbs provide noticeably more vibrant flavor. Consider adding grated vegetables like zucchini, carrots, or mushrooms to the mixture for added moisture and nutrition without changing the core dish. For a spicier version, increase the cayenne pepper to 1/2 teaspoon or add hot sauce to the glaze for extra heat and depth.
Common Mistakes to Avoid
Many home cooks overmix the meatloaf mixture, which develops the gluten in the meat and creates a dense, tough texture rather than tender results—mix gently and briefly. Don’t skip the breadcrumb and milk mixture; this creates the proper binder and keeps the meatloaf moist and tender throughout cooking. Another common mistake is failing to include the depression down the center—this helps heat penetrate the middle and ensures even cooking. Skipping the resting period after baking is problematic; those final minutes allow the juices to redistribute and prevent the meatloaf from being dry. Finally, using a high oven temperature causes the outside to overcook before the inside finishes cooking—keep the temperature moderate for even results.
Time-Saving Strategies
Prepare your minced garlic and onion the night before, storing them separately in the refrigerator for quick assembly. Mix the breadcrumb and milk mixture the morning of cooking, storing it in a covered container until needed. Consider preparing the entire meatloaf mixture the night before, then simply shape and bake on cooking day for maximum convenience. Another useful tip is preparing the glaze the night before as well, storing it in an airtight container and bringing it to room temperature before spreading. Pre-measure all your seasonings into a small bowl the night before, making the mixing process require only quick, efficient steps.
Chef Tips for Perfect Results
The secret to incredibly moist meatloaf is not overmixing the meat, adding moisture through breadcrumb binder and broth, and not overbaking—remove from the oven at exactly 160°F internal temperature. Always let the meatloaf rest after baking; this crucial step allows the juices to redistribute throughout the meat, preventing dryness that occurs when you slice immediately.
Frequently Asked Questions
Can I make meatloaf in a loaf pan instead of on a baking sheet? Absolutely—loaf pans work beautifully and contain any drippings; cooking time remains the same though you may need slightly more time due to the pan’s shape.
What if my meatloaf is too dry? Add more milk to the breadcrumb mixture next time, or add more broth while baking; ensure you reach exactly 160°F and don’t overcook.
Can I use ground turkey instead of beef? Yes, ground turkey works well and creates a leaner meatloaf; add an extra egg to compensate for less fat and keep it moist.
How do I prevent the glaze from burning before the meatloaf is done? Add the glaze during the final 20 minutes of cooking rather than at the beginning; check internal temperature frequently to prevent overcooking.
Can I prepare this meatloaf completely ahead of time? Yes, prepare the raw mixture up to 24 hours ahead and refrigerate; shape and bake when ready to serve for maximum freshness.
Conclusion
This classic meatloaf recipe represents the perfect balance of nostalgic comfort and genuine cooking excellence, delivering reliable results that taste far better than any boxed version or takeout alternative. Moreover, the combination of tender, juicy meat held together with proper binders, flavorful seasonings, and a glossy, caramelized glaze creates a complete dish that satisfies both appetite and soul simultaneously. The magic of this meatloaf lies in respecting fundamental technique: proper binder ratios for moisture, gentle mixing to prevent toughness, and careful temperature monitoring to prevent overcooking. Additionally, this recipe is incredibly adaptable, allowing you to customize it with different meats, vegetables, or glaze variations without compromising the fundamental excellence of the classic dish. I genuinely believe this will become a beloved staple in your cooking rotation because it’s simple enough for weeknight family dinners, impressive enough for casual entertaining, and consistently delicious enough that everyone asks for the recipe. The combination of tender meat, savory seasonings, and tangy glaze creates a complete meal that tastes like pure comfort without requiring professional training or complicated procedures.
Did you love this recipe? Please save it, pin it, and share it with your friends and family! Your support means the world to us and motivates us to keep creating more delicious, easy recipes for you to enjoy. Let us know in the comments how your classic meatloaf turned out—we’d absolutely love to hear about your experience and any creative variations you tried to make this timeless comfort dish your own!