Easter sugar cookies bring joy and color to spring celebrations with their tender, buttery crumb and endless decorating possibilities that transform simple dough into edible works of art. These charming treats feature classic sugar cookie flavor infused with subtle vanilla and a touch of brightness that appeals to both children and adults alike. What makes this recipe truly special is the combination of a soft, easy-to-work-with dough that holds detailed cookie cutter shapes beautifully, paired with a simple royal icing that dries to a smooth, stunning finish perfect for creative decorating. The beauty of Easter sugar cookies lies in their versatility; dress them up with intricate icing designs, vibrant food coloring, edible glitter, or pearl dust for elegant sophistication, or keep them simple for casual family baking fun. Unlike finicky sugar cookie doughs that spread excessively or become tough and hard when baked, this recipe creates cookies that maintain their shape and texture perfectly, staying soft and delicious for days after baking. Whether you’re preparing cookies for an Easter egg hunt, holiday baking with family, or simply celebrating spring’s arrival, Easter sugar cookies deliver pure delight. The combination of quality ingredients creates cookies that taste homemade and special, proving that impressive treats don’t require complicated techniques or advanced decorating skills.
Ingredients
Serves: 24-30 cookies
For the Easter Sugar Cookie Dough:
- 2¾ cups all-purpose flour
- ½ teaspoon baking soda
- ½ teaspoon salt
- 1 cup unsalted butter, room temperature
- 1½ cups granulated sugar
- 1 large egg, room temperature
- 1 teaspoon vanilla extract
- ¼ teaspoon almond extract (optional but recommended)
For the Vanilla Royal Icing:
- 3 cups powdered sugar, sifted
- 2-3 tablespoons meringue powder
- 3-4 tablespoons warm water
- ½ teaspoon vanilla extract
- Pinch of salt
For Decorating (Optional):
- Gel food coloring in assorted colors
- Edible glitter
- Pearl dust or shimmer dust
- Sprinkles (nonpareils, jimmies, pearl sprinkles)
- Mini candies (if desired)
Step-by-Step Instructions
For the Easter Sugar Cookie Dough:
- In a medium bowl, whisk together the all-purpose flour, baking soda, and salt until evenly combined, then set aside.
- In a large mixing bowl, beat the room-temperature butter and granulated sugar together on medium speed for 3-4 minutes until the mixture becomes pale, fluffy, and creamy.
- Next, add the egg and both vanilla extract and almond extract to the butter mixture, beating on low speed until everything is well incorporated and smooth.
- Gradually add the flour mixture to the butter mixture, stirring on low speed until the dough just comes together; avoid overmixing, which can develop gluten and make the cookies tough.
- Divide the dough in half, flatten each half into a disk, wrap tightly in plastic wrap, and refrigerate for at least 2 hours, though overnight refrigeration is ideal.
- When ready to bake, preheat your oven to 350°F and line your baking sheets with parchment paper for even baking and easy removal.
- Remove one disk of dough from the refrigerator and allow it to sit at room temperature for about 10 minutes until slightly softened but still firm.
- On a lightly floured surface, roll out the dough to approximately ¼-inch thickness, working with one half at a time to keep the other chilled.
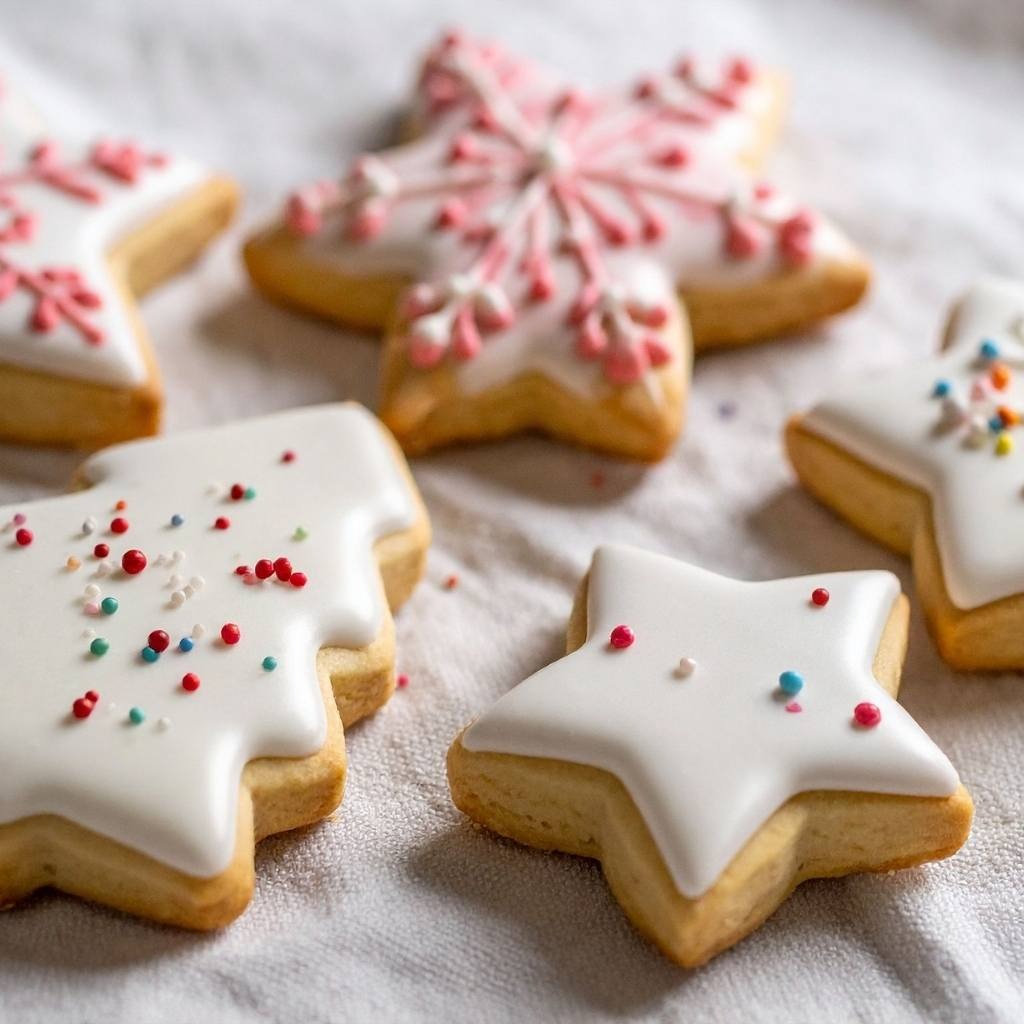
- Cut out Easter-themed shapes using cookie cutters such as eggs, bunnies, chicks, baskets, or flowers, placing each cut cookie on your prepared baking sheet.
- Gather and reroll the dough scraps, repeating the cutting process until all dough is used; chilled dough scraps cut more cleanly than warm ones.
- Bake the cookies for 8-10 minutes until the edges are light golden but the centers still look slightly underdone, creating a soft texture.
- Remove the cookies from the oven and allow them to cool on the baking sheet for about 3 minutes before transferring to a wire rack to cool completely.
- Repeat the rolling, cutting, and baking process with the remaining dough disk until all cookies are baked.
For the Vanilla Royal Icing:
- Sift the powdered sugar into a large mixing bowl to remove any lumps and create a smooth base for your icing.
- Add the meringue powder and salt to the powdered sugar, whisking together to combine these dry ingredients evenly.
- Next, add the warm water gradually to the dry mixture, stirring constantly with a spoon until you reach a smooth, thick consistency that holds peaks.
- Add the vanilla extract and stir until incorporated, then adjust the consistency by adding more water one teaspoon at a time if the icing is too thick, or additional powdered sugar if it’s too thin.
- The icing should be thick enough to hold its shape when piped but fluid enough to spread smoothly across the cookies; proper consistency is crucial for beautiful results.
- Divide the icing into separate bowls if creating multiple colors, adding gel food coloring to each bowl and stirring well until the color is even and consistent.
Decorating the Easter Sugar Cookies:
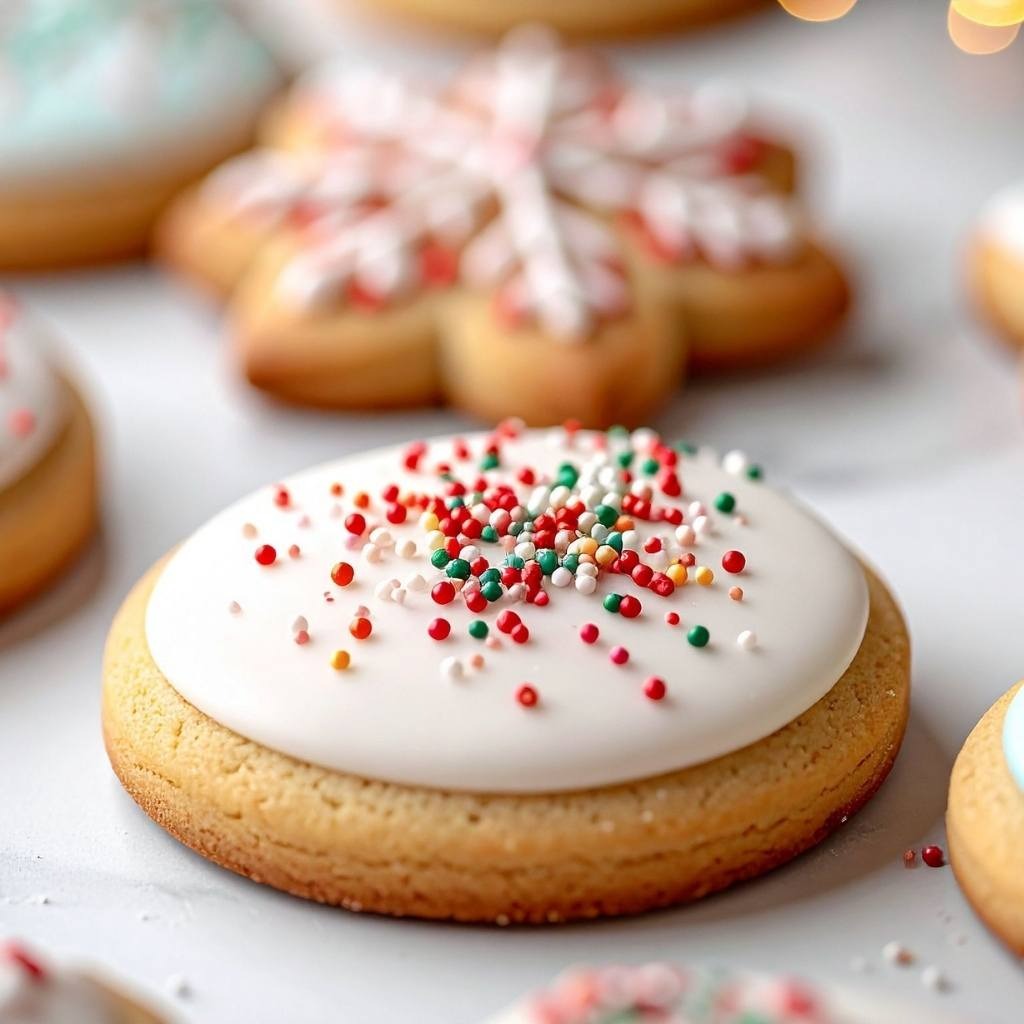
- Using a small spatula or knife, spread a thin layer of white or colored royal icing over the surface of each cooled cookie.
- Allow the icing to set for about 15-20 minutes until it forms a smooth, matte finish before adding additional decorative details.
- For more elaborate designs, fill a piping bag fitted with a small round tip with contrasting colored icing and pipe details, patterns, or outlines onto the cookies.
- Create striped patterns by dragging a toothpick or icing tool through wet icing to create feathered effects, adding sophistication to the design.
- Apply edible glitter, pearl dust, sprinkles, or candies while the icing is still wet, ensuring they adhere properly to the surface.
- Allow all decorated cookies to dry completely for at least 4 hours before storing or serving, ensuring the icing hardens fully.
Why Easter Sugar Cookies Excel
Easter sugar cookies hold a special place in holiday baking because they combine nostalgia with creative expression, allowing bakers to personalize each treat. First, the soft, tender crumb appeals to everyone and stays fresh for days when stored properly. Additionally, the cookies hold detailed shapes beautifully, making them ideal for intricate designs and decorative work. Furthermore, unlike some sugar cookies that spread excessively or become hard and brittle, this recipe creates cookies that maintain their shape and delightful texture. Moreover, the dough is forgiving and easy to work with, making it perfect for baking with children and creating family memories. Finally, the endless decorating possibilities mean you can customize cookies to match any Easter theme, color scheme, or personal style.
The Art of Decorating Easter Sugar Cookies
The royal icing technique transforms simple sugar cookies into stunning works of edible art that impress everyone who sees them. Next, the beauty of royal icing lies in its versatility; it dries to a smooth, professional finish that looks bakery-quality. Additionally, gel food coloring creates vibrant, consistent colors without adding excess liquid that affects icing consistency. Furthermore, the combination of icing techniques—spreading, piping, and adding embellishments—allows for countless creative designs without advanced decorating skills. In contrast to buttercream or frosting, royal icing holds its shape and creates clean lines perfect for detailed patterns. Finally, decorated Easter cookies make wonderful edible gifts, party favors, and dessert table centerpieces that celebrate the season beautifully.
Serving Tips
Present Easter sugar cookies displayed on a beautiful platter or cake stand, arranging them by color or theme to create an eye-catching dessert display. Additionally, package individual cookies in small cellophane bags tied with ribbons for charming party favors or thank-you gifts. Furthermore, arrange cookies on tiered stands or in baskets for Easter brunches, celebrations, or spring gatherings. For Easter egg hunts, hide decorated cookies alongside traditional eggs for a sweet treat that extends the celebration beyond the initial egg search. You can also display them on a dessert table alongside other Easter treats, creating a coordinated, festive presentation. Additionally, serve cookies with milk, tea, or coffee as a delightful snack anytime during the Easter season. Finally, create cookie bouquets by arranging decorated cookies in vases or containers with Easter grass, creating beautiful centerpieces that guests can actually eat.
Storage and Make-Ahead Tips
Room Temperature Storage:
Undecorated baked cookies keep beautifully at room temperature for up to 1 week when stored in an airtight container with layers separated by parchment paper. Additionally, fully decorated cookies with hardened royal icing keep for up to 2 weeks when stored in airtight containers, as long as they’re not stacked directly on top of each other. However, avoid storing decorated and undecorated cookies together, as the moisture from the icing can affect undecorated cookies’ texture.
Refrigerator Storage:
Baked, undecorated cookies can be refrigerated for up to 2 weeks in airtight containers, though room temperature storage is preferred. Additionally, refrigerated cookies should be brought to room temperature before decorating, as cold cookies don’t accept icing as smoothly as room-temperature ones. Furthermore, avoid refrigerating decorated cookies with royal icing, as humidity in the refrigerator can cause the icing to become sticky and lose its matte finish.
Freezing Instructions:
The unbaked cookie dough can be frozen for up to 3 months when wrapped tightly in plastic wrap and stored in a freezer-safe container or resealable freezer bag. To use, thaw the dough in the refrigerator overnight, then let it sit at room temperature for 10 minutes before rolling and cutting. Additionally, baked, undecorated cookies can be frozen for up to 3 months when stored in airtight containers, then thawed at room temperature before decorating. However, it’s not recommended to freeze fully decorated cookies, as the icing may crack or become discolored during freezing and thawing.
Make-Ahead Strategy:
Prepare the dough up to 3 days ahead, wrapping disks tightly and refrigerating until ready to bake. Next, bake all cookies 2-3 days before decorating, storing them in airtight containers at room temperature. Furthermore, prepare royal icing up to 1 day ahead by storing it in airtight containers in the refrigerator, then bringing it to room temperature and stirring well before using. Finally, decorate cookies the day before serving or up to 2 weeks ahead, allowing them to dry completely before storing in airtight containers. This approach allows you to spread the work across several days and minimize last-minute stress.
Gifting and Sharing:
Wrap individual decorated cookies in cellophane bags and tie with ribbons for beautiful party favors or thank-you gifts. Additionally, arrange cookies in decorative boxes lined with tissue paper for impressive hostess gifts or Easter basket fillers. Furthermore, create cookie assortments in clear containers tied with bows, making them perfect for neighbors, coworkers, or friends. Finally, include a handwritten card with storage instructions and any special decorating details for extra thoughtfulness.
Helpful Tips for Success
Mastering Easter sugar cookies requires understanding key techniques that ensure beautiful, consistently excellent results. First, chill the dough thoroughly before rolling and cutting, as chilled dough holds detailed shapes much better than warm dough. Next, use a lightly floured surface when rolling, but avoid using excessive flour, which can make cookies tough and dry. Additionally, cut cookies and work quickly; warmed dough spreads during baking, losing the crisp shape you worked to create.
Furthermore, don’t overbake the cookies; remove them from the oven when the edges are just beginning to turn golden and the centers still look slightly underdone. This creates a soft, tender texture that improves after cooling. Additionally, allow cookies to cool on the baking sheet for a few minutes before transferring to a wire rack, as they continue to cook slightly from residual heat and firm up enough to handle.
When making royal icing, use meringue powder rather than raw eggs for food safety and consistency; meringue powder creates icing that dries smoothly without separation. Furthermore, invest in gel food coloring rather than liquid coloring, as it creates vibrant colors without thinning the icing. Finally, practice piping techniques on parchment paper first before decorating actual cookies, building confidence and ensuring steady hands when adding final details.
Chef Tips
Professional pastry chefs recommend using a cookie scoop to portion dough before rolling, ensuring even thickness and consistent baking throughout. Additionally, chill your baking sheets in the freezer for 15 minutes before placing cookies on them; cold sheets slow the cookies’ spread, creating more defined shapes and cleaner edges.
Frequently Asked Questions
Why are my cookies spreading too much during baking? Ensure the dough is thoroughly chilled before rolling and cutting, as warm dough spreads excessively; additionally, check that your oven temperature is accurate using an oven thermometer, as too-warm ovens cause excessive spreading.
How do I prevent royal icing from cracking? Ensure the icing consistency is correct—thick enough to hold shape but not so thick it becomes brittle; additionally, allow icing to dry slowly at room temperature rather than in a warm environment, which causes cracking.
Can I use liquid food coloring instead of gel? While possible, liquid coloring thins the royal icing and requires adding more powdered sugar to maintain consistency; gel coloring is strongly recommended for vibrant colors and proper icing texture.
How do I get smooth, even icing coverage on my cookies? Use an offset spatula or the back of a spoon dipped in warm water to spread icing smoothly; additionally, let the base layer set slightly before adding detailed piping on top, preventing designs from sinking into wet icing.
Can I decorate cookies the night before serving? Yes, absolutely—decorated cookies with hardened royal icing keep beautifully for up to 2 weeks when stored in airtight containers; this actually makes baking easier by spreading the work across multiple days.
Decorating Ideas and Design Inspiration
Easter sugar cookies serve as wonderful canvases for creative decorating that suits any skill level and aesthetic preference. First, consider creating pastel-colored cookies with simple stripe patterns using contrasting piping, evoking spring colors and classic Easter themes. Next, design detailed bunny faces with piped features, or create egg-shaped cookies decorated with elaborate floral patterns. Additionally, make speckled chick cookies with yellow icing and tiny black piped dots, creating adorable designs perfect for children. Furthermore, create Easter basket cookies decorated with intricate woven patterns and filled-in designs using various shades of icing. Finally, experiment with ombre effects by blending multiple shades of a single color across the cookie surface, creating sophisticated, trendy designs.
Why This Recipe Works
Easter sugar cookies succeed because they respect time-tested cookie baking principles while remaining accessible to home bakers of all skill levels. The balance of butter, sugar, and eggs creates a tender crumb that holds its shape beautifully. Moreover, the vanilla extract with optional almond extract provides classic sugar cookie flavor that appeals universally. Additionally, the dough holds detailed shapes, making it ideal for creative decorating. Finally, the royal icing creates a professional, bakery-quality finish that transforms simple cookies into stunning edible art.
This recipe appeals to anyone who loves holiday baking and creative expression through decorating. Furthermore, while the cookies themselves are straightforward, the decorating aspect allows for endless customization and personalization. Additionally, the forgiving dough and icing mean first-time decorators create beautiful results without advanced skills. Finally, the versatility of designs means you can match cookies to any Easter theme, color scheme, or celebration style.
Perfect Occasions for Easter Sugar Cookies
These delightful treats shine at virtually any Easter celebration or spring gathering. First, serve them at Easter brunches alongside ham, quiche, and spring vegetables for a sweet finale to the meal. Next, include them in Easter baskets alongside chocolate eggs and jelly beans for a homemade element that adds personal touch. Additionally, serve them at spring celebrations, baby showers, or garden parties where their colorful appearance brightens any dessert table. Furthermore, package them beautifully for Easter gifts that show thought and care. Finally, enjoy baking and decorating them as a family activity, creating memories and traditions that extend the Easter celebration beyond the holiday itself.
Final Thoughts
Making Easter sugar cookies from scratch is a rewarding experience that combines the joy of baking with the creative satisfaction of decorating and personalizing each treat. Additionally, there’s something deeply special about giving edible gifts that you’ve made yourself, especially when they’re as beautiful and delicious as these cookies. This recipe proves that impressive, professional-looking desserts are entirely within the reach of home bakers who appreciate quality ingredients and simple techniques.
Next time you’re planning an Easter celebration or spring gathering, remember that these sugar cookies deliver beautiful results with straightforward steps and endless creative possibilities. The combination of buttery cookie flavor, smooth icing finish, and your personal decorative touches creates magic on the plate and smiles on guests’ faces. Whether it’s your first time making Easter cookies or your fiftieth, these treats never fail to bring joy and festive spirit to the table.
We’d absolutely love to hear what you think about these Easter sugar cookies! Did you try decorating them? What colors and designs did you create? Did your family enjoy baking and decorating them together? Please save this recipe to your favorite collection, pin it to your Pinterest board so you can find it easily each Easter season, and share it with friends and family who love holiday baking and creative fun. Your feedback and support truly encourage us to keep creating delicious recipes and helpful baking guidance for you. Thank you for being part of our cooking community!