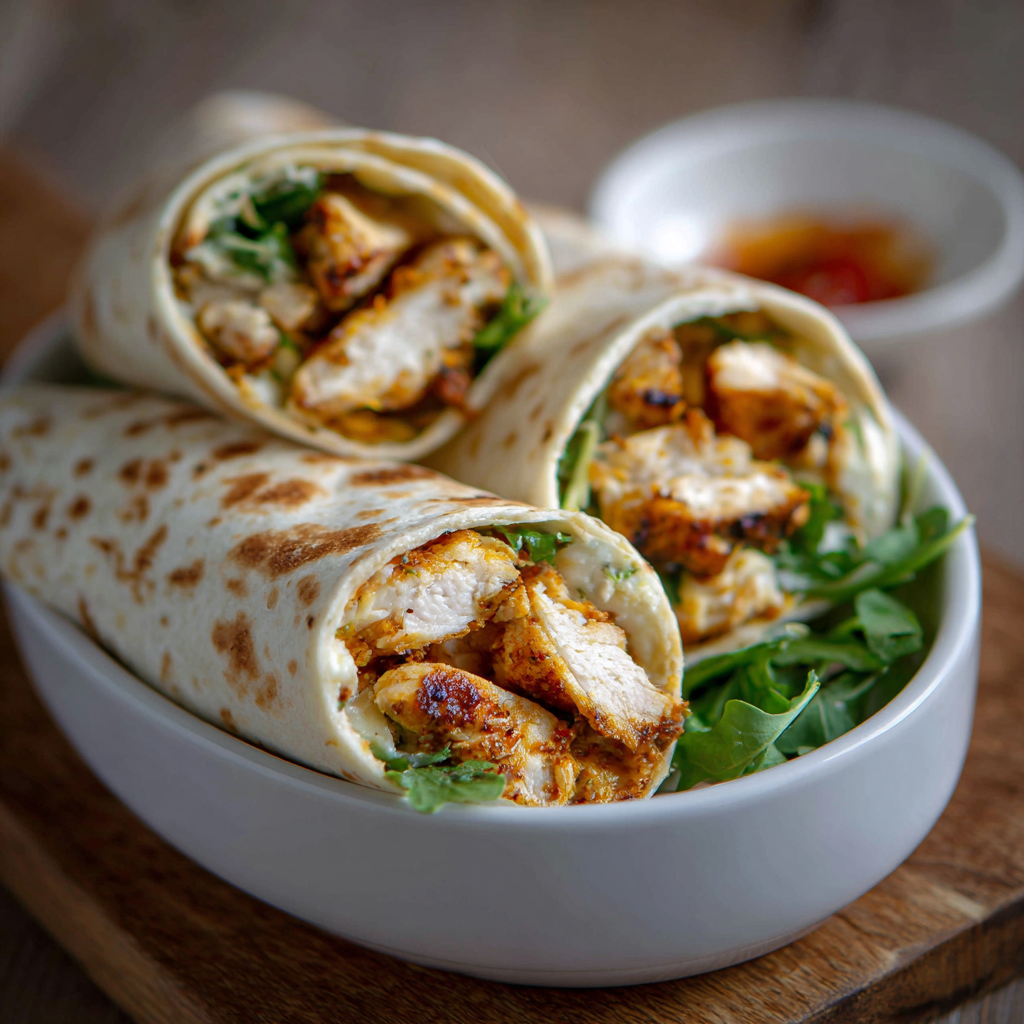
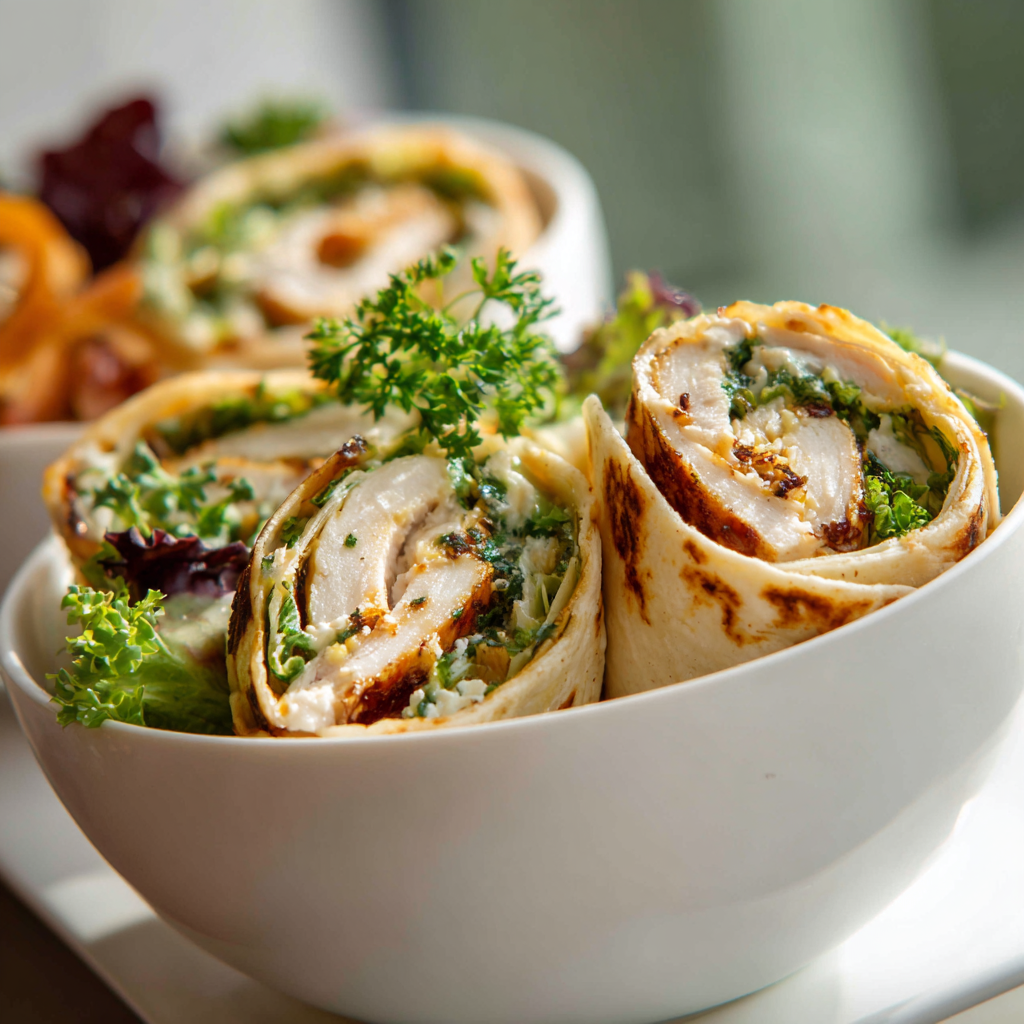
There’s something wonderfully satisfying about transforming yesterday’s roast chicken into tonight’s dinner sensation without spending hours in the kitchen. First, these wraps celebrate the magic that happens when quality leftovers meet creative assembly and simple flavors that complement each other perfectly. The beauty of this recipe lies in its elegant simplicity—you’re not masking the chicken with complicated sauces or obscuring flavors with excessive ingredients. What makes this dish truly special is how it comes together in mere minutes while tasting like you’ve invested serious cooking time and effort. Additionally, the wraps invite customization based on what you have available, making them adaptable to your pantry and personal preferences. Whether you’re recovering from roasting an entire bird or grabbing store-bought rotisserie chicken, this recipe transforms it into something entirely new and exciting. The combination of tender chicken, crisp vegetables, creamy spreads, and soft wraps creates a harmonious balance that satisfies both hungry weeknight appetites and sophisticated dinner guests seeking something unpretentious yet impressive.
Ingredients
Serves 4-6
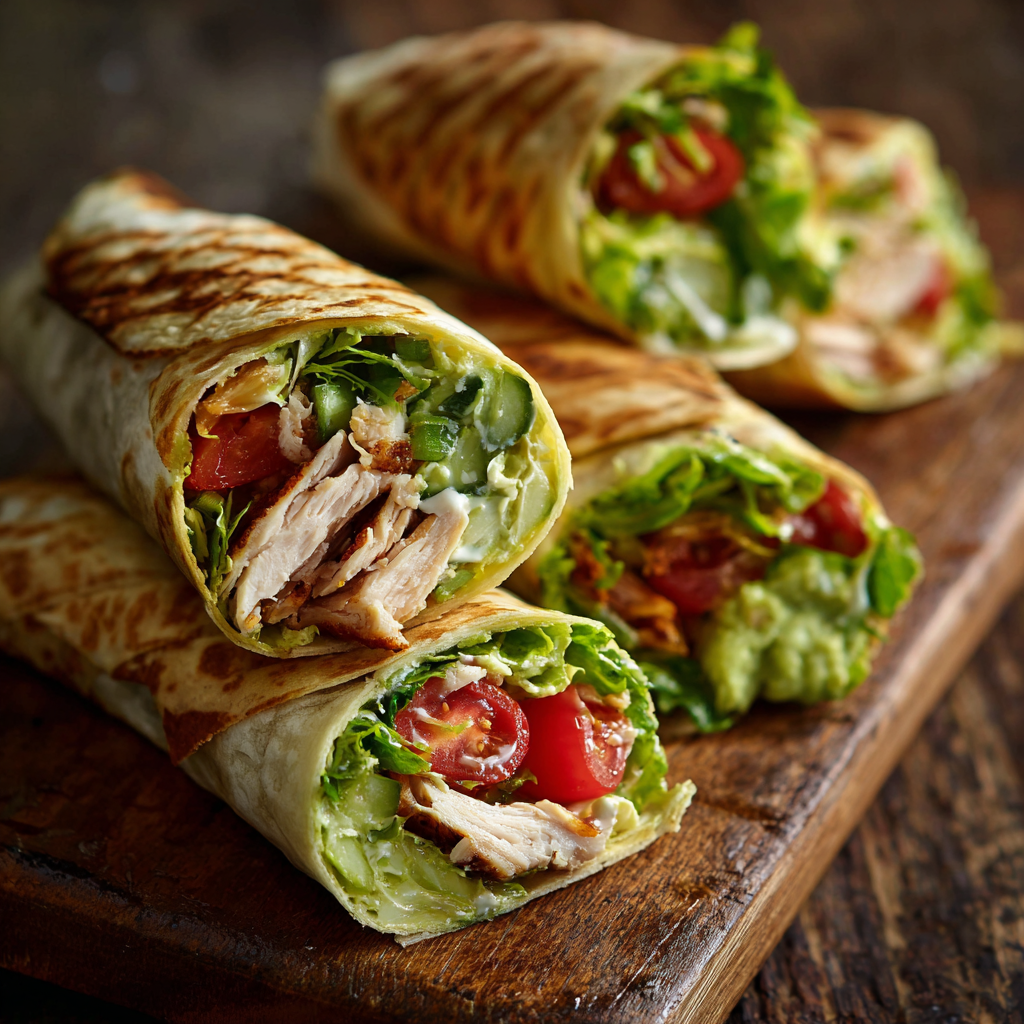
- 3 cups shredded or diced roast chicken, cooked and cooled
- 6 large flour tortillas or wraps (10-inch size)
- ¼ cup mayonnaise
- 2 tablespoons Dijon mustard
- 1 tablespoon whole grain mustard
- 2 tablespoons honey
- 2 cups fresh mixed greens or spinach
- 1 large red bell pepper, thinly sliced
- 1 medium cucumber, julienned or thinly sliced
- 1 cup shredded carrots
- ½ red onion, thinly sliced
- 1 avocado, sliced (optional but recommended)
- ¾ cup crumbled feta cheese or shredded cheddar cheese
- ¼ cup fresh cilantro or parsley, chopped
- 1 tablespoon fresh lemon juice
- ½ teaspoon garlic powder
- ½ teaspoon salt
- ¼ teaspoon black pepper
- Optional: crispy bacon pieces, dried cranberries, or roasted pecans
Preparing Your Ingredients and Workspace
Success in wrap assembly begins before you even unfold your first tortilla. Next, organize all ingredients on your workspace in the order you’ll use them, creating an efficient assembly line that flows naturally. Additionally, having everything prepped and within arm’s reach prevents mid-assembly scrambling and keeps your focus on creating delicious wraps. Meanwhile, ensuring your chicken is completely cooled prevents warm chicken from wilting fresh vegetables or making the wraps soggy.
Step-by-Step Instructions
- Mix together mayonnaise, Dijon mustard, whole grain mustard, and honey in a small bowl, stirring until smooth and well combined. Subsequently, this flavorful spread creates the foundation that brings all wrap components together harmoniously.
- Season your cooled shredded or diced roast chicken with garlic powder, salt, and black pepper, tossing gently to distribute seasonings evenly. Additionally, drizzle the lemon juice over the chicken and toss once more, allowing the citrus brightness to enhance the natural poultry flavor.
- Warm your flour tortillas briefly by wrapping them in a damp paper towel and microwaving for 15-20 seconds. First, this step makes them pliable and less likely to crack during rolling. Subsequently, warm tortillas also keep all components together better than cold ones.
- Lay the first tortilla flat on a clean cutting board or large plate, creating your work surface for the wrap assembly. Next, spread approximately 2 tablespoons of the mustard-honey mixture across the bottom half of the tortilla, leaving a 1-inch border around the edges.
- Layer fresh mixed greens or spinach over the spread, creating a bed that will catch any moisture from vegetables and prevent sogginess. Additionally, the leafy greens act as a barrier between the wrap and all other ingredients, extending freshness.
- Arrange shredded roast chicken in a line across the center of the greens, approximately 3-4 inches from the bottom edge. Meanwhile, distribute it evenly so each wrap contains equal portions and won’t be lopsided or unbalanced.
- Add red bell pepper slices, cucumber slices, shredded carrots, and red onion slices in organized rows, creating a rainbow of colors and textures. Subsequently, this layering ensures each bite contains multiple ingredients rather than separating during eating.
- Place avocado slices on one side of the wrap if using, and sprinkle crumbled feta cheese or shredded cheddar over all components. Furthermore, the cheese adds richness and helps bind everything together as you roll.
- Scatter chopped fresh cilantro or parsley over the filled area, adding brightness and aromatic depth to the entire wrap. Additionally, if using optional bacon, dried cranberries, or roasted pecans, distribute them now for final flavor complexity.
- Begin rolling by folding the bottom edge of the tortilla up and over the fillings, tucking it firmly against the ingredients. First, this initial tuck creates the foundation for a tight, secure wrap that won’t unravel.
- Fold in both left and right sides of the tortilla toward the center, creating enclosed ends that prevent fillings from escaping. Subsequently, this technique, borrowed from burrito-making, ensures nothing slides out during eating.
- Continue rolling the wrap away from you, maintaining firm pressure throughout the rolling motion to keep everything compact. Additionally, this rolling action compresses all ingredients into a cohesive bundle rather than allowing them to shift separately.
- Once fully rolled, place the wrap seam-side down on the cutting board, allowing gravity to hold it closed for a few seconds. Meanwhile, you can wrap the bottom half in foil or parchment paper for easier handling, or simply serve immediately.
- Repeat the assembly process with remaining tortillas and fillings, creating multiple wraps for your meal or meal prep. Furthermore, if making ahead, refrigerate wrapped and wrapped wraps for up to 6 hours before serving.
Creating the Perfect Flavor Balance
Understanding how each component contributes to the overall wrap experience ensures your creation tastes balanced and satisfying. Next, the mustard-honey spread provides richness and tangy sweetness that prevents the wrap from tasting bland or one-dimensional. Meanwhile, the fresh vegetables add brightness, crunch, and nutritional value that transforms simple chicken into something genuinely nourishing. Additionally, the cheese contributes umami depth that rounds out all other flavors beautifully.
Serving and Storing Tips
Serving Suggestions
Serve your chicken wraps immediately after assembly while all components remain at their optimal temperature and texture. First, present them on a cutting board or platter, optionally cutting them diagonally so the beautiful filling layers are visible to guests. Additionally, serving with side salads, roasted vegetables, or fresh fruit creates a complete meal experience. Meanwhile, these wraps work beautifully for lunch boxes, picnics, casual weeknight dinners, or even elegant entertaining because they offer impressive presentation without requiring formal plating techniques.
The versatility of wraps means they suit virtually any occasion from casual family meals to sophisticated gatherings. Subsequently, pairing with light beverages like iced tea, lemonade, or white wine complements the fresh ingredients beautifully. Furthermore, these wraps travel well, making them perfect for on-the-go meals without requiring heating or special equipment.
Storage Tips
Store assembled wraps in an airtight container in the refrigerator for up to 4 hours before serving, keeping them fresh and preventing them from drying out. However, for longer storage, wrap each wrap individually in foil or parchment paper and refrigerate for up to 6 hours. Subsequently, the wrapping prevents moisture loss while maintaining structural integrity for several hours. Alternatively, you can store prepared components separately in airtight containers and assemble wraps just before serving, which extends freshness considerably.
To freeze, wrap completed wraps tightly in plastic wrap and aluminum foil, storing them for up to one month. When ready to eat, thaw overnight in the refrigerator and consume within a few hours of thawing. Additionally, the lettuce may become slightly softer after freezing, but all other components maintain quality beautifully. As a result, freezing works better if you prefer storing components separately rather than assembled wraps.
Helpful Notes and Variations
Ingredient substitutions ensure this recipe adapts to whatever you have available in your kitchen and pantry. Next, if you lack specific vegetables, substitute any fresh vegetables you enjoy—grilled zucchini, sliced tomatoes, or blanched broccoli work beautifully. Meanwhile, those who prefer different cheese can swap feta for goat cheese, blue cheese, or any variety that appeals to you. Additionally, if avocado isn’t available or desired, replace it with hummus, Greek yogurt, or additional vegetables for creaminess.
The spread can be customized based on your flavor preferences and dietary needs. For those preferring lighter versions, replace mayonnaise with Greek yogurt or sour cream while maintaining the mustard and honey elements. In contrast, adding sriracha or hot sauce to the spread creates spicy complexity for those who enjoy heat. Subsequently, pesto-based spreads offer Mediterranean flair, while ranch seasoning mixed with Greek yogurt creates creamy richness.
Common mistakes occur when assembling wraps include overfilling, which causes them to burst during rolling, or placing wet ingredients directly against the tortilla, which creates sogginess. Instead, layer lettuce between the tortilla and moist ingredients like tomatoes or cucumber. Furthermore, using room temperature ingredients rather than cold ones prevents the wrap from becoming rigid and difficult to roll smoothly.
Chef Tips for Exceptional Results
First, warming your tortillas immediately before assembly makes them dramatically more pliable and less prone to cracking or tearing during rolling. Subsequently, arranging all ingredients in front of you like a wrap assembly line accelerates the process and ensures consistency across multiple wraps.
Frequently Asked Questions
Can I make these wraps the night before? Yes, wrap them individually in foil and refrigerate for up to 6 hours; the tortillas may soften slightly but will still taste delicious.
What if my chicken is still warm from roasting? Allow it to cool to room temperature before assembling wraps; warm chicken will wilt the greens and make wraps soggy.
Can I use a different type of tortilla? Absolutely, whole wheat, spinach, or flavored tortillas work perfectly; just ensure they’re large enough to contain all fillings.
How do I prevent the wraps from falling apart? Fold the sides in before rolling, maintain firm pressure while rolling, and place seam-side down for several seconds before eating.
Can I substitute the chicken with another protein? Yes, turkey, beef, pork, or even tofu work beautifully; adjust seasoning accordingly based on your protein choice.
Exploring Creative Variations
This foundational wrap recipe welcomes numerous creative interpretations that keep meals exciting throughout the year. Next, adding Asian-inspired elements like sesame oil, ginger, and soy sauce transforms the wrap into something entirely different. Meanwhile, Mediterranean variations using sun-dried tomatoes, olives, and oregano create distinctly different flavor profiles. Additionally, Mexican-inspired wraps using cilantro lime chicken, black beans, and pico de gallo celebrate different culinary traditions beautifully.
The beauty of this recipe lies in its adaptability to whatever ingredients inspire you. First, consider your favorite flavor combinations and how chicken complements them, then build wraps around those concepts. Subsequently, experimenting with different spreads, vegetables, and toppings keeps this simple recipe from becoming predictable or boring.
Making Wraps for Meal Prep
Preparing wraps in advance transforms them into convenient lunch or dinner options throughout your busy week. Next, storing components separately rather than assembling wraps allows flexibility in combination options and extends freshness considerably. Additionally, prepping vegetables on Sunday ensures they’re ready for quick assembly on busy weeknights. Meanwhile, keeping cooked chicken refrigerated in an airtight container maintains quality for 3-4 days after cooking.
The meal prep approach transforms occasional dinner into practical weekday solution that saves time without sacrificing quality or nutrition. First, spending 30 minutes on Sunday afternoon preparing components pays dividends throughout the week. Subsequently, quick assembly takes mere minutes when everything is prepped and ready, making dinner achievable even on exhausting days.
Understanding Wrap Wrapping Technique
Mastering the rolling technique ensures your wraps hold together beautifully throughout eating rather than falling apart awkwardly. First, ensuring the first tuck is tight creates the foundation for successful rolling. Subsequently, folding the sides creates enclosed ends that contain all fillings securely. Additionally, maintaining even pressure throughout the rolling motion prevents some areas from becoming compressed while others remain loose.
The technique improves with practice, but even your first attempts will likely succeed because wraps are forgiving compared to other rolled preparations. Next, watching instructional videos or practicing a few times before serving to guests builds confidence. Meanwhile, recognizing that slight imperfections create rustic charm rather than detracting from the final result removes pressure for perfection.
Why Leftover Chicken Transforms Into Something Special
Understanding the appeal of transforming leftovers into completely different dishes prevents food waste while maximizing value from ingredients you’ve already purchased. First, roasted chicken that stands alone as a main course becomes something entirely new when incorporated into wraps with fresh vegetables and creative spreads. Subsequently, this transformation demonstrates resourcefulness and creativity that elevates simple home cooking. Additionally, knowing that your roasted bird will provide multiple meals encourages purchasing whole chickens rather than pre-cut parts, ultimately saving money and reducing waste.
Conclusion
Your Easy Dinner Leftover Roast Chicken Wraps await creation, ready to prove that simple ingredients assembled thoughtfully create memorable meals worth repeating. This recipe transforms everyday leftover chicken into something exciting and crave-worthy that satisfies both busy weeknights and entertaining occasions. Through proper ingredient preparation, organized assembly, and attention to layering techniques, you’ll create wraps that exceed expectations while requiring minimal cooking skill or time investment. Gather your ingredients, follow these steps methodically, and prepare yourself for the appreciation and requests for this recipe that are sure to follow.
Did you love this Easy Dinner Leftover Roast Chicken Wraps recipe? Please save this recipe to your collection, pin it to your Pinterest board, and share it with friends and family who need easy weeknight dinner inspiration that transforms leftovers into something genuinely delicious. Your support means everything and encourages us to keep creating more simple, versatile recipes that make home cooking enjoyable and achievable for everyone!