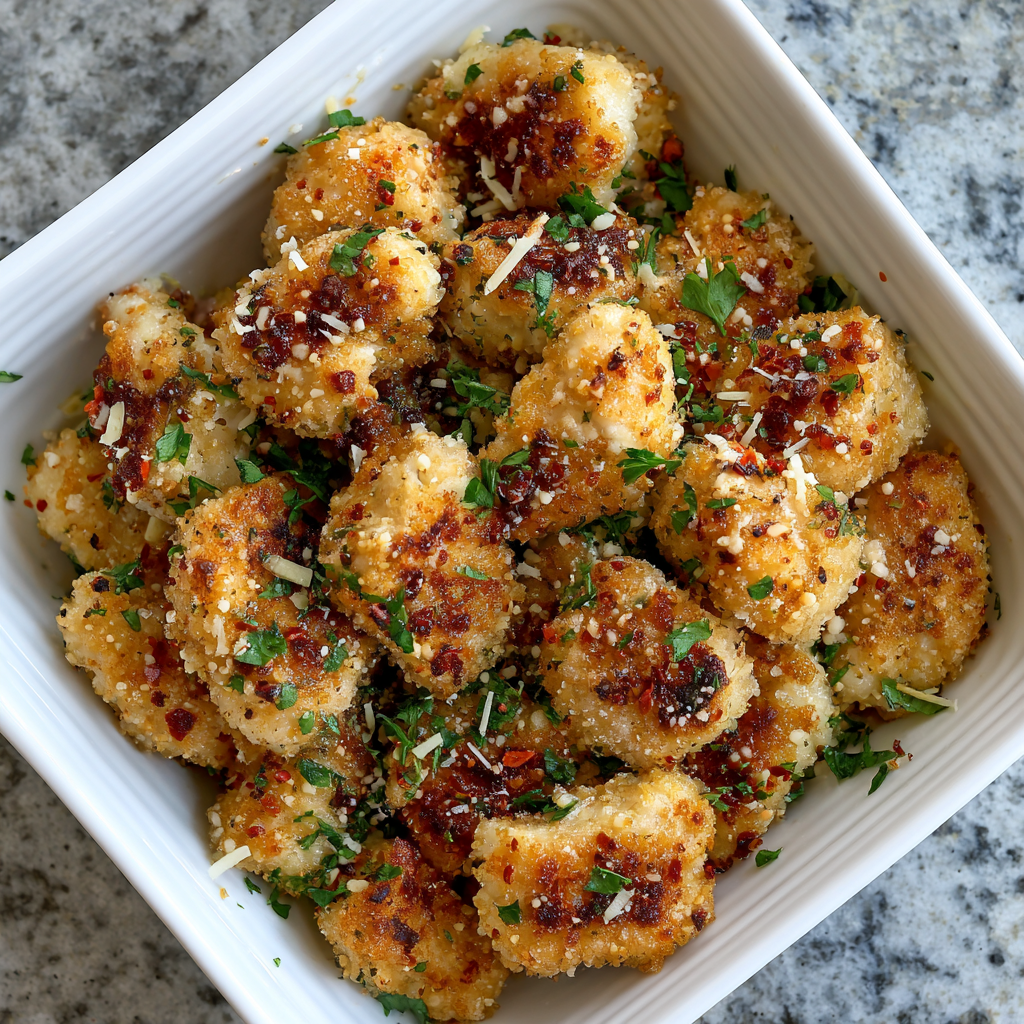
There’s nothing quite like the satisfaction of serving golden, crispy chicken tenders that disappear from platters faster than you can refill them, bringing genuine joy to everyone gathered for the big game. First, these game day crispy chicken tenders represent the perfect solution for anyone seeking impressive finger food that tastes authentically indulgent while delivering genuine satisfaction without requiring deep frying or complicated cooking. The beauty of this recipe lies in how it achieves restaurant-quality crispiness through strategic baking rather than messy oil splashing, allowing you to remain present at your gathering instead of tending to constantly bubbling grease. What makes this dish truly special is how the golden exterior contrasts beautifully with tender, juicy chicken inside, creating textural perfection impossible to overlook. Additionally, these chicken tenders work beautifully for Super Bowl parties, sports celebrations, casual entertaining, kids’ parties, or anyone seeking satisfying game day food that appeals across all ages and preferences. Whether you’re preparing them specifically for Super Bowl Sunday or making them regularly throughout the year for entertaining occasions, the result remains the same—absolutely delicious, crispier-than-deep-fried chicken tenders that rival restaurant versions in every meaningful way. The combination of crispy panko exterior, juicy chicken meat, and diverse dipping sauces creates irresistible bites appealing to everyone from picky eaters to devoted chicken enthusiasts seeking something genuinely special and utterly unforgettable.
Ingredients
Serves 8-10 (Makes approximately 24-30 tenders depending on size)
For the Chicken Tenders:
- 3 pounds boneless, skinless chicken breasts
- 2 tablespoons olive oil
- 1 teaspoon sea salt, plus more for seasoning
- ½ teaspoon black pepper
For the Coating:
- 2 cups all-purpose flour
- 1 teaspoon sea salt
- ½ teaspoon black pepper
- 1 teaspoon garlic powder
- 1 teaspoon paprika
- ½ teaspoon dried Italian seasoning
- Optional: ¼ teaspoon cayenne pepper for heat
For the Wet Mixture:
- 3 large eggs
- ¼ cup whole milk
- 2 tablespoons olive oil
- 1 teaspoon vanilla extract
For the Crispy Coating:
- 3 cups panko breadcrumbs
- 1 teaspoon sea salt
- ½ teaspoon black pepper
- ½ teaspoon garlic powder
- ½ teaspoon paprika
- Optional: 2 tablespoons grated Parmesan cheese for additional richness
For Serving:
- Honey mustard sauce
- Buffalo sauce or hot sauce
- Ranch dressing
- Barbecue sauce
- Honey for drizzling
- Fresh lemon wedges
- Optional: sriracha, mayo-based sauces, or marinara
Understanding Crispy Chicken Tender Fundamentals
Creating perfect crispy chicken tenders requires understanding how to achieve golden exterior through proper breading and baking technique. Next, properly prepared tenders maintain juicy interiors while developing crispy coating through strategic heat management. Additionally, using panko breadcrumbs creates superior crispiness compared to regular breadcrumbs through their irregular shape and size. Meanwhile, proper oil application ensures browning without creating greasy, soggy results.
Step-by-Step Instructions
- Remove chicken breasts from the refrigerator and place them on a cutting board, allowing them to reach room temperature for approximately 10 minutes. First, room temperature chicken cooks more evenly than cold chicken. Additionally, this brief rest ensures even cooking without cold centers.
- Slice chicken breasts lengthwise into strips approximately ¾-inch thick, creating uniform tenders that cook evenly throughout. First, uniform thickness ensures consistent cooking without some pieces becoming overdone while others remain undercooked. Subsequently, aim for consistency rather than perfection; slight variations add character.
- Pat the chicken tenders completely dry using paper towels, removing all surface moisture that prevents proper seasoning and browning during baking. First, this step is absolutely essential for achieving crispy coating rather than soggy exterior. Additionally, completely dry tenders brown properly while wet tenders release steam preventing browning.
- Preheat your oven to 400°F and position racks to the upper-middle and lower-middle positions, allowing proper heat circulation around tenders on both levels. Subsequently, line two large sheet pans with aluminum foil and place oven-safe wire racks on each pan to elevate tenders.
- Combine all-purpose flour, sea salt, black pepper, garlic powder, paprika, dried Italian seasoning, and optional cayenne pepper in a shallow bowl or plate, stirring to blend seasonings thoroughly. Next, this seasoned flour forms the base coating layer.
- Combine eggs, whole milk, olive oil, and vanilla extract in another shallow bowl, whisking vigorously to create uniform wet mixture. Additionally, the vanilla extract adds subtle sweetness and helps browning without creating sweet-tasting chicken.
- Combine panko breadcrumbs, sea salt, black pepper, garlic powder, paprika, and optional grated Parmesan cheese in a third shallow bowl, stirring to blend thoroughly. Meanwhile, this final coating creates the crispy exterior everyone loves.
- Working with one chicken tender at a time, coat it completely in the seasoned flour, shaking off excess. First, the flour creates initial coating layer. Subsequently, excess flour creates lumpy coating; shake thoroughly to remove surplus.
- Dip the floured tender into the egg mixture, ensuring complete coverage on all sides. Additionally, the egg acts as adhesive helping breadcrumbs adhere properly. Meanwhile, complete coating creates crispy exterior rather than patchy coverage.
- Place the wet tender into the panko breadcrumb mixture, coating completely and pressing gently to ensure breadcrumbs adhere firmly. First, gentle pressing helps breadcrumbs stick without compressing the coating excessively. Subsequently, thorough coating creates the signature crispy exterior.
- Arrange coated tenders on the prepared sheet pans with wire racks, spacing them approximately 1 inch apart to allow hot air circulation underneath and around each tender. Additionally, ensure tenders don’t touch each other, which causes steaming rather than crisping.
- Drizzle or spray the coated tenders lightly with olive oil on both sides using a spray bottle or light brush. First, minimal oil application promotes browning without creating greasy, soggy tenders. Additionally, this light coating creates the crispiest results compared to excessive oil.
- Place sheet pans in your preheated 400°F oven, positioning one on the upper-middle rack and one on the lower-middle rack. First, this dual-rack arrangement maximizes oven space while ensuring even cooking. Subsequently, swap pan positions halfway through cooking to ensure uniform browning.
- Bake for 15-20 minutes, checking at the 12-minute mark for browning status. First, exact timing depends on tender size and your specific oven. Additionally, tenders should turn golden brown with crispy exterior when cooked properly.
- Flip the tenders using tongs approximately halfway through baking, ensuring both sides develop the golden-brown, crispy coating. Additionally, flipping ensures even browning throughout rather than golden tops with pale bottoms.
- Tenders are finished when the internal temperature reaches 165°F when measured with a meat thermometer inserted into the thickest part. First, test doneness without guessing, ensuring safe consumption and optimal juiciness. Subsequently, properly cooked tenders should feel crispy on the outside while remaining tender inside.
- Remove the tenders from the oven and allow them to rest on the sheet pans for exactly 3-5 minutes before transferring to serving platters. First, this brief resting prevents burns when guests grab tenders. Subsequently, the rest allows the exterior to set, becoming even crispier.
- Transfer rested tenders to serving platters lined with parchment paper for easy serving and cleanup. First, arrange tenders attractively to encourage guests to grab and enjoy. Subsequently, position platters strategically throughout your entertaining space, encouraging mingling.
- Serve immediately with diverse dipping sauce options arranged in small bowls alongside the tenders. Additionally, provide fresh lemon wedges allowing guests to squeeze brightness over their choices. Meanwhile, sauce variety accommodates different preferences without requiring additional cooking.
Mastering Crispy Breading Technique
Understanding how to achieve crispy exterior without deep-frying removes intimidation factors while delivering superior results. Next, completely drying chicken before breading is non-negotiable for proper crisping rather than steaming. Meanwhile, using three-stage breading process with flour, egg, and panko creates superior coating compared to single-step approaches. Additionally, maintaining proper oven temperature ensures tenders brown adequately without cooking too quickly outside while remaining raw inside.
Serving and Storing Tips
Serving Suggestions
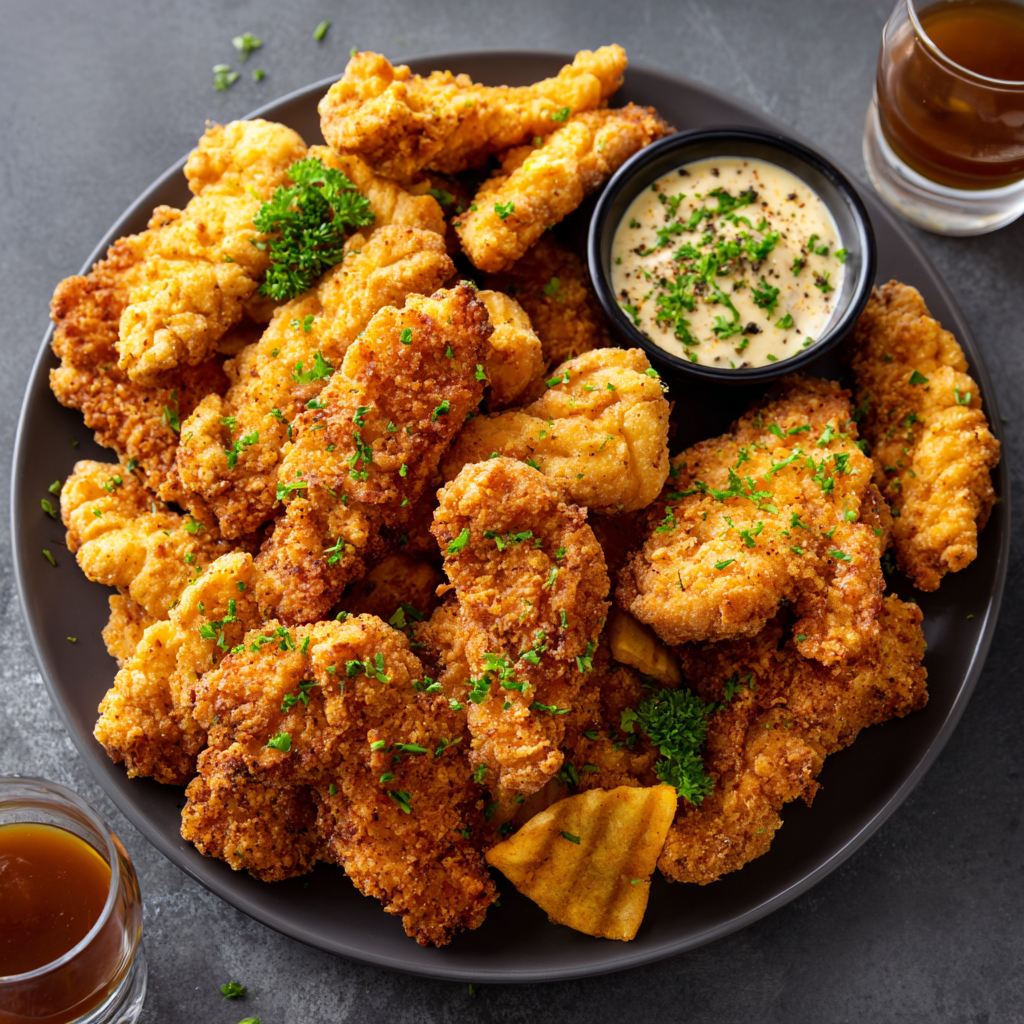
Serve your crispy chicken tenders hot directly from the oven with coating at peak crispiness and aromas filling the air. First, present tenders on wooden boards, ceramic platters, or tiered stands that showcase them attractively while making grabbing easy. Additionally, setting up a dipping sauce bar with multiple options allows guests to customize their tenders according to personal preferences. Meanwhile, these tenders work beautifully as Super Bowl food, tailgate offerings, casual entertaining, kids’ parties, or even main courses because their handheld nature suits informal settings perfectly.
The versatility means tenders suit virtually any occasion from casual gatherings to entertaining because they offer impressive presentation without requiring formal plating. Subsequently, pairing with side dishes like coleslaw, fries, or grilled vegetables creates complete meal experiences. Furthermore, these tenders travel beautifully in containers with sauces stored separately, making them perfect for potlucks and on-the-go gatherings.
Storage Tips
Store leftover cooked tenders in airtight containers in the refrigerator for up to 3 days, keeping them moist while maintaining crispness as much as possible. However, tenders taste best consumed within a few hours of cooking while they maintain maximum crispiness. Subsequently, if you have leftover tenders, reheat them in a 350°F oven for 8-10 minutes until warmed through and re-crisped. Alternatively, cold tenders can be enjoyed straight from the refrigerator paired with dipping sauces, creating a different but equally enjoyable experience.
To freeze, store cooled uncoated chicken tenders in freezer-safe containers for up to three months before breading and baking. Additionally, breaded uncooked tenders can be frozen on sheet pans, then transferred to freezer bags and baked directly from frozen, adding 5-10 additional minutes to baking time. Furthermore, fully cooked tenders freeze beautifully for up to one month, reheating well in a 350°F oven.
Helpful Notes and Variations
Ingredient substitutions ensure this recipe adapts to whatever you have available in your kitchen and pantry while maintaining crispy, delicious results. Next, if you lack panko breadcrumbs, regular breadcrumbs substitute though the final texture will be less crispy. Meanwhile, those preferring different seasonings can adjust the coating spices according to personal preferences or favorite flavor profiles. Additionally, if you dislike certain herbs, simply omit them or replace with favorites like thyme or rosemary.
The coating can be customized based on flavor preferences and available ingredients. For those preferring extra crispiness, add additional cornstarch to the panko mixture which creates ultra-crispy texture. In contrast, those preferring milder versions can reduce garlic powder and paprika. Subsequently, adding Cajun seasoning, Italian herbs, or even curry powder to the coating creates entirely different flavor profiles. Furthermore, honey or maple syrup drizzled on finished tenders creates Asian-inspired variations.
Common mistakes occur when tenders are cut too thick, requiring extended cooking time preventing proper exterior crisping. Instead, cut tenders to approximately ¾-inch thickness ensuring even cooking. Additionally, overcrowding sheet pans causes steaming rather than crisping; space tenders generously. Furthermore, forgetting to flip tenders halfway through creates uneven cooking with crispy tops and pale bottoms requiring additional cooking.
Chef Tips for Exceptional Results
First, using oven-safe wire racks elevates tenders above accumulated fat and renders them far crispier than tenders sitting directly on sheet pans. Subsequently, light oil application creates crispier results than heavy coating; less is more for maximum crispiness.
Frequently Asked Questions
Can I prepare these tenders ahead and reheat them? Yes, bake tenders ahead and reheat in a 350°F oven for 8-10 minutes until warmed through and re-crisped; avoid microwave which softens coating.
What’s the best way to keep tenders warm during a gathering? Use a warming tray or keep finished tenders in a 200°F oven loosely covered with foil to maintain temperature for several hours without softening.
Can I bread the tenders the night before? Absolutely, prepare through the breading step, refrigerate on sheet pans covered, then bake when ready; frozen tenders may need 2-3 additional minutes.
How do I make this recipe gluten-free? Use gluten-free flour blend for the dry coating and ensure panko or gluten-free breadcrumbs are used; all other ingredients remain identical.
Can I use chicken tenders straight from the package instead of slicing breasts? Yes, pre-made tenders work perfectly; reduce baking time by 3-5 minutes since they’re already uniform thickness.
Exploring Sauce and Flavor Variations
This foundational crispy chicken tender recipe welcomes numerous creative sauce and coating interpretations beyond traditional presentations. Next, Asian-inspired variations using panko mixed with sesame seeds and served with honey-soy sauce create distinctly different flavor profiles. Meanwhile, Italian-style versions with Italian herbs and served with marinara sauce celebrate Mediterranean traditions beautifully. Additionally, spicy honey variations with cayenne pepper in coating and served with hot honey create sophisticated heat.
The beauty of chicken tender preparation lies in its adaptability to whatever sauces and flavors appeal to your guests. First, consider your favorite sauce flavor profiles and build tender variations around those concepts. Subsequently, offering multiple sauce and coating options allows guests customization without requiring entirely different cooking batches.
Understanding Crispy Tender Appeal for Game Day
Tenders represent the perfect entertaining food because they’re impressive without requiring fancy technique, satisfying without requiring utensils or plates, and shareable in ways encouraging casual gathering. Next, the handheld nature means guests can eat while standing, socializing, and watching the game simultaneously. Meanwhile, tenders appeal across age groups from children to adults. Additionally, knowing that tenders take minimal active cooking time means you’re actually available to enjoy your gathering rather than disappearing into the kitchen.
Building a Sauce Bar
Creating a sauce station transforms basic tenders into customizable creations appealing to diverse taste preferences. First, prepare two or three sauce varieties in small bowls with spoons, allowing guests to dip tenders according to personal preference. Subsequently, offering mild, medium, and spicy options accommodates different heat tolerances. Additionally, this interactive approach turns tender consumption into participatory dining where guests customize their experience.
Making Tenders Your Game Day Signature
Understanding why crispy tenders deserve permanent rotation into your game day entertaining strategies removes hesitation. First, properly executed baked tenders deliver impressive results rivaling deep-fried versions. Subsequently, the casual nature suits entertaining friends better than formal cooking. Additionally, knowing that tenders work for Super Bowl, tailgates, kids’ parties, and regular gatherings means you’ll make them regularly.
Mastering Tender Cooking Consistency
Proper tender cooking ensures each piece delivers balanced crispiness and juiciness rather than becoming uneven or overly dry. First, arranging tenders in single layers without crowding creates adequate space for hot air circulation. Subsequently, flipping tenders halfway through cooking ensures even browning on both sides. Additionally, using an instant-read thermometer confirms doneness at 165°F without relying on guesswork.
The technique improves with practice, but even your first attempts will succeed because tenders are forgiving. Next, watching your oven during final cooking minutes helps understand exactly when tenders reach perfect crispiness. Meanwhile, recognizing that slight variations add character removes pressure for perfection.
Customizing for Dietary Preferences
These crispy tenders adapt beautifully to various dietary approaches including gluten-free, dairy-free, and lower-carb preferences. Next, using gluten-free flour blends and gluten-free breadcrumbs creates gluten-free versions. Meanwhile, using dairy-free milk in the egg wash creates dairy-free alternatives. Additionally, those avoiding breadcrumbs can explore nut-based coatings creating entirely different preparations.
The flexibility means these tenders suit virtually any dietary approach your guests navigate. First, focus on maintaining crispiness, juiciness, and satisfying heartiness regardless of specific dietary substitutions. Subsequently, providing alternative sauce options ensures all guests feel included and nourished.
Conclusion
Your Game Day Crispy Chicken Tenders Platter Recipe awaits creation, ready to prove that crispy, impressive tenders don’t require deep frying or complicated techniques. This recipe transforms simple chicken breasts into something exciting and crave-worthy that keeps guests satisfied throughout your gathering. Through proper preparation, organized cooking, and attention to crispiness and flavor, you’ll create tenders exceeding expectations while requiring minimal cooking ability. Gather your ingredients, follow these steps methodically, and prepare yourself for how quickly your platter empties and how much appreciation you receive for creating such delicious, shareable food.
Did you love this Game Day Crispy Chicken Tenders Platter Recipe? Please save this recipe to your collection, pin it to your Pinterest board, and share it with friends and family who need impressive entertaining solutions requiring minimal stress and maximum delicious, crispy flavor. Your support means everything and encourages us to keep creating more simple, crowd-pleasing recipes that make entertaining enjoyable and achievable for everyone!