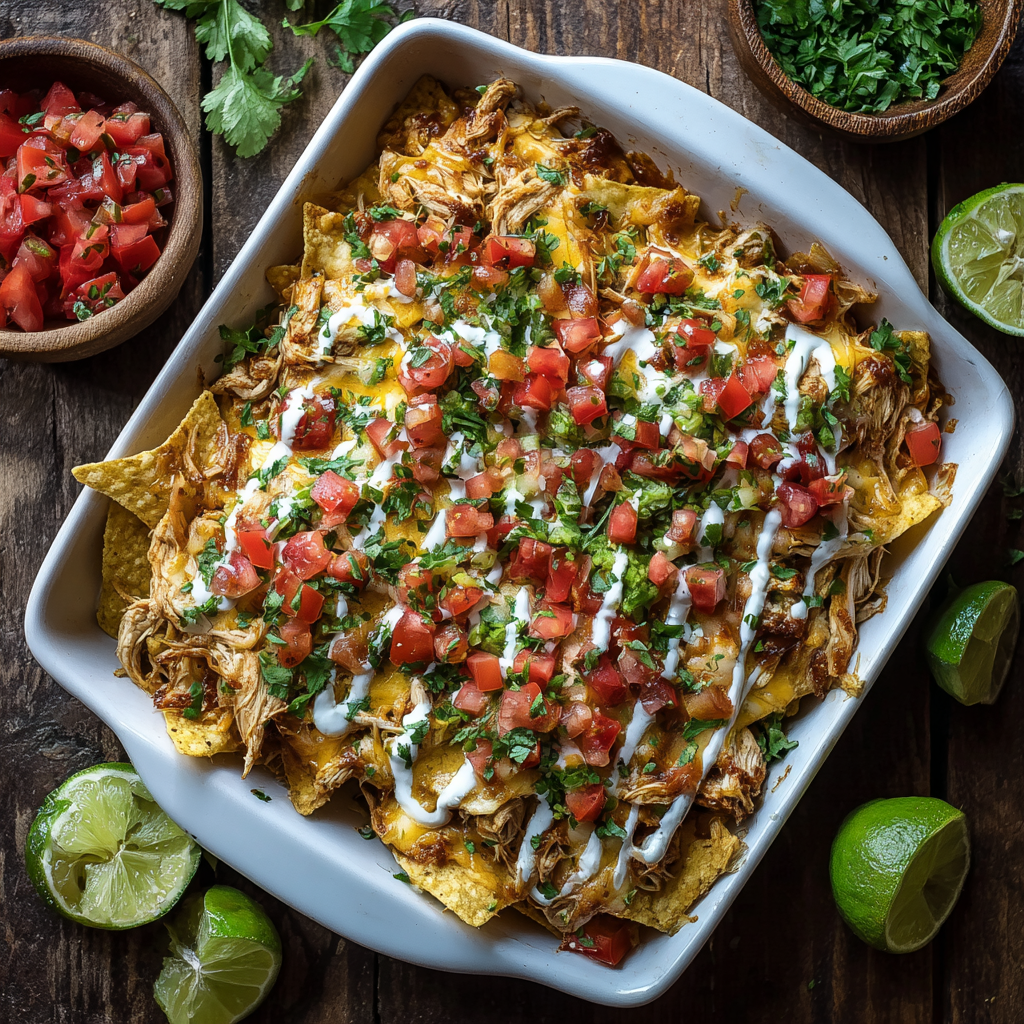
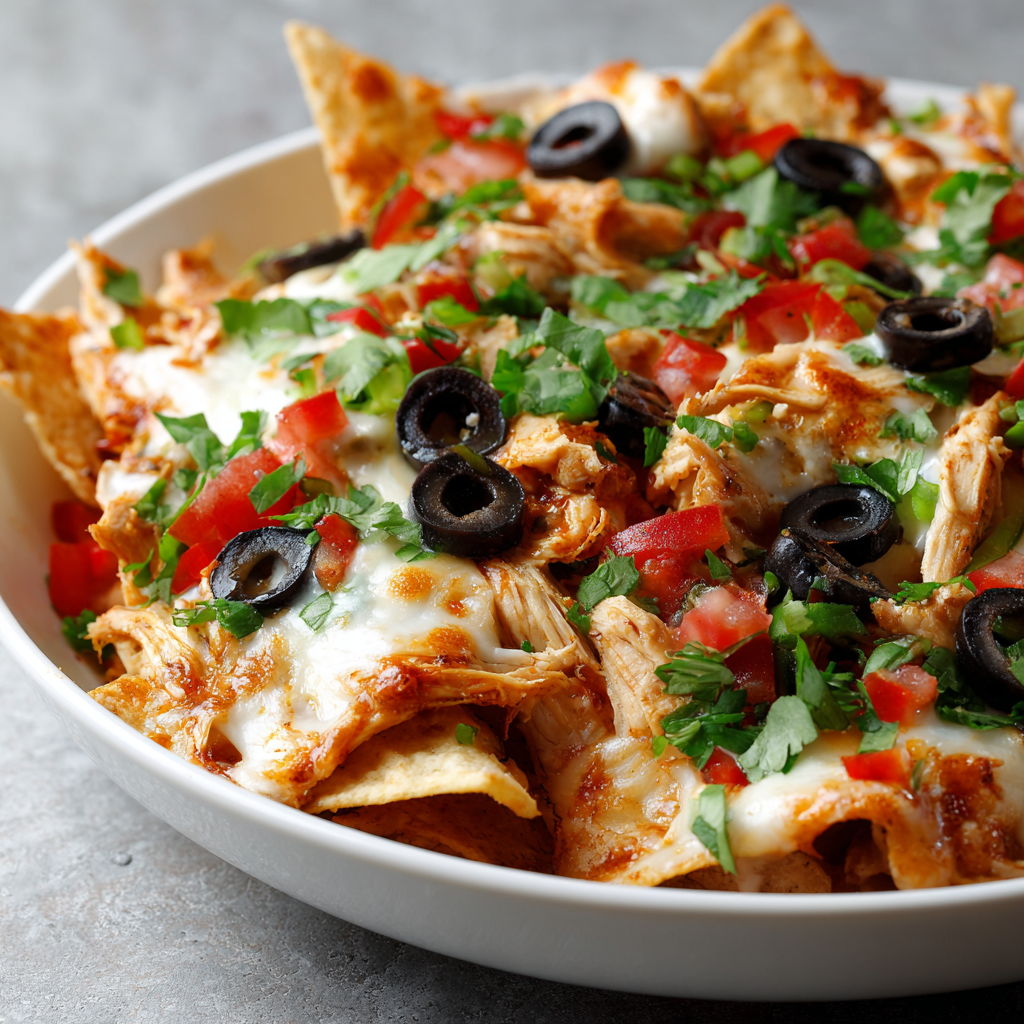
Picture this: friends gathering around your kitchen, the big game on the television, and a towering plate of loaded nachos that disappear faster than anyone expected. This is what makes gameday entertaining truly special, and this recipe delivers exactly that kind of crowd-pleasing magic. These chicken nachos combine crispy tortilla chips with tender shredded chicken, melted cheese, and all your favorite toppings in one unforgettable dish. Next, what sets this recipe apart is how incredibly simple it is to execute, requiring minimal prep time and ingredients you likely already have on hand. Additionally, unlike traditional nachos that can feel heavy and overwhelming, this version strikes the perfect balance between indulgent and satisfying. Whether you’re hosting a watch party, preparing a casual weeknight dinner, or looking for an appetizer that impresses without requiring hours in the kitchen, these nachos deliver every single time. Furthermore, the beauty of this dish lies in its endless customization possibilities, allowing you to tailor it to your guests’ preferences and dietary needs.
Ingredients
Makes: 4-6 servings
- 1.5 pounds boneless, skinless chicken breasts
- 6 cups tortilla chips (about one 13-ounce bag)
- 2 cups shredded cheddar cheese
- 1 cup shredded Monterey Jack cheese
- 1 medium red bell pepper, diced
- 1 medium jalapeño, sliced (optional)
- 1 cup corn kernels (fresh, frozen, or canned)
- 0.5 red onion, finely diced
- 1 can (15 ounces) black beans, drained and rinsed
- 1 cup sour cream
- 0.5 cup fresh cilantro, chopped
- 0.25 cup lime juice (about 2 limes)
- 2 tablespoons taco seasoning
- 1 tablespoon olive oil
- 0.5 teaspoon salt
- 0.25 teaspoon black pepper
- 1 cup salsa (mild or spicy, according to preference)
- 0.5 avocado per serving (optional, for garnish)
- Fresh lime wedges for serving
Preparation and Cooking Instructions
Cooking the Chicken
First, preheat your oven to 375°F and place a baking sheet inside to heat. Meanwhile, pat your chicken breasts dry with paper towels and season both sides with salt and black pepper. Next, heat the olive oil in a large skillet over medium-high heat until it shimmers.
Once the oil is hot, carefully place the chicken breasts in the skillet and cook for approximately six to seven minutes per side until the internal temperature reaches 165°F on an instant-read thermometer. However, don’t worry if they’re not completely cooked through at this point, as they’ll continue cooking while you assemble the nachos. Additionally, the goal is to achieve a light golden color on the exterior rather than a deep brown crust.
Transfer the partially cooked chicken to a plate and let it rest for three to four minutes. Next, once it’s cool enough to handle, shred the chicken using two forks or your hands, pulling it apart into bite-sized pieces. Afterward, place the shredded chicken in a bowl and toss it with the taco seasoning, mixing until every piece is evenly coated with the flavorful spice blend.
Preparing Your Toppings
While the chicken cooks, prepare all your additional toppings so they’re ready when you need them. First, dice your red bell pepper into small, uniform pieces for even distribution across the nachos. Next, slice your jalapeño if you’re using it, removing the seeds if you prefer less heat. Additionally, finely dice your red onion to ensure it distributes evenly without overwhelming any single bite.
In a small bowl, combine your sour cream with the lime juice and a pinch of salt, stirring until smooth and well combined. This creates a cooling, tangy sauce that balances the savory and spicy elements of the nachos beautifully. Meanwhile, gather your black beans, corn, salsa, and cilantro in separate small bowls or containers for easy access during assembly.
Building Your Nacho Masterpiece
Remove your heated baking sheet from the oven carefully. Next, spread a single layer of tortilla chips across the entire surface, creating an even foundation. Afterward, scatter approximately one-third of your shredded chicken across the chips, distributing it as evenly as possible to ensure every bite includes some protein.
Sprinkle one-third of your mixed cheeses over the chicken and chips. Meanwhile, add a portion of your black beans, corn, diced bell pepper, and jalapeño slices across the surface. As a result, you’re building layers of flavor and texture that will make every chip delicious.
Return the baking sheet to the oven and bake for eight to ten minutes until the cheese melts completely and the chips warm through. However, watch carefully during the final minutes to prevent the chips from burning, which can happen quickly at this temperature.
Adding Final Touches
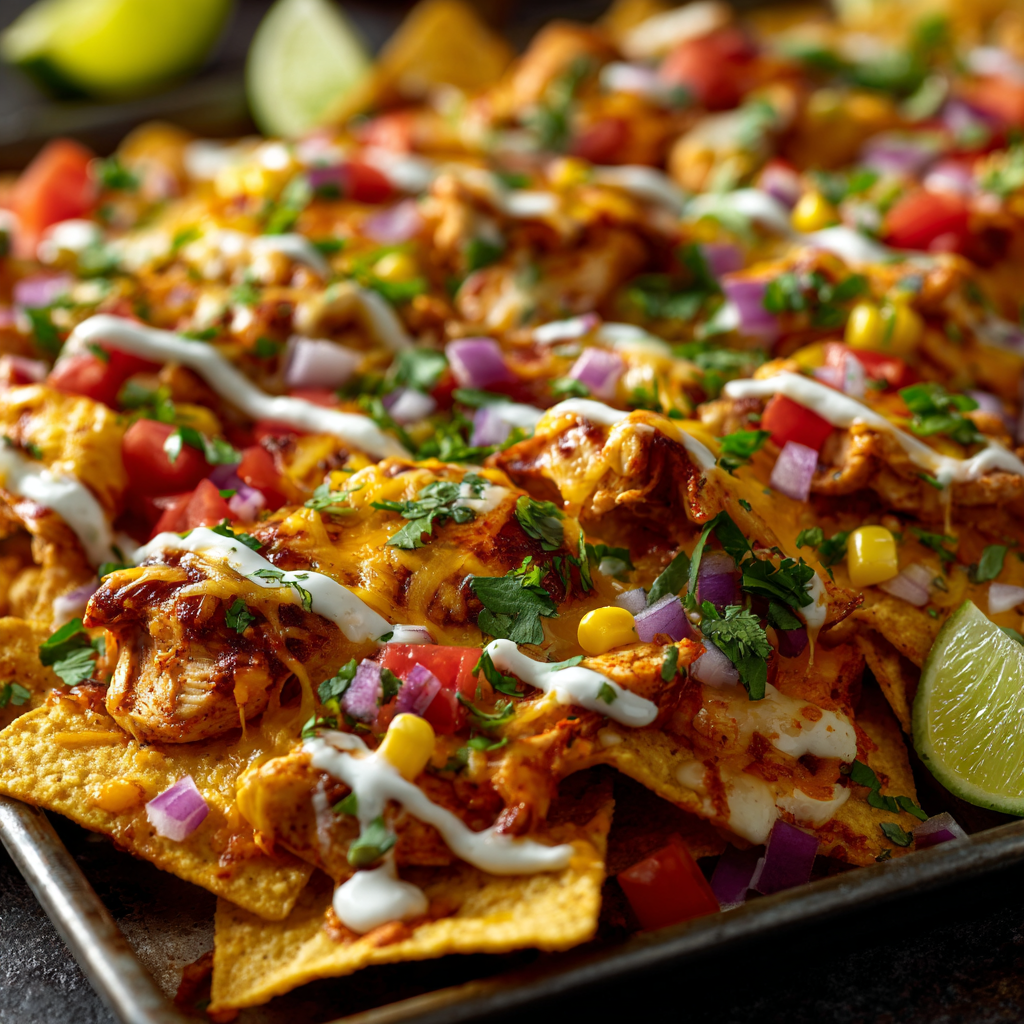
Remove the baking sheet from the oven and let the nachos rest for one minute. Next, drizzle the lime-sour cream mixture generously over the top, creating pools of coolness throughout the dish. Additionally, add spoonfuls of your salsa in various spots, creating visual appeal and flavor variation.
Finish with fresh cilantro scattered across the entire surface and a sprinkle of diced red onion for crunch and color. Furthermore, if you’re using avocado, slice it thinly and arrange it on top just before serving to prevent browning. Serve immediately with lime wedges on the side for guests to squeeze over their nachos according to their preference.
Serving and Storing Tips
Serving Suggestions
Serve these chicken nachos immediately while the cheese is still melted and the chips retain their crispness. Next, present them on a large platter in the center of your gathering space, creating an inviting focal point for your guests. Additionally, arrange small plates and napkins nearby, as nachos are best enjoyed standing and mingling rather than sitting at a formal table.
For gameday entertaining, consider making multiple batches and serving them in waves throughout the game. Meanwhile, this approach ensures that late arrivals also experience warm, freshly baked nachos rather than a cold, soggy version. Furthermore, you can set up a nacho bar with toppings on the side, allowing guests to customize their portions according to their preferences and dietary restrictions.
These nachos pair beautifully with cold beverages, whether that’s your favorite beer, refreshing limeade, or a classic margarita. Additionally, they work equally well as a main course for casual dinners or as an appetizer for more formal entertaining.
Storage Tips
Unlike many dishes, nachos are best consumed immediately after assembly and baking. However, if you have leftovers, transfer them to an airtight container and refrigerate for up to two days, though the chips will soften over time. When you’re ready to enjoy the leftovers, spread them on a baking sheet and warm in a 350°F oven for five to seven minutes until the cheese melts again and the chips crisp up slightly.
You can prepare the chicken and toppings separately up to one day in advance, storing each in its own airtight container in the refrigerator. Next, when you’re ready to serve, simply assemble the nachos as described and bake them fresh. Additionally, the lime-sour cream mixture keeps well for three to four days in the refrigerator and actually tastes better as the flavors meld together over time.
For the best results, avoid refrigerating assembled but unbaked nachos, as the chips will absorb moisture from the toppings and become soggy. Instead, assemble and bake them immediately before serving for maximum crispness and texture.
Helpful Notes and Tips
Ingredient Substitutions and Variations
If you prefer ground beef to chicken, simply brown one and one-half pounds of ground beef in a skillet over medium-high heat, breaking it apart as it cooks. Next, drain any excess fat and season with the same taco seasoning. Additionally, pulled pork, shredded turkey, or even black beans and tofu work beautifully for vegetarian versions.
For cheese variations, experiment with pepper jack for additional heat, smoked gouda for depth of flavor, or a combination of cheeses for complexity. Meanwhile, if you need a dairy-free option, use your favorite plant-based cheese alternative, though you may need to adjust the baking time slightly.
The toppings are infinitely customizable based on what you have available and your guests’ preferences. Next, consider adding sliced black olives, diced tomatoes, fresh pineapple for a Hawaiian twist, crispy bacon bits, or caramelized onions. Additionally, if you enjoy heat, add a drizzle of hot sauce or a sprinkle of cayenne pepper to the chicken before baking.
Common Mistakes to Avoid
One frequent error is overcrowding the baking sheet with too many chips and toppings at once. When layers are too thick, the bottom chips don’t warm through properly and become soggy while the top remains crunchy. Instead, make multiple smaller batches that are easier to control and ensure even cooking throughout.
Additionally, avoid using stale or thin chips that break easily under the weight of the toppings. Choose sturdy, thick tortilla chips that can support the ingredients without crumbling. Furthermore, keep your baking sheet preheated so the chips warm immediately upon contact, creating that desirable crispy texture.
Another common mistake involves adding the sour cream and guacamole too far in advance before serving. As a result, they’ll slide off the hot chips and create a mess. Instead, add these cool toppings just before serving, preserving both their texture and their visual appeal.
Time-Saving Tips
Prepare all your toppings and cook your chicken earlier in the day, storing each component separately in the refrigerator. Next, when your guests arrive, simply assemble and bake, which takes only about fifteen minutes total from start to table.
Additionally, if you’re in an extreme time crunch, use a rotisserie chicken from your grocery store instead of cooking chicken from scratch. Meanwhile, this simple substitution cuts your prep time in half without sacrificing flavor or quality.
For even faster assembly, pre-measure your cheese and other toppings into small bowls before your guests arrive. As a result, you’ll work quickly and efficiently without stopping to chop or measure anything during the crucial serving moment.
Chef Tips for Success
First, the secret to evenly melted cheese lies in using a combination of cheeses with different melting points rather than relying on just one type. The cheddar provides sharp flavor while the Monterey Jack melts smoothly, creating a beautiful, creamy texture that distributes evenly.
Additionally, for restaurant-style presentation, assemble your nachos on an oven-safe platter or skillet rather than a flat baking sheet. This creates depth and allows cheese to pool in the crevices, creating pockets of melted goodness throughout the dish. Furthermore, warming your serving platter in the oven alongside the nachos keeps everything hot longer after you remove it from the heat.
Frequently Asked Questions
Can I make these nachos without meat for a vegetarian version? Absolutely! Simply omit the chicken and increase your black beans to two cans, or add seasoned tofu, extra corn, roasted vegetables, or mushrooms for heartiness and protein.
How far in advance can I prepare the ingredients for these nachos? You can cook the chicken, chop vegetables, and prepare sauces up to one day ahead, storing each component separately in the refrigerator and assembling just before baking.
What’s the best way to prevent the chips from getting soggy? Use a preheated baking sheet, assemble the nachos just before baking, don’t overload with wet toppings, and add the sour cream and avocado only after removing from the oven.
Can I make these nachos in a cast iron skillet instead of a baking sheet? Yes, a cast iron skillet works beautifully for nachos and creates an attractive presentation that can go directly from oven to table, keeping everything warm longer.
How do I adjust the recipe if I’m serving fewer people? Simply halve all the ingredients and use a smaller baking sheet or oven-safe platter, reducing the baking time to five to seven minutes depending on the thickness of your topping layers.
Final Thoughts
These gameday easy chicken nachos represent the perfect balance between impressive and effortless, making them an ideal choice for entertaining without spending hours in the kitchen. Next, the combination of tender chicken, melted cheese, fresh toppings, and that satisfying crunch of tortilla chips creates an experience that keeps guests reaching for more. Furthermore, the versatility of this recipe means you can adapt it endlessly to match your preferences, dietary needs, and what you have on hand.
The next time you’re hosting a gathering, whether it’s for the big game, a casual party, or simply a weeknight dinner with family, remember that these nachos deliver everything you need: flavor, satisfaction, and the kind of simplicity that lets you enjoy time with the people you love. Additionally, your guests will appreciate both the delicious food and the fact that you weren’t stressed out preparing it.
So gather your ingredients, fire up your oven, and prepare to become the hero of your next event with a generous platter of these irresistible, loaded, and genuinely easy chicken nachos.
Did you love this recipe? If Gameday Easy Chicken Nachos has become your go-to crowd-pleaser, please save this recipe, pin it to your Pinterest board, and share it with friends and family who would love it! Your support helps us continue creating delicious, easy recipes that bring people together. Thank you for cooking with us!