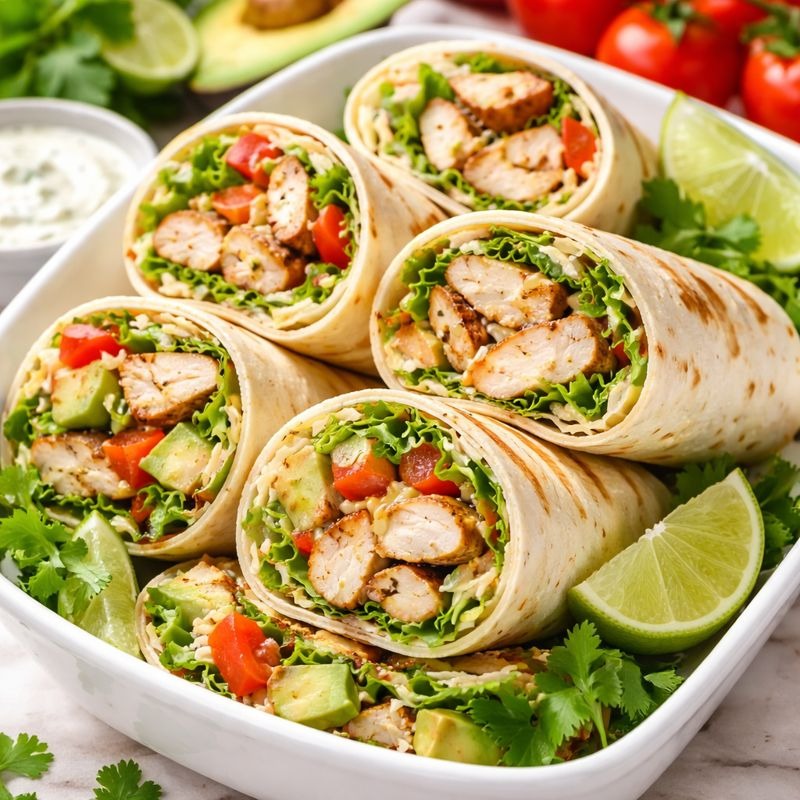
There’s something wonderfully satisfying about biting into a perfectly constructed wrap filled with juicy grilled chicken and fresh, vibrant vegetables. These handheld delights offer the convenience of quick, portable eating without compromising on flavor or nutrition. Whether you’re packing lunch for work, preparing a meal for your family, or hosting a casual gathering, grilled chicken wraps deliver impressive results with minimal fuss. The smoky, charred exterior of grilled chicken contrasts beautifully with cool, crisp vegetables and creamy spreads, creating a textural masterpiece in every bite. What makes this recipe truly special is how customizable it becomes; everyone can choose their favorite fillings and condiments while the grilled chicken remains the star of the show. Unlike heavy, cooked-all-day meals, these wraps come together in under twenty-five minutes from grill to plate. Best of all, the entire process feels approachable and manageable, even for cooks who rarely venture near a grill, making this an ideal choice for busy weeknights or weekend entertaining.
Ingredients
This recipe makes 4 wraps.
- 1.5 pounds boneless, skinless chicken breasts
- 3 tablespoons olive oil
- 2 tablespoons balsamic vinegar
- 2 cloves garlic, minced
- 1 tablespoon fresh lemon juice
- 1 teaspoon dried Italian herbs
- 1/2 teaspoon salt
- 1/4 teaspoon black pepper
- 4 large flour tortillas or spinach wraps (10-inch)
- 1/2 cup hummus or Greek yogurt
- 2 cups fresh spinach or mixed greens
- 1 large tomato, sliced
- 1 cucumber, thinly sliced
- 1/2 red onion, thinly sliced
- 1 bell pepper (red or yellow), sliced
- 1 cup shredded mozzarella or feta cheese
- 1/4 cup fresh basil leaves
- 1/4 cup roasted red peppers (jarred or homemade)
- 2 tablespoons sun-dried tomato pesto (optional)
- Lemon wedges for serving
Step-by-Step Instructions
Preparing the Chicken for Grilling
- Begin by patting your chicken breasts dry with paper towels, removing excess moisture that prevents proper browning.
- Place each chicken breast between two pieces of plastic wrap and gently pound to an even thickness of about three-quarters of an inch.
- Combine olive oil, balsamic vinegar, minced garlic, lemon juice, dried Italian herbs, salt, and black pepper in a small bowl.
- Whisk the marinade together until well blended, creating an aromatic mixture that will infuse the chicken with incredible flavor.
- Transfer the chicken breasts to a shallow dish and pour the marinade over them, ensuring each piece becomes thoroughly coated.
- Cover the dish with plastic wrap and refrigerate for at least fifteen minutes, though thirty minutes yields even deeper flavor development.
Grilling the Chicken
- Preheat your grill to medium-high heat, cleaning the grates thoroughly with a grill brush to prevent sticking.
- Lightly oil the grill grates using a paper towel dipped in oil, creating a non-stick surface for the chicken.
- Remove the chicken from the marinade and place it directly on the preheated grill, reserving the remaining marinade for basting.
- Allow the chicken to cook undisturbed for about five to six minutes, developing those beautiful grill marks on the first side.
- Flip the chicken carefully and cook for an additional five to six minutes on the second side until fully cooked through.
- Use a meat thermometer to verify doneness; the internal temperature should reach 165 degrees Fahrenheit at the thickest part.
- During the final minute of cooking, baste the chicken lightly with the reserved marinade for extra flavor and shine.
- Transfer the grilled chicken to a clean cutting board and allow it to rest for five minutes before slicing.
- Slice the rested chicken against the grain into strips about half an inch thick, making it easier to roll into wraps.
Preparing Your Toppings and Components
- While the chicken grills and rests, arrange all your fresh vegetables in separate bowls for easy assembly.
- Wash and dry the spinach or mixed greens thoroughly, removing excess moisture that could make the wraps soggy.
- Slice the tomato, cucumber, and bell peppers into thin, even pieces that fit comfortably within the wrap.
- Thinly slice the red onion and separate the layers slightly so they distribute evenly throughout each wrap.
- Gently tear the fresh basil leaves by hand rather than cutting them, preserving their delicate flavor and appearance.
- Have your hummus or Greek yogurt spread ready, along with the sun-dried tomato pesto if using it.
- Lay out all your ingredients in an organized line so assembly becomes quick and efficient.
Assembling Your Wraps
- Warm the tortillas lightly by placing them directly over a gas flame for a few seconds or wrapping them in foil and warming in a warm oven.
- Place the first tortilla on a clean work surface and spread a thin layer of hummus or Greek yogurt across the center, leaving about an inch of space around the edges.
- Layer a handful of fresh spinach or mixed greens next, creating a bed that holds all your other fillings.
- Arrange a quarter of the sliced grilled chicken down the center of the tortilla, dividing it equally among all four wraps.
- Add sliced tomato, cucumber, bell pepper, and red onion in layers, distributing them as evenly as possible.
- Sprinkle a quarter of the shredded cheese over the vegetables, providing creamy richness that binds everything together.
- Top with roasted red peppers and several fresh basil leaves for additional flavor and a pop of color.
- If using sun-dried tomato pesto, drizzle a small amount over the filling for concentrated tomato intensity.
- Fold the bottom edge of the tortilla up and over the filling, then fold the sides in toward the center.
- Roll the wrap tightly away from you, keeping tension on the tortilla so nothing shifts as you roll.
- Cut the finished wrap diagonally to make it easier to eat and more visually appealing on the plate.
Serving and Storing Tips
Serving Suggestions

These grilled chicken wraps shine brightest when served immediately while the chicken remains warm and the fresh vegetables stay crisp. Serve alongside a simple side salad dressed with a light vinaigrette for a more complete meal. Pair with fresh fruit like berries, melon, or grapes for a refreshing, balanced lunch that satisfies throughout the day. A cold beverage like iced tea, lemonade, or sparkling water complements the flavors beautifully without overwhelming your palate. For entertaining, arrange prepared wraps on a platter with lime wedges and a small bowl of extra pesto or sauce on the side. Consider serving alongside hummus, guacamole, or a yogurt-based sauce so guests can add extra flavor if desired.
Storage and Reheating
Wrapped chicken keeps in the refrigerator for up to three days when stored in an airtight container or wrapped tightly in foil. For best results, store the grilled chicken separately from the assembled wraps; assemble them fresh just before eating to prevent sogginess. To reheat grilled chicken, warm it gently in a skillet over medium heat for one to two minutes, or microwave it for thirty to forty-five seconds wrapped loosely in a damp paper towel. Alternatively, serve the wraps cold straight from the refrigerator, as they taste delicious at any temperature. If you’ve made extra grilled chicken, it keeps refrigerated for three to four days and works wonderfully in salads, sandwiches, or grain bowls throughout the week.
Helpful Notes
First, the marinading step isn’t optional if you want maximum flavor; even just fifteen minutes makes a noticeable difference in the chicken’s taste and tenderness. Additionally, if you don’t have a grill available, a grill pan on the stovetop works beautifully and creates similar charred results. However, if using a grill pan, cook over medium-high heat for the same amount of time, adjusting based on your specific stove’s heat distribution. Feel free to substitute the flour tortillas with whole wheat wraps, spinach wraps, tomato wraps, or even large lettuce leaves for a lower-carb option. Meanwhile, the cheese choice dramatically affects the wrap’s flavor profile; feta provides tanginess while mozzarella offers milder creaminess, so choose based on your preferences. A common mistake involves making the wraps too full, which causes them to burst when rolling or fall apart when eating. Aim for a single layer of each ingredient rather than piling everything high. As a result, you’ll achieve wraps that hold together beautifully while still being generously filled. Another helpful tip involves warming your tortillas before assembly; cold tortillas crack more easily and don’t seal as effectively. Additionally, if you’re preparing these ahead for lunch, wrap them individually in parchment paper or foil, which keeps them fresh and makes them portable. For meal prep, prepare containers with the grilled chicken and fresh ingredients separated, then assemble the wraps just before eating to prevent sogginess.
Chef Tips
The secret to restaurant-quality grilled chicken lies in proper resting after cooking; this allows the juices to redistribute throughout the meat, ensuring incredibly tender, juicy results rather than dry, stringy chicken.
Additionally, always slice the chicken against the grain, which breaks down the muscle fibers and creates pieces that feel tender and melt in your mouth rather than tough and chewy.

Frequently Asked Questions
Can I prepare grilled chicken wraps ahead of time? Absolutely! Grill the chicken and prepare your fillings the day before, then assemble the wraps just before eating to prevent them from becoming soggy and losing texture.
What’s the best cheese to use in these wraps? Feta cheese adds a tangy, Mediterranean flavor, while fresh mozzarella provides creaminess and mildness. Goat cheese offers tanginess and sophistication; choose based on your flavor preferences.
Can I cook the chicken on a stovetop instead of grilling? Yes, a grill pan on medium-high heat works wonderfully and creates similar charred marks. Alternatively, a regular skillet produces delicious chicken without visible grill marks.
How do I prevent the wraps from falling apart when eating? Secure them with toothpicks if serving at a party, or wrap them tightly in parchment paper for lunch boxes. Avoid overfilling, which is the most common cause of wraps coming apart.
Are these wraps suitable for meal prepping? Store the grilled chicken and fresh ingredients separately in containers, then assemble wraps fresh each morning or the night before eating. This prevents sogginess while maintaining flavor and freshness.
If you loved this recipe for Grilled Chicken Wraps, we’d be absolutely thrilled if you’d save it to your favorite recipe collection, pin it to your Pinterest board, or share it with a friend who needs an easy lunch solution. Your support helps us continue creating delicious, accessible recipes that bring joy to your kitchen and table! Please let us know in the comments below what you thought of these wraps or share any favorite filling combinations you’ve discovered. We can’t wait to hear how this recipe becomes a regular favorite in your home and meal prep rotation!