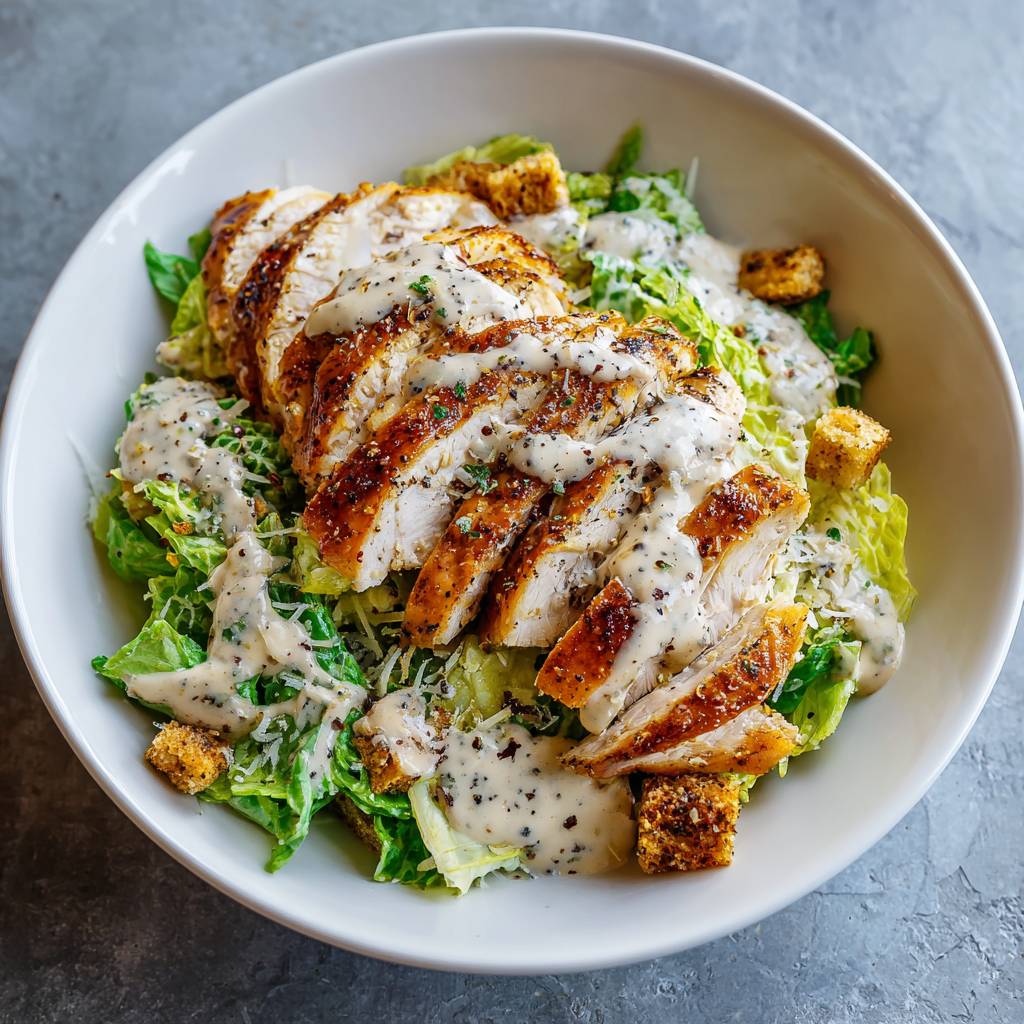
Imagine a satisfying, protein-packed bowl that brings together crispy roasted chicken, fresh romaine lettuce, and a creamy homemade Caesar dressing that tastes restaurant-quality. The Healthy Chicken Caesar Bowls transform a classic salad into something substantial enough for complete meals that nourish and energize you throughout the day. What makes this recipe truly special is how it delivers all the flavors you love about Caesar salad while incorporating whole grains, fresh vegetables, and lean protein into a balanced, filling bowl. First, the perfectly roasted chicken provides substantial protein that keeps you satisfied for hours. Additionally, the combination of crispy croutons, creamy dressing, and fresh greens creates textural and flavor complexity that makes eating healthy genuinely enjoyable. Whether you’re meal prepping for the week, looking for a lunch option that impresses colleagues, or seeking a complete dinner that satisfies both hunger and taste preferences, these Healthy Chicken Caesar Bowls deliver restaurant-quality nutrition that makes you feel absolutely amazing.
Ingredients
This recipe makes 4 generous chicken Caesar bowls, serving 4 people as a complete main course.
- 4 boneless, skinless chicken breasts (6 ounces each)
- 2 tablespoons olive oil
- 1 teaspoon garlic powder
- ½ teaspoon smoked paprika
- Salt and freshly ground black pepper to taste
- 2 cups cooked farro, quinoa, or brown rice
- 6 cups fresh romaine lettuce, chopped
- 1 cup cherry tomatoes, halved
- ½ cup cucumber, diced
- ¼ cup red onion, sliced thinly
- 2 cups whole grain croutons or homemade
- ¼ cup grated Parmesan cheese
- ½ cup plain Greek yogurt
- 3 tablespoons mayonnaise
- 2 tablespoons fresh lemon juice
- 1 tablespoon Worcestershire sauce
- 2 cloves fresh garlic, minced
- 1 teaspoon Dijon mustard
- 4 anchovy fillets, minced finely (optional but recommended)
- ¼ teaspoon salt
- ⅛ teaspoon freshly ground black pepper
- 2 tablespoons grated Parmesan cheese for dressing
- Water for thinning dressing
- Fresh parsley for garnish
- Lemon wedges for serving
- Extra Parmesan shavings for garnish
Step-by-Step Instructions
Preparing the Chicken
- Remove your chicken breasts from the refrigerator about 15 minutes before cooking to allow them to reach room temperature. This step ensures more even cooking throughout the meat and prevents the outside from overcooking while the inside remains undercooked.
- Pat the chicken breasts completely dry using paper towels, removing any excess moisture from the surface. Additionally, if the chicken breasts are particularly thick, gently pound them to approximately ¾ inch thickness for more consistent cooking.
- Season both sides of each chicken breast generously with salt, freshly ground black pepper, garlic powder, and smoked paprika. Make sure the seasonings are distributed evenly across the entire surface of each piece.
- Heat 2 tablespoons of olive oil in a large skillet over medium-high heat until the oil shimmers. Next, carefully place the seasoned chicken breasts in the hot skillet, making sure not to overcrowd the pan.
- Cook the chicken for 6 to 7 minutes on the first side without moving it around, allowing a golden crust to develop. However, if the chicken appears to be browning too quickly, reduce the heat slightly and continue cooking.
- Flip each chicken breast carefully and cook the other side for another 6 to 7 minutes until the meat is cooked through completely. The internal temperature should reach 165°F when measured with a meat thermometer in the thickest part.
- Transfer the cooked chicken to a clean cutting board and let it rest for 5 minutes before slicing. This resting period allows the juices to redistribute, keeping the chicken moist and flavorful.
- Slice each chicken breast into strips approximately ¼ inch thick. Next, set the sliced chicken aside in a convenient location until ready for bowl assembly.
Creating the Homemade Caesar Dressing
- In a small mixing bowl, combine the Greek yogurt, mayonnaise, fresh lemon juice, Worcestershire sauce, minced garlic, and Dijon mustard. Whisk these ingredients together thoroughly until smooth and well combined.
- Add the grated Parmesan cheese to the dressing mixture and stir well to incorporate. Additionally, add the minced anchovy fillets if using, stirring carefully to distribute them evenly throughout the dressing.
- Season the dressing with salt and freshly ground black pepper, tasting and adjusting seasonings according to your preference. Add more lemon juice for tanginess, more Worcestershire for depth, or more garlic for pungency.
- If the dressing is too thick, add water one tablespoon at a time until reaching desired consistency. The dressing should be pourable but thick enough to coat the lettuce and other ingredients.
- Transfer the finished dressing to an airtight glass container if preparing ahead, or keep it in a small bowl for immediate use. Additionally, if making ahead, store the dressing in the refrigerator for up to 5 days.
Preparing the Grains and Vegetables
- If you haven’t already prepared your farro, quinoa, or brown rice, cook according to package directions. Alternatively, if you prefer warmer grains, reheat pre-cooked grains gently in a saucepan over medium-low heat with a splash of water.
- Season the cooked grains lightly with salt and freshly ground black pepper, adding a drizzle of olive oil if desired. Additionally, add a squeeze of fresh lemon juice to create brightness and enhance the overall flavor profile.
- Chop your romaine lettuce into bite-sized pieces, removing any wilted or damaged outer leaves. Next, place the chopped lettuce in a large bowl, ensuring you have plenty of greens for all four bowls.
- Halve your cherry tomatoes and dice your cucumber finely, placing them in separate small bowls. Additionally, slice your red onion thinly and set aside. Having all vegetables prepared and organized makes bowl assembly quick and efficient.
Preparing the Croutons
- If using store-bought whole grain croutons, simply measure out the desired amount. However, if making homemade croutons, cut whole grain bread into cubes, toss with olive oil and Italian seasoning, then bake at 375°F for 8 to 10 minutes until golden and crispy.
- Homemade croutons provide superior flavor and texture compared to store-bought versions. Next, allow the croutons to cool completely before using, as this helps them maintain their crispness throughout storage and assembly.
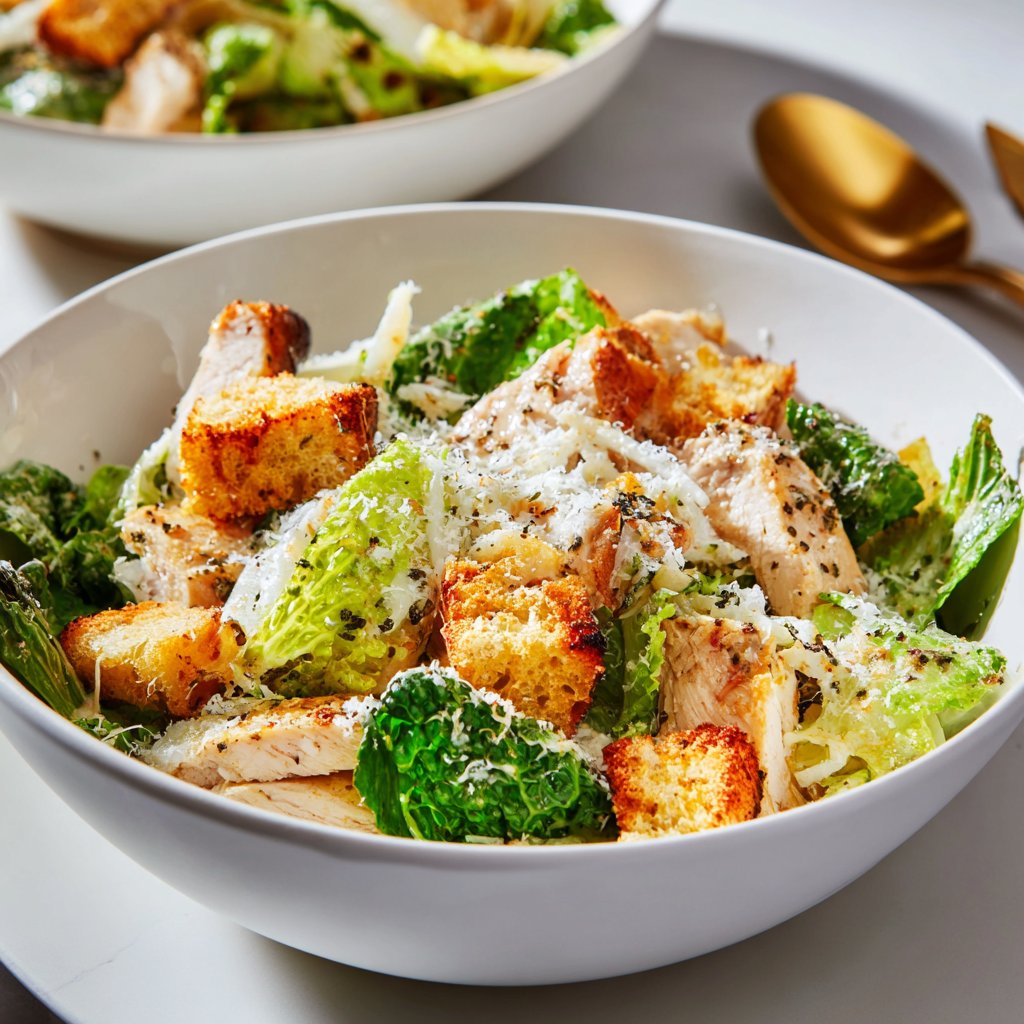
Assembling the Chicken Caesar Bowls
- Divide the cooked grains evenly among four bowls, creating a solid base layer. Next, arrange the chopped romaine lettuce on top of the grains or around the sides of each bowl.
- Top each bowl with sliced chicken breast, distributing the strips evenly across the salad greens. Additionally, ensure each bowl receives a generous portion of chicken for substantial, filling meals.
- Scatter the halved cherry tomatoes, diced cucumber, and sliced red onion across each bowl, distributing them evenly. Next, add the whole grain croutons, using approximately ½ cup per bowl for maximum crunch.
- Sprinkle grated Parmesan cheese over each bowl, using approximately 1 tablespoon per bowl. Additionally, add extra Parmesan shavings for visual appeal and additional richness.
- Drizzle each bowl generously with the homemade Caesar dressing, creating beautiful patterns across the top. Alternatively, provide extra dressing on the side for those who prefer additional sauce.
- Garnish each bowl with fresh parsley and a lemon wedge for brightness and visual appeal. Serve immediately while the chicken is still warm and the greens remain crisp.
Serving and Storage Tips
Serving Suggestions
The Healthy Chicken Caesar Bowls work beautifully as a complete lunch or dinner that requires no additional sides. Serve each bowl individually for elegant, restaurant-quality presentation. Additionally, you can arrange all components on a large serving platter, allowing guests to assemble their own bowls according to personal preferences and dietary needs.
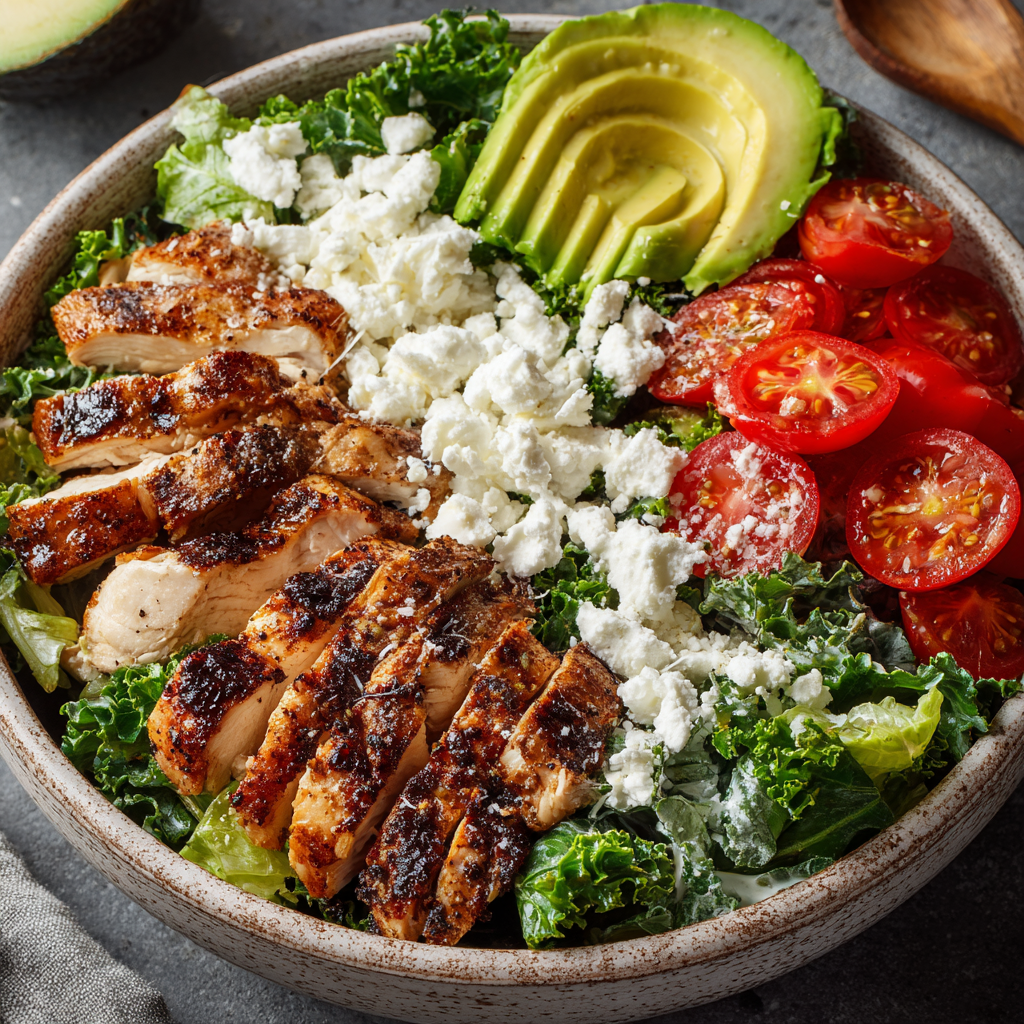
Next, consider offering additional toppings like sliced avocado, hard-boiled eggs, or crispy bacon bits on the side for customization. Furthermore, you can serve these bowls with warm flatbread or crusty whole grain bread for those who want additional carbohydrates. For a lighter version, you can reduce the grains and focus on the protein and vegetables.
These bowls work exceptionally well for meal prep, allowing you to prepare components in advance and assemble fresh as needed throughout the week. Additionally, serve these bowls at casual gatherings where guests appreciate substantial, nutritious options that don’t require heavy cooking. For office lunches, pack the components in separate containers and assemble just before eating to maintain optimal texture.
These bowls pair beautifully with sparkling water with lemon, iced tea, or fresh lemonade for refreshing beverages. Additionally, they work wonderfully alongside a simple side salad or fresh fruit for additional nutrition and variety. For entertaining, you can set up a Caesar bowl assembly bar where guests customize their bowls with preferred toppings and dressing amounts.
Proper Storage and Keeping
Store the Healthy Chicken Caesar Bowl components in separate airtight containers in the refrigerator for up to 4 days. This approach preserves vegetable texture and chicken quality while allowing you to assemble fresh bowls as needed throughout the week. Additionally, store the homemade Caesar dressing separately in an airtight glass container for up to 5 days.
The cooked chicken can be stored in one container and the grains in another for flexible meal assembly. Additionally, keep the greens, vegetables, and croutons separate to maintain their individual textures and flavors. Store croutons in an airtight container at room temperature for up to 1 week to preserve their crispness.
These components don’t freeze well due to the water content in vegetables and greens, so refrigeration provides the best storage method. However, you can freeze the cooked chicken in separate portions for up to 2 months if desired, then thaw and use in fresh bowls. To reheat chicken, warm it gently in a skillet over medium-low heat or in a microwave for 1 to 2 minutes.
Helpful Notes and Tips
This recipe is wonderfully adaptable to your personal preferences and dietary needs. However, if you prefer fish-free dressing, simply omit the anchovy fillets—the dressing remains delicious and authentically flavored. For those seeking additional vegetables, add roasted broccoli, roasted Brussels sprouts, or shredded carrots for extra nutrition and crunch.
Next, you can adjust the grain component based on preference and nutritional goals. Using additional quinoa or lentils increases protein content, while brown rice provides heartier texture. Additionally, you can substitute the homemade dressing with store-bought versions if short on time, though homemade consistently outperforms commercial options.
One common mistake involves cooking the chicken at too high temperature, which results in dry, overcooked meat. Therefore, maintain medium-high heat and watch carefully to prevent overcooking. Additionally, failing to let the chicken rest after cooking affects moisture retention, so don’t skip this important step.
Another mistake involves adding the dressing too far in advance of eating, which can make greens soggy. Therefore, drizzle dressing just before serving or provide it on the side for optimal texture maintenance. Furthermore, not chopping the lettuce into bite-sized pieces makes these bowls difficult to eat, so take time for proper preparation.
Chef’s Professional Tips
First, using fresh-caught quality chicken from a trusted source ensures superior flavor and texture compared to mass-produced varieties. Next, making your own Caesar dressing from scratch using quality ingredients delivers authenticity that cannot be replicated by store-bought versions, making the effort absolutely worthwhile.
Frequently Asked Questions
Can I make these bowls vegetarian? Yes, simply omit the chicken and add additional grains, legumes, or roasted vegetables—the bowls remain absolutely delicious and nutritionally complete.
How far in advance can I prepare these bowls? Prepare all components separately up to 24 hours ahead, then assemble with dressing just before serving to maintain optimal texture and freshness.
What if I don’t have anchovy fillets? Simply omit them—the dressing remains flavorful and authentic, though anchovies add traditional depth that Caesar enthusiasts particularly appreciate.
Can I make these bowls without grains? Absolutely—use additional vegetables or legumes as your base instead of grains for a grain-free, lower-carb option that remains equally satisfying.
Is this bowl suitable for specific diets? Yes, when made vegetarian without chicken, this bowl works beautifully for Mediterranean, gluten-free, and various other dietary preferences and restrictions.
Why These Bowls Become Your New Favorite
The Healthy Chicken Caesar Bowls represent the perfect intersection of classic comfort food and genuine nutrition that home cooks seek. The combination of crispy-edged chicken, fresh greens, and creamy homemade dressing creates meals that satisfy completely while supporting your wellness goals. Additionally, the abundance of fresh ingredients and homemade components create sensory excitement that makes eating nutritious food genuinely enjoyable.
Furthermore, this recipe proves that healthy meals don’t require sacrifice or complicated preparation. The simple process of roasting chicken and combining fresh components transforms into something visually stunning and deeply satisfying. Next, the customizable nature of these bowls allows everyone to create their perfect combination based on personal preferences and dietary needs.
These bowls work equally well for dedicated health enthusiasts, busy professionals needing quick lunches, or anyone seeking meals that nourish without weighing you down. Whether you’re meal prepping for the week, hosting a casual gathering, or simply craving something fresh and energizing, these Healthy Chicken Caesar Bowls deliver every single time. The reliability of this recipe combined with its exceptional nutritional profile makes it a permanent addition to your regular rotation.
The beauty of this dish lies in how it celebrates classic Caesar salad flavors while delivering complete nutrition through thoughtful ingredient combinations. First-time cooks achieve impressive, nutritionally complete meals while experienced home chefs appreciate the flexibility to customize with preferred ingredients. Additionally, the homemade Caesar dressing from scratch elevates this bowl beyond ordinary salads, creating something restaurant-quality that impresses everyone.
These bowls remain delicious at various temperatures, though they’re most spectacular when served with warm chicken contrasting cool, crisp greens for textural excitement. The fresh lemon juice and anchovy-enhanced dressing bring all components together beautifully, creating harmony between different flavors and temperatures. However, room-temperature bowls work wonderfully for portable lunches and outdoor eating occasions.
Did you love this recipe? Save it to your favorite recipe app, pin it to your Pinterest board, and share it with your friends and family who would absolutely adore these Healthy Chicken Caesar Bowls! Your feedback and shares encourage us to keep creating more delicious recipes for your table. We can’t wait to hear how your chicken Caesar bowls turn out—leave us a comment and let us know what you thought!