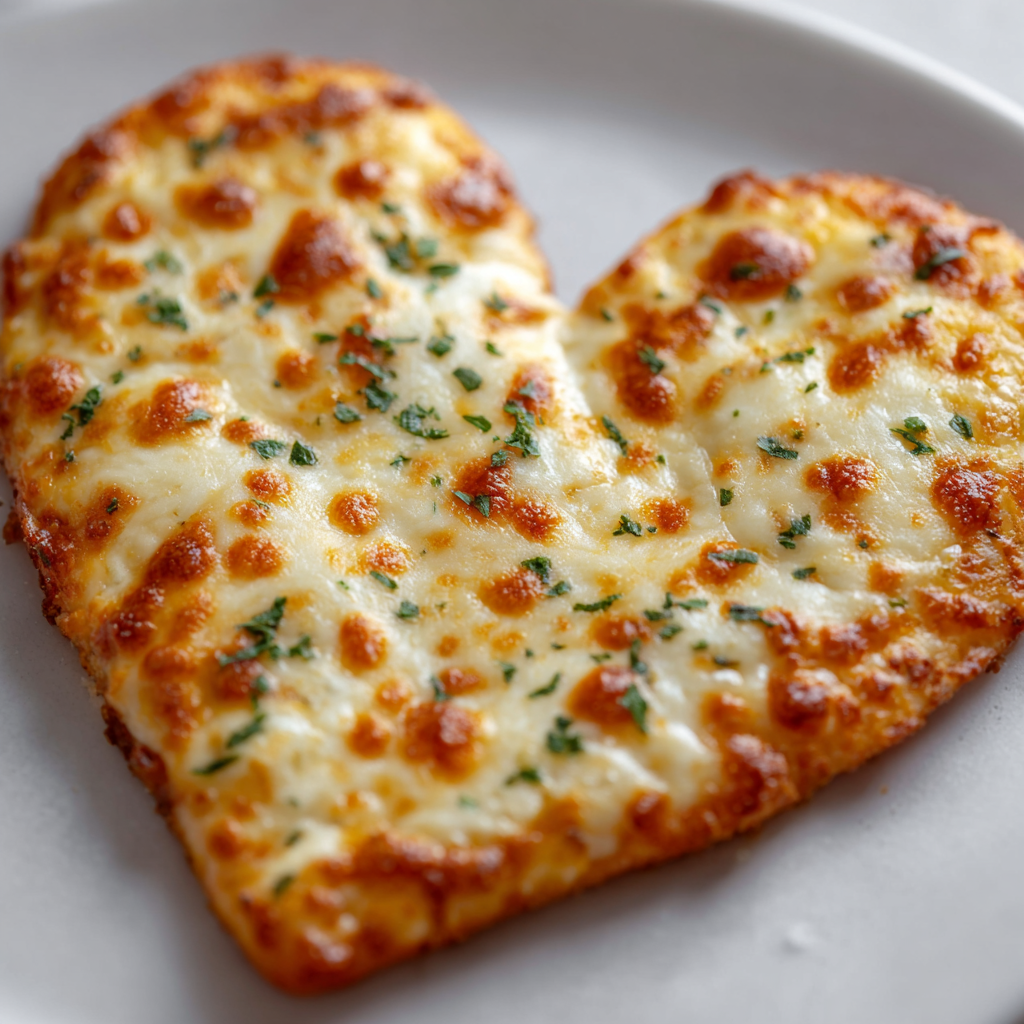
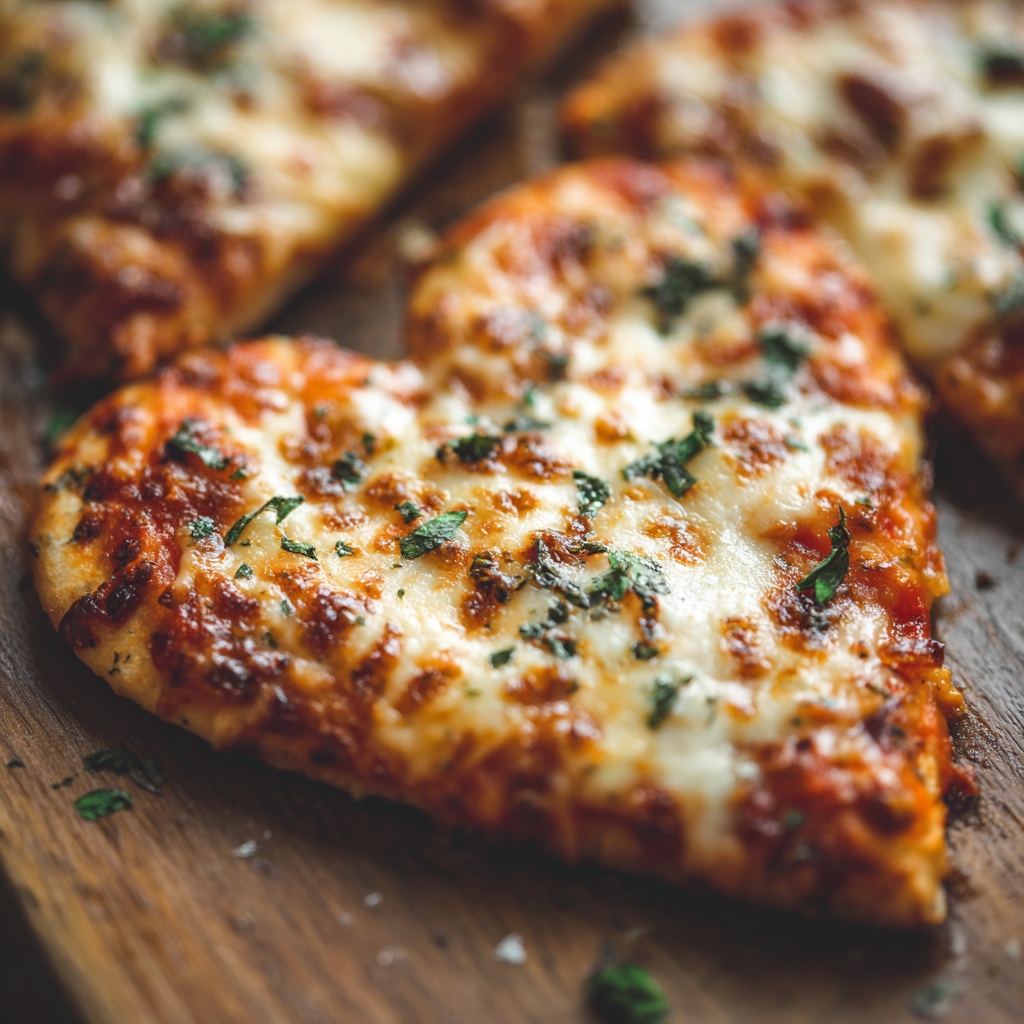
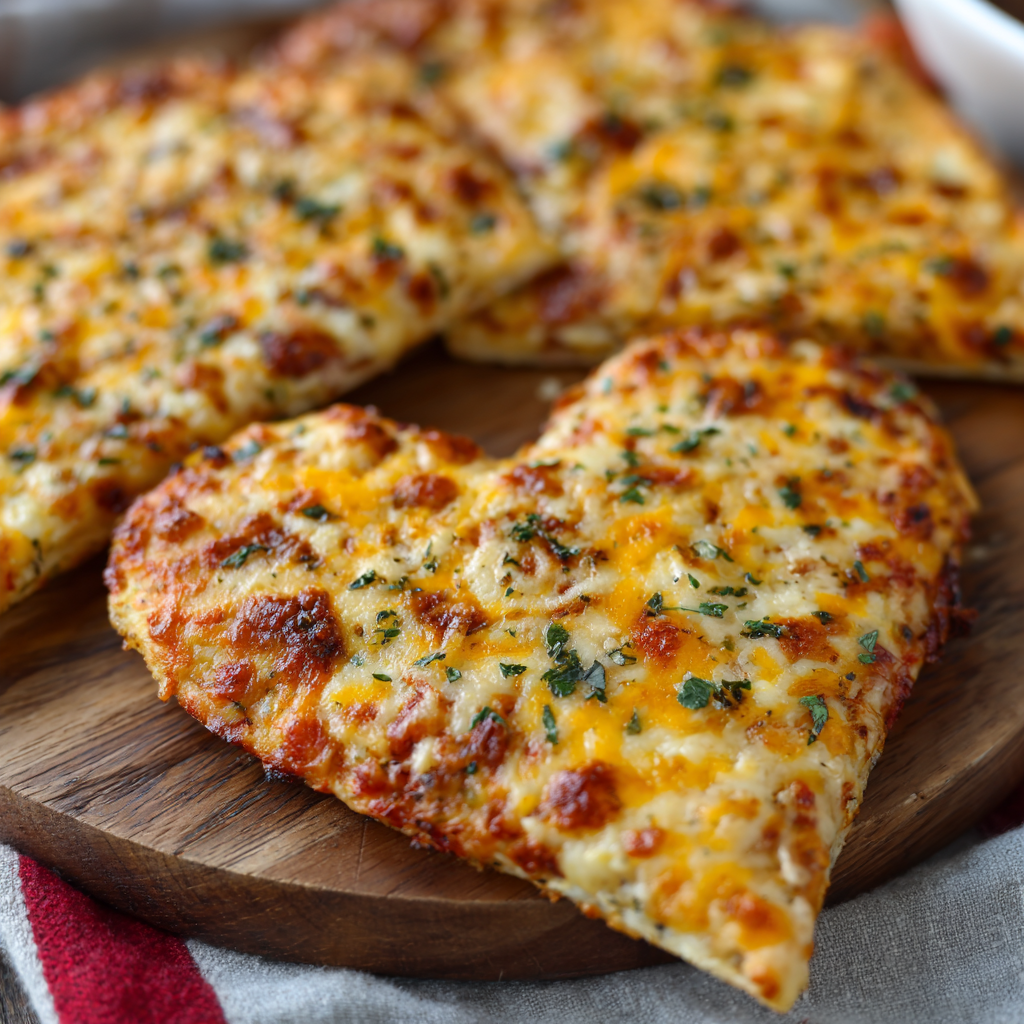
Pizza night takes on an entirely new meaning when you shape your dough into a perfect heart and top it with bubbling, melted cheese that stretches in those irresistible strands that make pizza so utterly craveable. This Heart Shaped Cheese Pizza Recipe combines homemade dough that’s light, airy, and wonderfully flavorful with the simplicity of quality mozzarella cheese, creating a dish that looks absolutely stunning while remaining refreshingly unpretentious and delicious. What makes this recipe so special is how it celebrates the beauty of simplicity—there are no complicated techniques, no overwhelming ingredient lists, and no need for any special equipment beyond what most home cooks already possess. Whether you’re planning a romantic Valentine’s dinner, hosting a casual gathering with friends, or treating your family to something fun and memorable, a heart shaped pizza delivers the perfect combination of playful charm and genuine deliciousness. The homemade dough rises beautifully, the cheese melts into golden, bubbly perfection, and the finished pizza looks like you spent hours planning and preparing when really, the entire process takes less time than you might expect. Your guests will be absolutely delighted by the thoughtful presentation and impressed by the homemade quality that shines through in every single bite. This is pizza perfection with heart, quite literally.
Ingredients
This recipe makes one large heart shaped pizza, serving 4 to 6 people.
For the Pizza Dough:
- 3 cups all-purpose flour
- 1 packet instant dry yeast (2¼ teaspoons)
- 1 teaspoon salt
- 1 tablespoon granulated sugar
- 1 tablespoon olive oil, plus extra for the pan
- 1 cup warm water (between 105°F and 110°F)
For the Pizza Toppings:
- 2 tablespoons olive oil
- 1 teaspoon garlic powder
- ½ teaspoon dried oregano
- ¼ teaspoon salt
- ¼ teaspoon black pepper
- 3 cups shredded mozzarella cheese (approximately 12 ounces)
- ½ cup grated Parmesan cheese (optional but recommended)
- Fresh basil leaves for garnish (optional)
Instructions
Prepare the Pizza Dough
- Combine the warm water and instant dry yeast in a large mixing bowl, stirring gently and allowing the mixture to sit for about 2 minutes until the yeast begins to activate and becomes foamy on top.
- Add the olive oil, flour, salt, and sugar to the yeast mixture, stirring with a wooden spoon until a shaggy dough begins to form and no dry flour remains visible in the bowl.
- Transfer the dough to a clean, lightly floured work surface and knead it for 8 to 10 minutes with your hands, working it until it becomes smooth, elastic, and springs back slightly when you poke it with your finger.
- Clean your mixing bowl and coat it lightly with olive oil, then place the kneaded dough into the bowl and turn it over to coat all sides with the oil.
- Cover the bowl with a clean kitchen towel and place it in a warm, draft-free location for 1 to 1½ hours until the dough has doubled in size and is puffy and light.
Prepare Your Pan and Shape the Dough
- Preheat your oven to 425°F and coat a large baking sheet or pizza pan generously with olive oil, ensuring the entire surface is covered so the dough doesn’t stick during cooking.
- Once the dough has risen, gently remove it from the bowl and place it on a lightly floured surface, then press down gently to release some of the air bubbles that have formed during rising.
- Next, shape the dough into a rough circle first by gently pressing and stretching it outward with your hands, working from the center toward the edges to create an even thickness.
- To form the heart shape, fold the circle in half and carefully shape the rounded end into two lobes for the top of the heart, creating the classic romantic silhouette.
- Alternatively, you can create a heart shape by making two circles of dough slightly overlapping at the top, then bringing the bottom point down to complete the heart outline.
- Transfer the shaped dough to the prepared baking sheet, then gently stretch and adjust it until you have an even thickness throughout of about ½ to ¾ inch.
Add the Olive Oil and Seasonings
- Combine the 2 tablespoons of olive oil with the garlic powder, dried oregano, salt, and black pepper in a small bowl, stirring until the seasonings are evenly distributed throughout the oil.
- Using a pastry brush or your fingertips, spread this seasoned olive oil evenly across the entire surface of the dough, ensuring it’s well coated from edge to edge.
- Pay special attention to the crust edges, as they develop beautiful flavor when brushed with the herb-infused oil and will brown more evenly and attractively during baking.
Add the Cheese
- Sprinkle the shredded mozzarella cheese evenly across the entire pizza surface, distributing it generously so there are no large bare patches and every bite includes melted cheese.
- Create deeper pockets of cheese by gently pressing some of the shreds down into the dough slightly, which helps anchor them and ensures they stay in place during the baking process.
- If using Parmesan cheese, sprinkle it evenly over the top as a finishing layer, which will create additional golden color and add a sharp, complex flavor that complements the milder mozzarella.
Bake to Perfect Doneness
- Place the loaded pizza into the preheated 425°F oven and bake for 15 to 18 minutes until the cheese is melted, bubbly, and spotted with golden brown color that indicates proper caramelization.
- Watch carefully during the final few minutes of baking, as oven temperatures vary—the pizza is perfectly done when the crust is golden brown on the bottom and the cheese has achieved that beautiful bubbling appearance.
- Remove the pizza from the oven using a large spatula or pizza peel, being careful to avoid any steam that rises from the hot cheese.
Finish with Fresh Elements
- Allow the pizza to cool for 2 to 3 minutes on the baking sheet before transferring it to a cutting board, which lets the cheese set slightly so it doesn’t slide off when you cut into it.
- Tear fresh basil leaves and scatter them artfully across the top of the warm pizza if desired, allowing the heat to gently wilt the basil and release its aromatic oils.
- Cut the heart shaped pizza into slices using a sharp knife or pizza cutter, serving it warm while the cheese is still perfectly melted and stretchy.
Serving and Storing Tips
How to Serve This Romantic Pizza
Present your beautiful heart shaped pizza directly from the oven while it’s still warm and the cheese is in that perfect melted state, as this is when the pizza achieves its absolute best flavor and texture. First, arrange it on a beautiful serving platter or cutting board to showcase the romantic shape that makes this dish so special. Additionally, set out napkins because melted cheese and fresh basil create that wonderfully indulgent eating experience that might cause a few drips. Meanwhile, you might consider serving this pizza with simple sides like a fresh green salad tossed with a light vinaigrette, roasted vegetables, or garlic bread for a complete meal. For extra enjoyment, provide small bowls of fresh marinara sauce, garlic oil, or hot pepper flakes on the side, allowing guests to customize their experience according to personal preferences. Furthermore, if you’re serving this for Valentine’s Day or a romantic dinner, consider pairing it with your favorite beverage, whether that’s wine, sparkling cider, craft soda, or freshly brewed coffee for dessert.
Storage Instructions for Leftover Pizza
Keep leftover pizza slices in an airtight container in the refrigerator for up to 4 days, though they’re most delicious when enjoyed within the first day or two of baking. To reheat, place slices on a baking sheet and warm them in a 350°F oven for 8 to 10 minutes until the cheese is melted again and the crust has regained some of its crispness. Alternatively, you can reheat individual slices in a skillet over medium heat for about 2 minutes per side, which creates a wonderfully crispy exterior while keeping the center warm and cheesy. For longer storage, wrap individual pizza slices tightly in plastic wrap and aluminum foil, then freeze them for up to 3 months in a freezer-safe container. To thaw frozen pizza, move it to the refrigerator overnight, then reheat it using your preferred method for fresh-tasting results.
Helpful Notes and Pro Tips
Tips for Pizza Success
Start by checking your water temperature with a kitchen thermometer before mixing it with the yeast, as water that’s too hot will kill the yeast and prevent rising, while water that’s too cold will slow the process significantly. Additionally, if your kitchen is cool, place the covered dough on top of your refrigerator or in an oven with just the light turned on for gentle, consistent warmth that encourages perfect rising. The key to achieving a crispy crust is ensuring your baking sheet or pizza pan is properly oiled and preheated if possible, which helps the bottom develop that satisfying crunch. Furthermore, don’t be afraid to get creative with the heart shape—homemade pizza is forgiving, and a slightly imperfect heart shape still looks charming and delicious. When stretching the dough, work gently from the center outward to create even thickness throughout, and allow the dough to rest for a few minutes if it becomes too elastic and springs back.
Ingredient Substitutions and Variations
If you don’t have instant yeast available, you can use active dry yeast in the same quantity, though the rising time might take slightly longer—typically an additional 15 to 30 minutes. In contrast, if you prefer a quicker pizza, you can use rapid-rise yeast and reduce the rising time by about 30 minutes. For those with gluten sensitivities, whole wheat flour or a gluten-free flour blend can substitute for all-purpose flour, though you may need to add slightly more water to achieve the proper dough consistency. You could also use a store-bought pizza dough to dramatically reduce preparation time while still creating an impressive heart shaped pizza that tastes homemade. Meanwhile, if you’d like to add vegetables, consider topping the cheese with fresh tomato slices, roasted red peppers, caramelized onions, or fresh arugula added after baking for color and freshness. Alternatively, those who enjoy more robust flavors might add crumbled sausage, crispy bacon, fresh mushrooms, or olives before baking for additional layers of deliciousness.
Cheese and Topping Variations
Beyond simple mozzarella cheese, you can create completely different pizzas by experimenting with cheese combinations like mozzarella mixed with fontina for nutty depth, or mozzarella with smoked gouda for complexity. Additionally, a three-cheese blend combining mozzarella, Parmesan, and feta creates an interesting contrast of flavors that appeals to adventurous palates. Fresh burrata cheese torn over the warm pizza just after baking creates luxury and indulgence that guests will absolutely love. Meanwhile, a white sauce made from ricotta and garlic can replace the olive oil base for a completely different flavor profile. You could also experiment with flavored oils infused with roasted garlic, hot peppers, or fresh herbs before spreading them across the dough for personalized variations.
Chef Tips
Professional pizzerias always stretch dough by holding it at the edges and allowing gravity to help extend it, which creates even thickness more easily than pressing with your hands alone. Additionally, using a combination of mozzarella and Parmesan cheese creates more complex flavor and better browning than mozzarella alone, as Parmesan’s lower moisture content helps achieve that beautiful golden color on top.
Frequently Asked Questions
Can I prepare the pizza dough ahead of time and refrigerate it before shaping and baking? Yes, after the first rise, you can punch down the dough, place it in an oiled container, cover it, and refrigerate it for up to 24 hours—simply allow it to come to room temperature before shaping and baking.
What if I don’t have a pizza pan and want to bake this on a regular baking sheet? A regular baking sheet works perfectly—just ensure it’s well-oiled and preheat it if possible, which helps the bottom crust become crispy and golden brown.
How do I prevent the dough from springing back when I try to stretch it into the heart shape? Allow the dough to rest for 5 to 10 minutes after initial shaping to relax the gluten, then gently stretch it again to your desired size and thickness.
Can I use fresh mozzarella instead of shredded mozzarella for this pizza? Fresh mozzarella releases a lot of water during baking, which can make the pizza soggy, so traditional shredded mozzarella works better, though you can add torn fresh mozzarella after baking for a luxurious touch.
How do I know if my yeast is still active before using it for the dough? When you mix yeast with warm water and a pinch of sugar, it should become foamy and bubbly within 5 to 10 minutes; if it doesn’t foam, the yeast is dead and you’ll need to start with fresh yeast.
Conclusion
Heart Shaped Cheese Pizza represents the perfect combination of culinary simplicity and romantic thoughtfulness that creates a meal absolutely bursting with charm and deliciousness. This pizza celebrates the beauty of homemade dough, quality cheese, and the straightforward pleasure of food made with care and intention. Whether you’re planning a special Valentine’s Day dinner, hosting a casual gathering where you want to impress without spending hours cooking, or simply treating yourself to something beautiful and delicious, this recipe delivers on every level. The homemade dough develops wonderful flavor during rising, the cheese melts into golden, bubbly perfection, and the heart shape adds that special touch that transforms ordinary pizza into something memorable and romantic. From the moment you begin stretching the dough into its distinctive shape to that first bite of crispy crust and melted cheese, every aspect of making this pizza becomes an enjoyable experience rather than a chore. The straightforward instructions and forgiving nature of pizza dough mean that even inexperienced home cooks can create something that looks professionally made and tastes absolutely incredible. Most importantly, the thoughtfulness of creating something heart shaped reminds everyone who shares this meal exactly how much they matter to you. This is more than just pizza—it’s an expression of love, creativity, and genuine care served warm and fresh.
Did you absolutely love making this Heart Shaped Cheese Pizza as much as we loved creating this recipe for you? We’d genuinely adore hearing about your pizza night experience! Please save this recipe to your favorites, pin it to your Pinterest board, and share it with friends and family who deserve a special, romantic pizza experience. Your shares, comments, and feedback inspire us to keep developing delicious recipes that bring joy and celebration to your kitchen and table. Don’t forget to tag us on social media if you make this beautiful pizza—we can’t wait to see your gorgeous heart shaped creations and hear how much your loved ones enjoyed this thoughtful homemade meal!