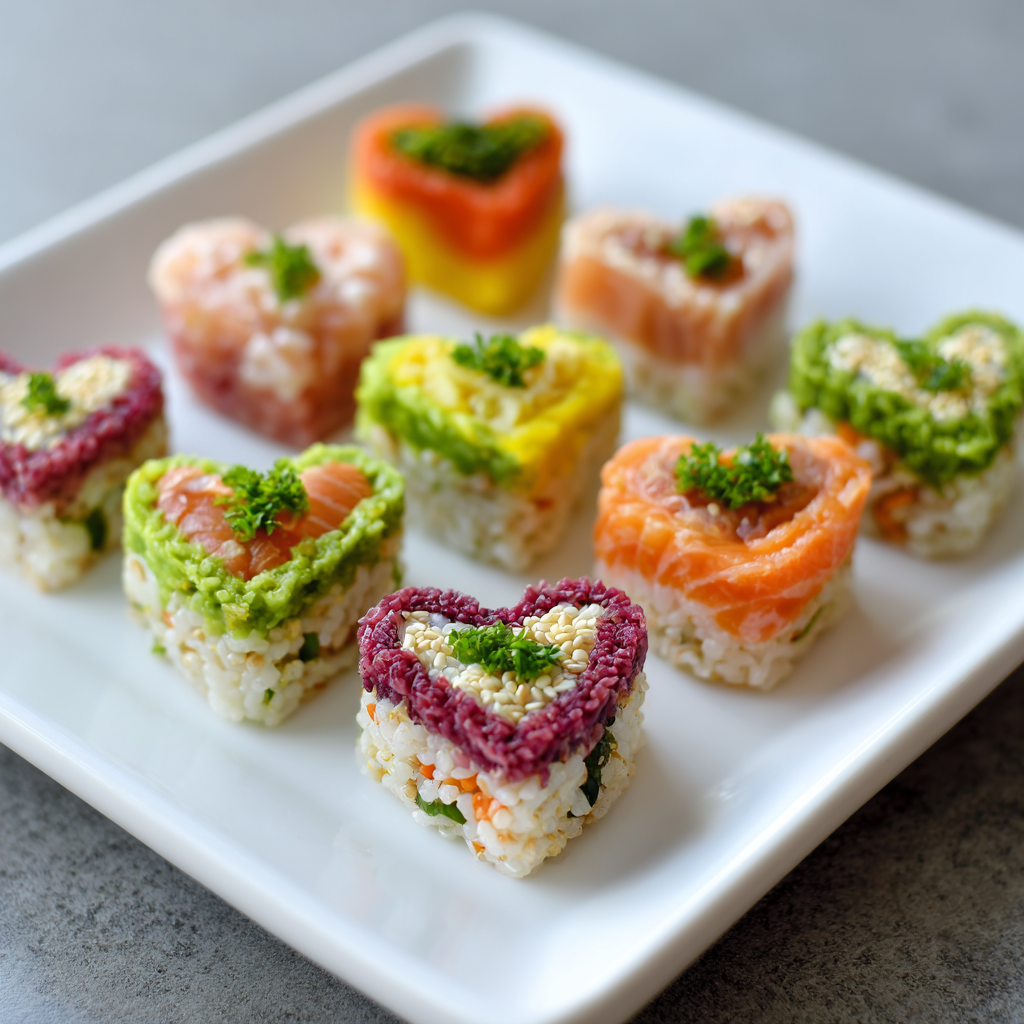
Creating something beautiful and delicious with your own hands is one of the most meaningful ways to express love, and these Heart Shaped Sushi Bites Recipe deliver an innovative twist on traditional sushi that’s absolutely stunning while remaining genuinely impressive and surprisingly achievable for home cooks of all skill levels. These adorable little morsels combine seasoned sushi rice with fresh, high-quality ingredients like succulent salmon, creamy avocado, and crisp cucumber wrapped in nori, then carefully shaped into perfect hearts that make sushi feel playful, romantic, and completely special. What makes this recipe truly unique is how it transforms the familiar art of sushi making into something that looks like a work of art while tasting absolutely incredible with every single bite. Whether you’re preparing these for a Valentine’s Day celebration, hosting an elegant dinner party, or surprising someone you love with something thoughtful and beautiful, these heart shaped sushi bites deliver a combination of sophistication, fun, and genuine culinary delight. The process of shaping and creating something so beautiful becomes a meditative, joyful experience that feels just as meaningful as sharing the finished creation with people you care about. Your loved ones will be absolutely enchanted by the thoughtful presentation, impressed by your sushi-making skills, and utterly satisfied by the fresh, delicious flavors that shine through in every carefully crafted bite.
Ingredients
This recipe makes approximately 12 to 16 heart shaped sushi bites, serving 2 to 4 people.
For the Sushi Rice:
- 1 cup sushi rice (short-grain white rice specifically for sushi)
- 1 cup water
- 3 tablespoons rice vinegar
- 2 tablespoons sugar
- 1 teaspoon salt
- 1 tablespoon sesame seeds
- Nori sheets (seaweed), cut into strips
For the Sushi Fillings:
- 6 ounces sushi-grade salmon, thinly sliced
- 1 ripe avocado, thinly sliced
- 1 cucumber, cut into thin strips
- ¼ teaspoon wasabi (optional, for those who enjoy heat)
- 2 tablespoons cream cheese (optional)
- Fresh cilantro or parsley leaves (optional)
- Pickled ginger for serving
For Assembly and Serving:
- Soy sauce for dipping
- Extra wasabi for serving (optional)
- Edible flowers for garnish (optional)
- Bamboo sushi mat (optional but helpful)
- Plastic wrap
- Fresh mint leaves for decoration (optional)
Instructions
Prepare the Perfect Sushi Rice
- Rinse the sushi rice under cold running water in a fine-mesh strainer, rubbing it gently with your fingers for 30 to 60 seconds until the water runs almost clear, removing excess starch.
- Combine the rinsed rice and 1 cup of water in a medium saucepan, bringing it to a boil over medium-high heat without covering.
- Once the water boils, reduce the heat to low, cover the pan with a tight-fitting lid, and cook for 15 minutes until all the water is absorbed and the rice is tender.
- Remove the pan from heat and allow it to rest, still covered, for 10 minutes, which completes the cooking process and allows the grains to set properly.
- While the rice cooks, combine the rice vinegar, sugar, and salt in a small bowl, stirring until the sugar completely dissolves.
- Transfer the cooked rice to a large, shallow bowl and pour the vinegar mixture over it, gently folding the rice with a wooden spoon to distribute the seasoning evenly throughout.
- Sprinkle the sesame seeds over the seasoned rice and fold gently, continuing until the rice is cool enough to handle and has taken on a subtle sheen.
- Cover the rice with a damp cloth to keep it fresh while you prepare your ingredients, as this prevents it from drying out during assembly.
Prepare Your Ingredients
- Arrange your salmon slices on a clean plate, ensuring each piece is intact and ready for assembly without any tears or damage.
- Slice the ripe avocado in half lengthwise, remove the pit, and carefully slice the flesh into thin, uniform pieces that will layer beautifully in your sushi.
- Slice the cucumber into thin, long strips using a mandoline slicer or vegetable peeler, creating pieces that are long enough to wrap around your sushi bites.
- Have all your ingredients organized and within easy reach before you begin assembling, as this makes the process smoother and more enjoyable.
Create the Heart Shaped Molds
- Cut a piece of plastic wrap approximately 8 inches square, then fold it in half diagonally to create a triangle shape for molding.
- Place the folded plastic wrap on your work surface with the fold pointing downward, creating the pointed bottom of your future heart shape.
- Alternatively, you can purchase silicone heart-shaped molds specifically designed for sushi, which eliminates the need for plastic wrap folding and makes shaping much easier.
- If using the plastic wrap method, you’ll create the rounded top of the heart by gently pressing rice and fillings into the fold.
Assemble the Sushi Bites
- Take a small handful of seasoned sushi rice, approximately 2 tablespoons, and place it in the center of your heart mold or plastic wrap.
- Gently press the rice down with a damp spoon, creating an even layer that covers the bottom and sides of your mold without compacting it too much.
- Next, layer your chosen fillings on top of the rice—place a thin slice of salmon, followed by a slice of avocado and a cucumber strip.
- If desired, add a small amount of cream cheese or a tiny dab of wasabi for additional flavor and complexity.
- Cover the fillings with another thin layer of sushi rice, gently pressing it to seal everything together and create a cohesive shape.
- Fold the plastic wrap up and over your creation, pressing gently to mold it into a perfect heart shape with smooth edges and defined lobes at the top.
- Allow the molded sushi bite to sit in the refrigerator for 5 minutes so the rice sets slightly, making it easier to handle when unwrapping.
- Carefully unwrap the plastic and gently invert the sushi bite onto a plate, revealing your beautifully shaped heart with the fillings visible and perfectly arranged.
Finish with Decorative Touches
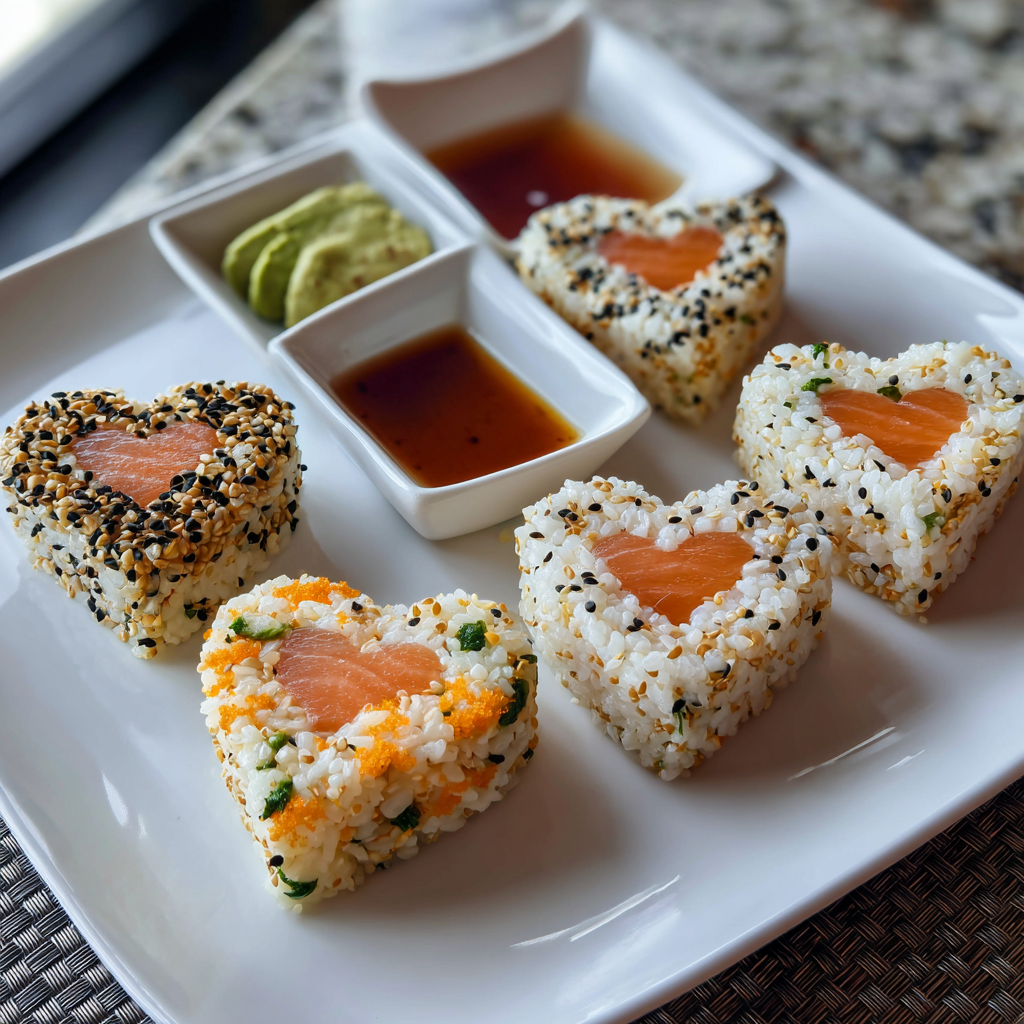
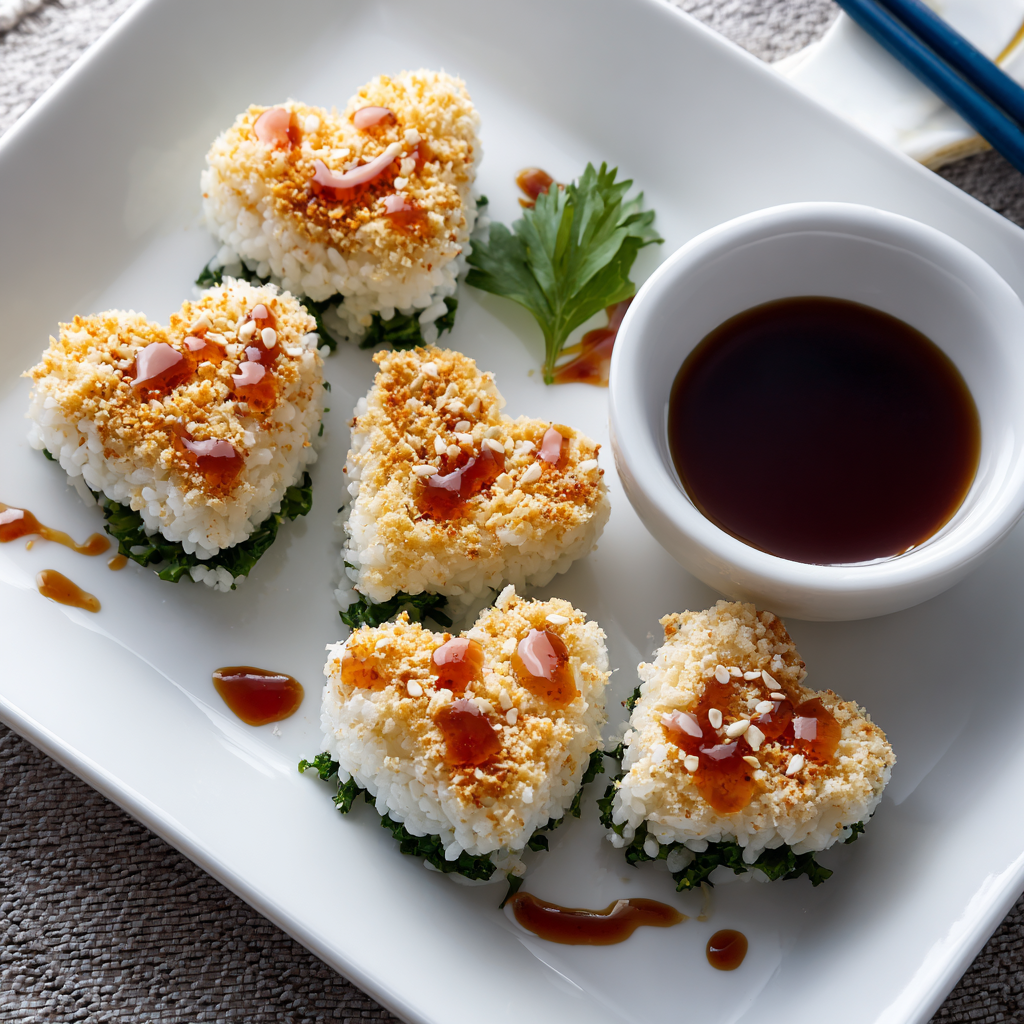
- If desired, cut thin strips of nori and wrap them delicately around each heart shaped sushi bite, creating a decorative band that holds everything together.
- For extra elegance, use a small amount of sesame seeds or edible glitter to accent the top of each heart, adding visual interest and sophistication.
- Arrange fresh cilantro leaves, mint leaves, or edible flowers on top of each sushi bite, creating a beautiful garnish that adds color and freshness.
- Place each finished heart shaped sushi bite on a serving platter lined with decorative paper or fresh lettuce leaves for an impressive presentation.
- Arrange the soy sauce, wasabi, and pickled ginger in small serving dishes alongside your sushi bites, allowing guests to customize their experience.
Serve and Enjoy
- Serve the heart shaped sushi bites chilled directly from the refrigerator, as they taste best when cold and the flavors are crisp and fresh.
- Encourage your guests to dip each bite lightly into soy sauce and enjoy it as a complete morsel rather than cutting it into smaller pieces.
Serving and Storing Tips
How to Serve These Elegant Sushi Bites
Present your beautiful heart shaped sushi bites on a beautiful serving platter or wooden sushi board that showcases the intricate shapes and colorful ingredients. First, arrange them in an aesthetically pleasing pattern that demonstrates the care and attention you invested in their creation. Additionally, provide small bowls of soy sauce, extra wasabi, and pickled ginger arranged strategically for easy dipping and customization. Meanwhile, consider serving alongside sake, white wine, or sparkling beverages that complement the fresh, delicate flavors beautifully. For romantic occasions, light candles and create an intimate atmosphere that celebrates the thoughtfulness of homemade sushi. Furthermore, add fresh flowers, edible flowers as garnish, or decorative elements that enhance the romantic presentation without overwhelming the elegant simplicity of the sushi itself.
Storage Instructions for Maximum Freshness
Keep the heart shaped sushi bites in an airtight container in the refrigerator for up to 1 day after making them, as they’re best enjoyed within a few hours while the rice remains perfectly textured and the fillings stay fresh and crisp. The nori wrapping will soften slightly over time, so serve them sooner rather than later for the ideal eating experience. These sushi bites are not recommended for freezing, as the rice becomes hard and unpleasant when frozen, and the delicate fillings don’t thaw well. If you need to make them ahead, you can prepare the sushi rice and cut all your ingredients the night before, then assemble the bites just a few hours before serving for maximum freshness. The sushi rice, when stored in an airtight container, keeps perfectly well in the refrigerator for up to 24 hours, making advance prep quite convenient.
Helpful Notes and Pro Tips
Tips for Perfect Sushi Rice
Start by using authentic sushi rice specifically labeled for sushi making, as regular white rice has too much moisture and won’t create the proper sticky texture needed for sushi. Additionally, the vinegar mixture is crucial—it adds flavor and helps preserve the rice while creating that characteristic sushi rice taste that you cannot replicate with regular cooked rice. Never skip the resting period after adding the vinegar, as this allows the flavors to distribute evenly throughout the rice and creates the perfect texture. Furthermore, always keep your rice covered with a damp cloth while working to prevent it from drying out, which would make shaping your hearts much more difficult. When working with the rice, use damp hands or damp utensils to prevent sticking, which makes the entire process smoother and more enjoyable.
Tips for Perfect Fillings and Assembly
Choose only the freshest, highest quality sushi-grade fish available from reputable sources, as this is crucial for both safety and flavor. Additionally, slice your fillings uniformly so they layer evenly and create a balanced bite with every piece. When layering fillings, less is often more—overstuffing will make your hearts too thick and difficult to shape properly. Meanwhile, allow each assembled heart to rest briefly in the refrigerator before serving, which helps everything set and makes handling easier. The key to beautiful presentation is taking your time with shaping and allowing the fillings to show through appealingly without being visible on the outside.
Ingredient Substitutions and Variations
If you prefer vegetarian sushi bites, you can create delicious hearts using only avocado, cucumber, and pickled vegetables, which are equally beautiful and satisfying. In contrast, for seafood lovers, you can use cooked shrimp, crab, or even scallops instead of salmon for completely different flavor profiles. You could also create a spicy version by adding sriracha-mayo mixed with a touch of wasabi to the rice layer before adding fillings. Meanwhile, experimenting with different vegetables like roasted asparagus, pickled radish, or sliced mango creates completely different seasonal variations. Alternatively, adding cream cheese creates a California roll variation that many people find irresistible and more approachable for sushi beginners.
Creative Decoration and Presentation Ideas
Beyond simple nori wrapping, you can create completely different presentations by using edible flowers as decorative elements that sit atop each heart. Additionally, sesame seeds in different colors—black, white, and red—can create ombré effects or decorative patterns. You could also drizzle a touch of spicy mayo or sriracha on top for visual interest and additional flavor. Meanwhile, arranging your hearts in a larger heart shape on the serving platter creates a romantic meta-presentation that shows extra thoughtfulness. You might also consider adding microgreens or fresh herbs between the hearts on the platter, creating a garden-like presentation that’s both beautiful and fresh.
Chef Tips
Professional sushi chefs always keep a small bowl of water nearby for dampening their hands and tools, as this prevents sticking and makes the entire process infinitely more pleasant and efficient. Additionally, using a bamboo sushi mat allows for more precise rolling and shaping, and the traditional tool creates a beautiful aesthetic that enhances the homemade quality of your creation.
Frequently Asked Questions
Do I need special equipment to make heart shaped sushi bites, or can I use household items? You can absolutely use plastic wrap folded into a heart shape, though purchasing inexpensive silicone heart-shaped molds specifically designed for sushi makes the process much easier and more consistent.
Can I make these sushi bites ahead of time for a Valentine’s Day celebration? You can prepare the components ahead, but it’s best to assemble the sushi bites just a few hours before serving to ensure the rice texture and filling freshness remain at their absolute best.
What if I can’t find sushi-grade salmon, and is it safe to use regular salmon instead? Sushi-grade salmon has been specially handled and frozen to eliminate parasites, while regular salmon has not—always use sushi-grade fish for raw preparations to ensure food safety.
How do I prevent the plastic wrap from sticking to the rice and making unwrapping difficult? Dampen the plastic wrap very lightly with water, or use silicone molds instead of plastic wrap, which prevents sticking and makes unmolding much easier.
Can I use brown rice or other whole grains instead of traditional sushi rice? Whole grain options won’t create the proper sticky texture sushi requires, so traditional sushi rice is essential for the correct result, though you can find brown sushi rice varieties at some specialty stores.
Conclusion
Heart Shaped Sushi Bites represent the perfect fusion of culinary artistry, romantic thoughtfulness, and fresh, delicious flavors that transforms traditional sushi into something playful, memorable, and absolutely special. This recipe proves that creating restaurant-quality presentations at home doesn’t require years of training or specialized expertise—it simply needs quality ingredients, patience, and genuine care. Whether you’re preparing these for Valentine’s Day, hosting an elegant dinner party, or surprising someone you love with something beautiful and thoughtful, these sushi bites deliver on every level. From the moment you begin shaping the first heart to the final presentation on a beautiful serving platter, every aspect of making these sushi bites becomes a meditation on care and love. The straightforward instructions mean that even inexperienced sushi makers can create something that looks professionally designed and tastes absolutely incredible without any stress or frustration. Most importantly, the time and attention you invest in creating these individual, artfully shaped bites shines through in every beautiful presentation and every delicious bite. This is more than just sushi—it’s an expression of love, creativity, and genuine affection served fresh and beautiful.
Did you absolutely love creating these Heart Shaped Sushi Bites as much as we loved sharing this recipe with you? We’d genuinely adore hearing about your sushi-making experience! Please save this recipe to your favorites, pin it to your Pinterest board, and share it with friends and family who deserve this beautiful, fresh, and absolutely thoughtful homemade sushi experience. Your shares, comments, and feedback inspire us to keep developing delicious recipes that bring joy and celebration to your kitchen and table. Don’t forget to tag us on social media if you make these stunning sushi bites—we can’t wait to see your gorgeous creations and hear how much your loved ones cherished this elegant, fresh, and absolutely romantic culinary creation!