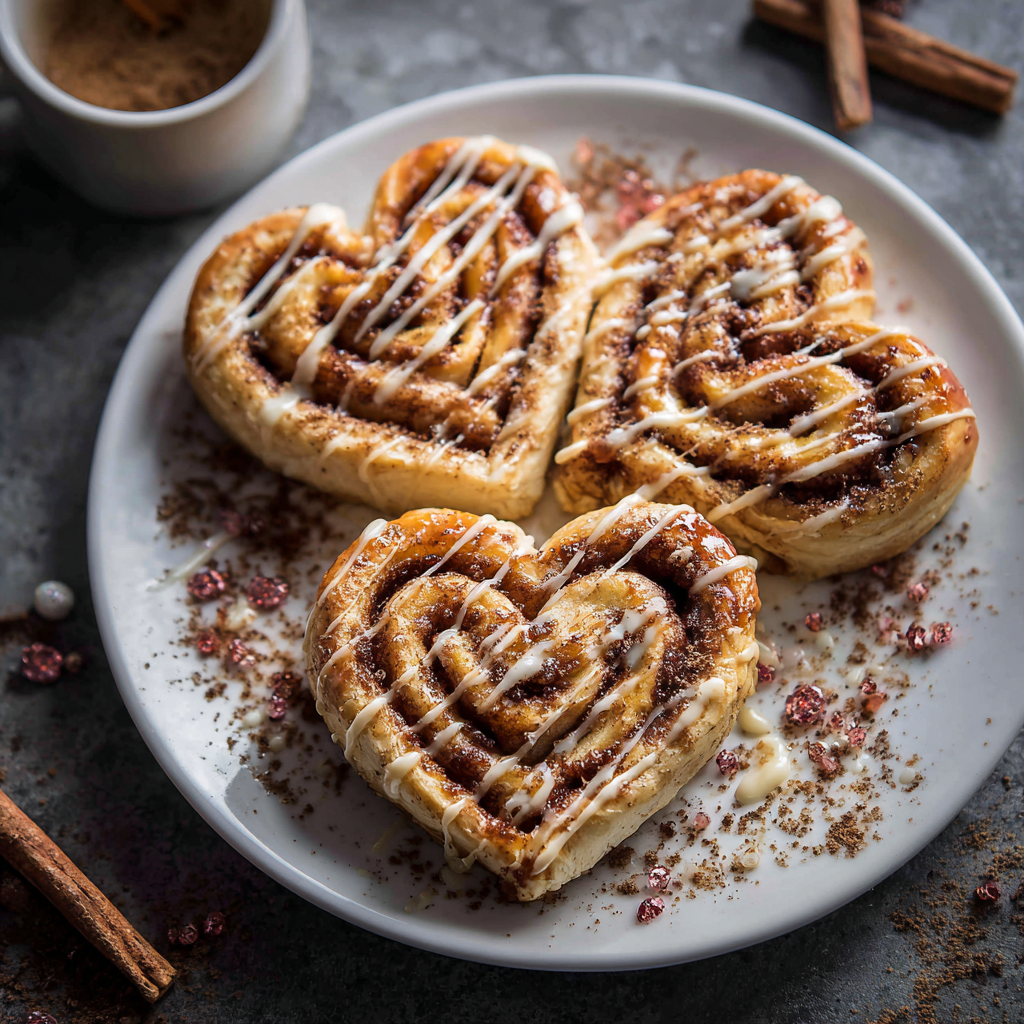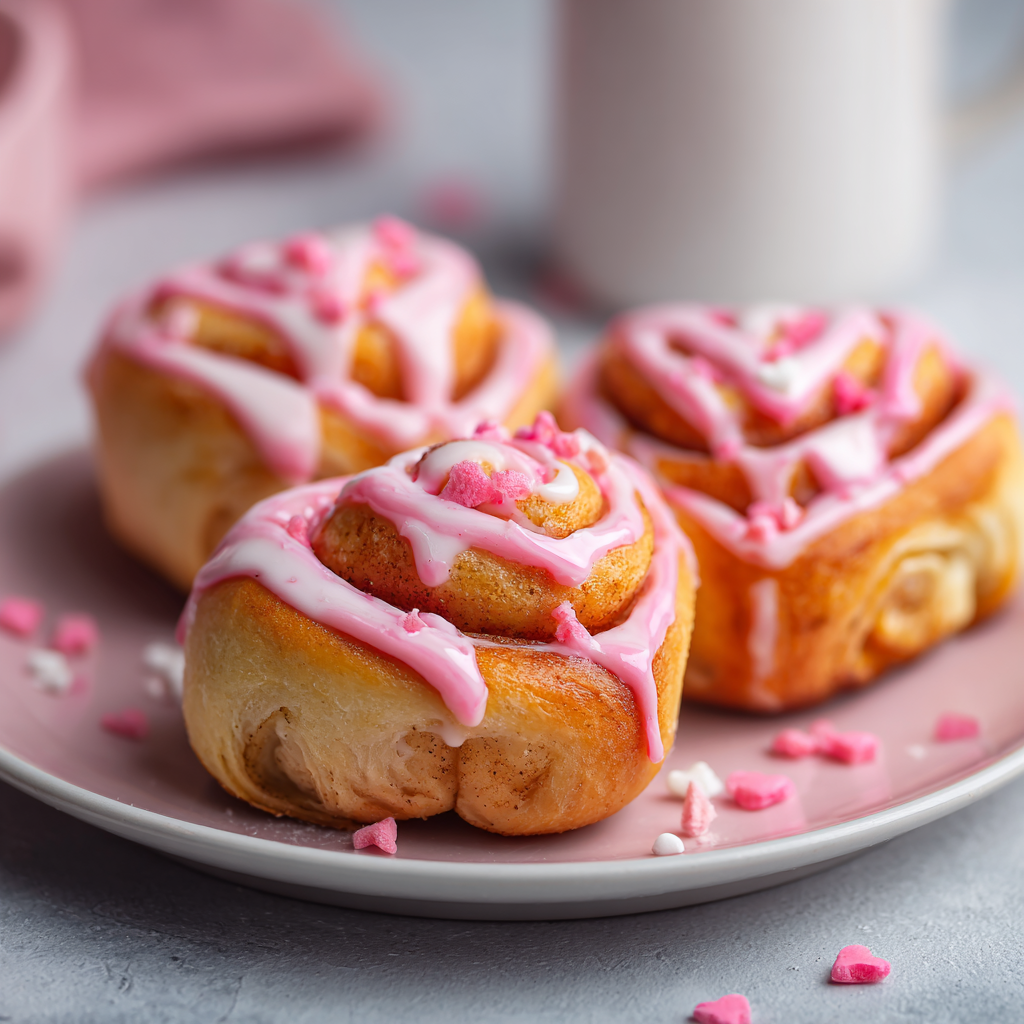
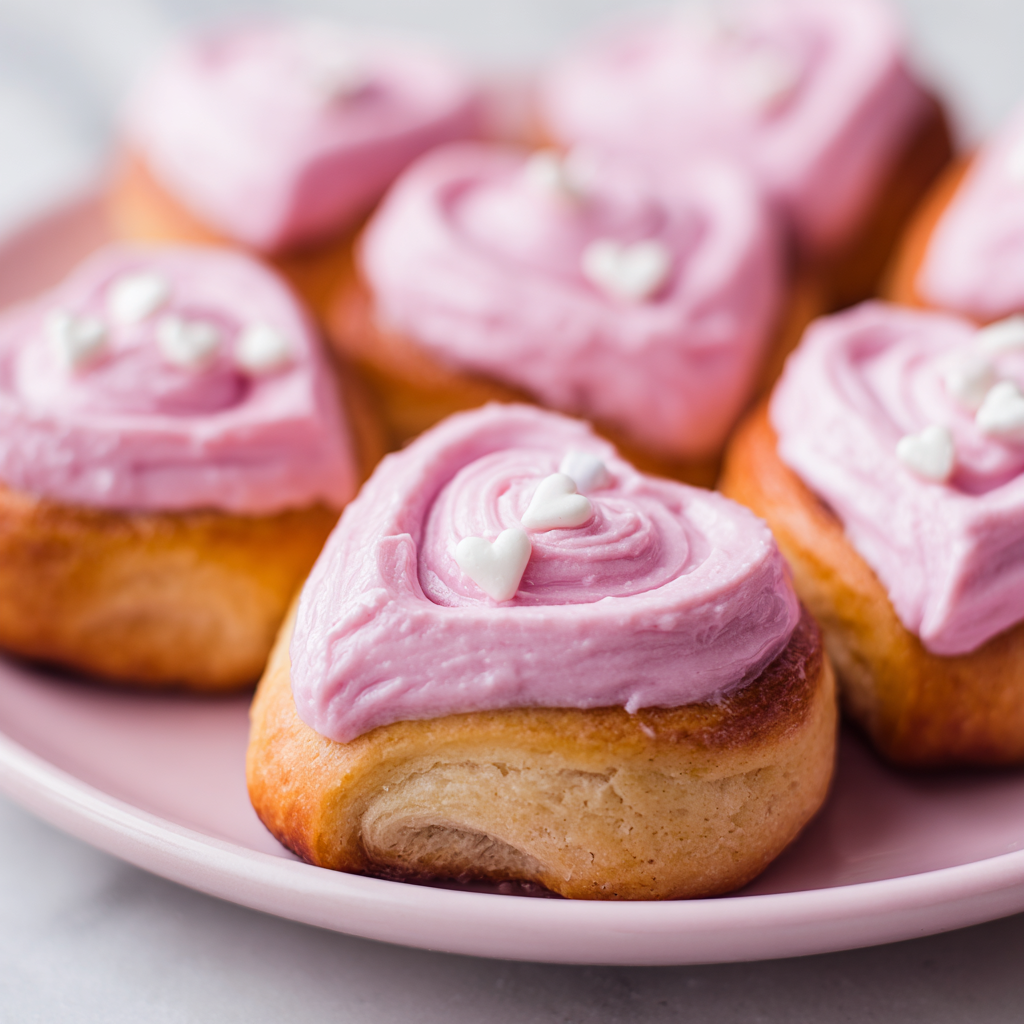
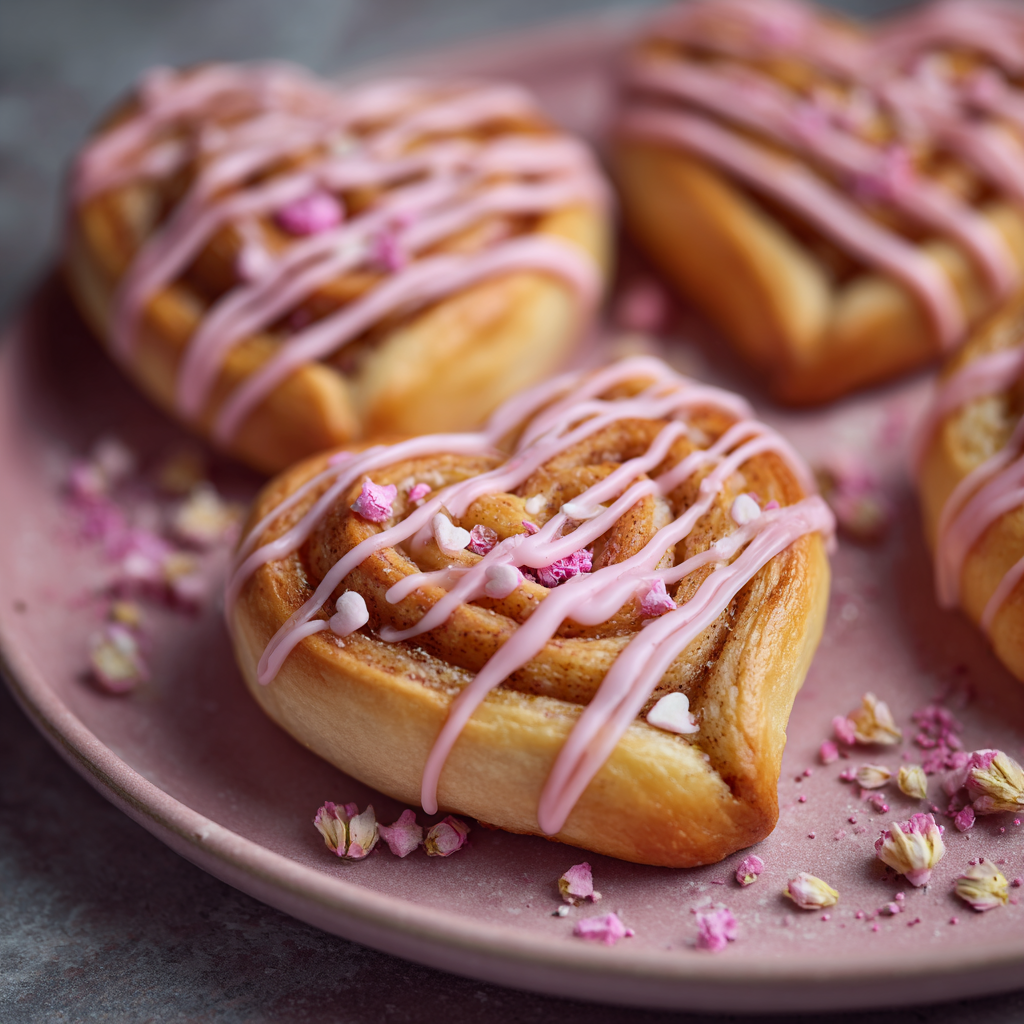
These absolutely adorable heart-shaped sweet rolls with pink icing are the perfect way to show love to the special people in your life through homemade baking. First, these charming rolls deliver tender, fluffy insides with buttery layers that make every bite feel genuinely luxurious and indulgent. Next, the simple dough comes together using straightforward mixing techniques that require no special equipment or advanced baking knowledge. Additionally, the distinctive heart shape makes these rolls perfect for Valentine’s Day, bridal showers, baby showers, anniversaries, or any occasion celebrating love and affection. The sweet filling combined with beautiful pink icing creates an irresistible treat that’s as visually stunning as it is delicious. Furthermore, whether you’re baking for your romantic partner, family members, friends, or simply to fill your home with the aroma of freshly baked goodness, these heart-shaped sweet rolls deliver impressive results that prove homemade treats taste even better when made with love and care.
Why Heart-Shaped Sweet Rolls Are Perfect for Celebrations
Heart-shaped baked goods hold a special place in the kitchen as edible expressions of affection and thoughtfulness that transcend ordinary desserts. These charming rolls offer the perfect combination of delicious comfort food and emotional significance, making them ideal for occasions celebrating love, friendship, and connection. Meanwhile, their distinctive shape immediately communicates care and effort, elevating homemade treats beyond what store-bought options could ever match. Furthermore, the soft, pillowy texture and sweet filling appeal to virtually everyone, making them appropriate for diverse taste preferences and ages. Additionally, unlike cakes or complicated desserts requiring advanced techniques, these rolls remain remarkably approachable for bakers of all skill levels. The combination of beautiful presentation and genuine deliciousness means every recipient feels genuinely valued and appreciated. For anyone seeking to create meaningful edible gifts or memorable treats for special occasions, heart-shaped sweet rolls represent thoughtful, delicious, and absolutely achievable baking success.
Ingredients (Makes 12 Heart-Shaped Rolls)
For the Dough:
- 1 cup whole milk, warmed (about 110°F)
- 2¼ teaspoons active dry yeast (one packet)
- 4 tablespoons unsalted butter, melted
- ¼ cup granulated sugar
- ½ teaspoon salt
- 1 large egg
- 3 cups all-purpose flour
- Additional flour for dusting
For the Filling:
- 3 tablespoons unsalted butter, softened
- ¼ cup brown sugar, packed
- 1 teaspoon ground cinnamon
- ¼ teaspoon vanilla extract
For the Pink Icing:
- 2 cups powdered sugar, sifted
- 2-3 tablespoons milk or cream (start with 2, add more as needed)
- 2 tablespoons unsalted butter, softened
- ½ teaspoon vanilla extract
- ¼ teaspoon almond extract (optional, adds depth)
- 2-3 drops red or pink food coloring (adjust to reach desired color)
- Pinch of salt
Optional Decorations:
- Pink sprinkles or pearl sprinkles
- Crushed freeze-dried strawberries
- Heart-shaped candies
- White chocolate shavings
Step-by-Step Instructions
Activating the Yeast and Beginning Dough
- Pour the warmed milk into a large mixing bowl, ensuring it’s warm to the touch but not so hot it would kill the yeast.
- Sprinkle the active dry yeast over the warm milk and let it sit undisturbed for about 1 minute.
- Add the melted butter, granulated sugar, and salt to the milk and yeast mixture, stirring gently to combine.
- Let the mixture sit for another minute, allowing the yeast to begin activating—you should see some foam forming on the surface.
- Add the egg to the mixture, beating it in gently with a whisk or wooden spoon until fully incorporated.
- Add the flour gradually, stirring with a wooden spoon or sturdy whisk until a shaggy dough forms.
- Turn the dough out onto a lightly floured work surface, scraping any bits from the bowl with a spatula.
Kneading the Dough
- Knead the dough for about 8-10 minutes, working it with the heels of your hands, folding it over, and repeating.
- The dough should become smooth, elastic, and slightly tacky but not sticky—if it’s too sticky, add flour a tablespoon at a time.
- When properly kneaded, the dough should spring back slowly when you poke your finger into it.
- Shape the kneaded dough into a smooth ball and place it in a lightly greased bowl, turning to coat all sides.
- Cover the bowl with a clean kitchen towel or plastic wrap and set it in a warm, draft-free location.
- Let the dough rise for about 1-1½ hours until doubled in size—you can tell by making a small indentation; it should rise back slightly or stay indented.
Preparing the Filling
- While the dough rises, prepare the cinnamon filling by combining the softened butter, brown sugar, cinnamon, and vanilla extract in a small bowl.
- Mix until the filling ingredients combine into a spreadable paste, then set aside until ready to use.
Rolling and Shaping the Dough
- Once the dough has doubled in size, punch it down gently with your fists to release excess air.
- Turn the dough out onto a lightly floured work surface and shape it into a rough rectangle.
- Using a rolling pin, roll the dough into a 12-inch by 16-inch rectangle, about ¼ inch thick.
- Spread the cinnamon filling evenly over the dough rectangle, leaving about ½ inch border on all sides.
- Starting from the long side closest to you, roll the dough tightly into a log, pinching the seam closed.
- Cut the rolled log into 12 equal pieces using a sharp knife or dental floss (dental floss prevents crushing the dough).
Creating the Heart Shape
- Place each piece cut-side down on a parchment-lined baking sheet, spacing them about 2 inches apart.
- Using your fingertips, gently press and shape each round piece into a heart shape by pressing two rounded indentations at the top.
- Work gently to create smooth, rounded lobes at the top that form the characteristic heart silhouette.
- Don’t worry about perfection—rustic, imperfect hearts are actually more charming and show authentic handmade love.
- Cover the shaped rolls with a clean kitchen towel and let them rise in a warm location for 45-60 minutes until puffy and light.
Baking the Rolls
- Preheat your oven to 375°F about 15 minutes before the rolls finish their second rise.
- Once the rolls have risen and appear light and puffy, place the baking sheet in the preheated oven.
- Bake for 15-18 minutes until the rolls are golden brown on top and cooked through.
- Remove from the oven and let the rolls cool on the baking sheet for 5 minutes.
- After 5 minutes, transfer the warm rolls to a wire cooling rack using a spatula.
- Allow the rolls to cool for at least 15 minutes before applying the pink icing.
Making the Pink Icing
- In a medium bowl, combine the softened butter and sifted powdered sugar, beating together with an electric mixer on low speed.
- Add the vanilla extract and almond extract if using, beating until the mixture becomes smooth and creamy.
- Add the milk one tablespoon at a time, beating on low speed after each addition.
- Continue adding milk and beating until the icing reaches a spreadable consistency—it should coat the back of a spoon but still flow slightly.
- Add the red or pink food coloring drop by drop, beating after each addition until you reach your desired shade of pink.
- Taste the icing and adjust flavor with additional vanilla, almond, or a pinch of salt as needed.
Decorating the Rolls
- Using an offset spatula or butter knife, spread a generous layer of pink icing over each cooled roll.
- Add decorative toppings while the icing is still wet so sprinkles and candies adhere properly.
- Allow the icing to set at room temperature for at least 30 minutes before serving or transporting.
- For faster setting, place decorated rolls in the refrigerator for 15 minutes until the icing firms up completely.
- Arrange the finished rolls on a beautiful platter, and serve alongside hot coffee, tea, or cold milk.
Serving and Storing Tips
How to Serve and Enjoy
These beautiful heart-shaped sweet rolls make stunning centerpieces for Valentine’s Day breakfasts, bridal showers, baby showers, and any celebration of love and affection. First, arrange them on a gorgeous tiered cake stand or wooden platter to create an Instagram-worthy display that’s almost too pretty to eat. Next, serve them warm or at room temperature alongside hot beverages like coffee, hot chocolate, or flavored lattes for the ultimate indulgent breakfast or brunch experience. Additionally, pair them with fresh fruit like strawberries and raspberries to add color and nutritional balance to the spread. Furthermore, these rolls work beautifully as part of a romantic breakfast in bed, a special morning surprise for loved ones, or the centerpiece of a festive brunch gathering. You might also package individual rolls in clear cellophane bags tied with pink ribbon to create memorable edible gifts for friends, coworkers, or family members. Consider serving them alongside simple sides like scrambled eggs, bacon, fresh pastries, and cheese for a complete, impressive brunch spread. These rolls are equally perfect for afternoon tea, as dessert after dinner, or as a sweet treat throughout the day.
Storage and Make-Ahead Instructions
To preserve these rolls at their peak freshness, allow them to cool completely before storing in an airtight container at room temperature. Layer them with parchment paper between each roll to prevent sticking and maintain their beautiful icing decoration. Properly stored undecorated rolls stay fresh for up to 3 days at room temperature, maintaining their soft, fluffy texture. Decorated rolls with pink icing should be stored in a single layer in an airtight container to prevent the icing from smudging or cracking, and consumed within 2 days for best appearance and taste. For extended storage, freeze undecorated baked rolls in a freezer-safe container or freezer bag for up to 2 months—thaw them at room temperature for about 1 hour, then decorate with fresh pink icing just before serving. The dough can be made ahead and refrigerated overnight before shaping; simply allow it to come to room temperature before rolling out and shaping into hearts. Alternatively, shape the rolls and refrigerate them overnight before the final rise and baking, which actually develops more complex flavor through extended cold fermentation. Remove refrigerated rolls from the cold and let them rise at room temperature for 1-2 hours before baking. For convenience, assemble the rolls fully, wrap them tightly in plastic wrap, and freeze for up to 1 month; bake directly from frozen, adding 5-8 minutes to the baking time. The prepared dough before rolling can be frozen in a ball for up to 2 months; thaw in the refrigerator overnight, then bring to room temperature before proceeding with rolling and shaping.
Helpful Notes and Tips
Several practical considerations will help you create beautiful, delicious heart-shaped sweet rolls that turn out perfectly every single time. First, the temperature of the milk is genuinely important—use an instant-read thermometer to verify it’s around 110°F, which is warm enough to activate yeast but not so hot it kills it. Next, don’t skip the second rise; although time-consuming, it ensures the rolls are light, fluffy, and tender rather than dense or heavy. Additionally, creating the heart shape requires only gentle finger work—overly aggressive shaping can deflate the rolls, so use a light touch and trust the process. Meanwhile, these rolls are fairly forgiving regarding icing consistency; if it’s slightly too thick, add a tiny splash of milk; if too thin, add more powdered sugar. The heart shape doesn’t need to be perfect to be charming—rustic, imperfectly formed hearts actually photograph beautifully and convey authentic handmade effort. Those preferring less sweet rolls can reduce the brown sugar filling or skip it entirely, though it contributes essential flavor development. For deeper cinnamon flavor, increase the cinnamon in the filling to 1½ teaspoons, or add a small pinch of nutmeg for warmth. The pink food coloring matters—gel coloring produces more vibrant pink without thinning the icing like liquid food coloring does, so consider investing in gel if you frequently make pink icing. For a more natural pink, use crushed freeze-dried strawberries whisked into the icing instead of food coloring, though this slightly affects texture. If rolls don’t rise properly, your environment might be too cold; place them in an oven with the light on, a turned-off oven preheated then turned off, or another warm location like a proofing box.
Chef Tips
Use a bench scraper or sharp knife dipped in water or flour to cleanly cut the rolled dough into pieces, preventing the sticky dough from bunching and tearing, which compromises the rolls’ final texture.
Allow the rolls to cool for at least 15 minutes before icing—applying icing to warm rolls causes it to melt and slide off, while properly cooled rolls accept icing beautifully and allow it to set firm.
Frequently Asked Questions
Can I make these rolls the night before? Yes! Shape the rolls, cover tightly, and refrigerate overnight; in the morning, let them rise at room temperature for 1-2 hours, then bake as directed.
What if my dough won’t rise? Your environment might be too cold; try placing the bowl in an oven with just the light on, a warm location, or a proofing box to create a consistently warm environment.
Can I use whole wheat flour instead of all-purpose? You can substitute up to 50% whole wheat flour for all-purpose; whole wheat creates denser, nuttier rolls, so increase rising times slightly.
How do I make the icing more pink without darkening it? Use gel food coloring instead of liquid, which allows vibrant color without adding excess moisture; start with ¼ teaspoon and adjust gradually.
Can I freeze the baked rolls before decorating? Yes! Freeze undecorated baked and cooled rolls for up to 2 months in a freezer-safe container; thaw at room temperature, then decorate with fresh pink icing.
The Joy of Edible Gifts Made with Love
Heart-shaped sweet rolls with pink icing represent far more than delicious baked goods—they’re edible expressions of affection that communicate thoughtfulness, effort, and genuine care. From the moment you activate the yeast and begin mixing the dough through those first moments admiring your beautifully decorated rolls, you’ll feel the joy of creating something meaningful with your own hands. The process of shaping, rising, baking, and decorating becomes a labor of love that transforms simple ingredients into something emotionally significant.
What makes these rolls truly special is the combination of genuine deliciousness with heartfelt presentation. First, the soft, pillowy dough provides the perfect foundation for the sweet cinnamon filling that infuses every bite with warmth and comfort. Next, the distinctive heart shape immediately communicates the emotions behind the gift, making these rolls impossible to misunderstand. Additionally, the beautiful pink icing transforms the rolls from simple to genuinely stunning, creating a visual presentation that matches the care invested in their creation. Furthermore, the versatility of these rolls means they work beautifully for nearly any celebration of love and affection, from romantic Valentine’s Day mornings to festive bridal showers.
Whether you’re baking for a romantic partner, close family members, dear friends, or simply to fill your home with the aroma of freshly baked goodness, these heart-shaped sweet rolls deliver genuine magic from your own kitchen. The combination of tender dough, sweet filling, and beautiful pink icing creates something truly memorable that leaves everyone feeling appreciated and cared for. Every batch promises fluffy interiors, beautiful heart shapes, and the warm satisfaction that comes from creating homemade treats that communicate love.
We’d absolutely love to hear if you try these heart-shaped sweet rolls with pink icing! Did they become your go-to recipe for showing love through baking? Please save this recipe for future special occasions, share it with friends and family members who would appreciate homemade expressions of affection, and pin it to your favorite celebration and brunch boards. Your feedback, comments, and shares truly motivate us to continue creating delicious, meaningful recipes that bring people together and make home baking feel joyful and achievable. Drop a comment below telling us who you made them for, what decorative touches you added, or how your loved ones reacted—we absolutely cherish hearing about your baking adventures and the joy our recipes bring to your celebrations and special moments!