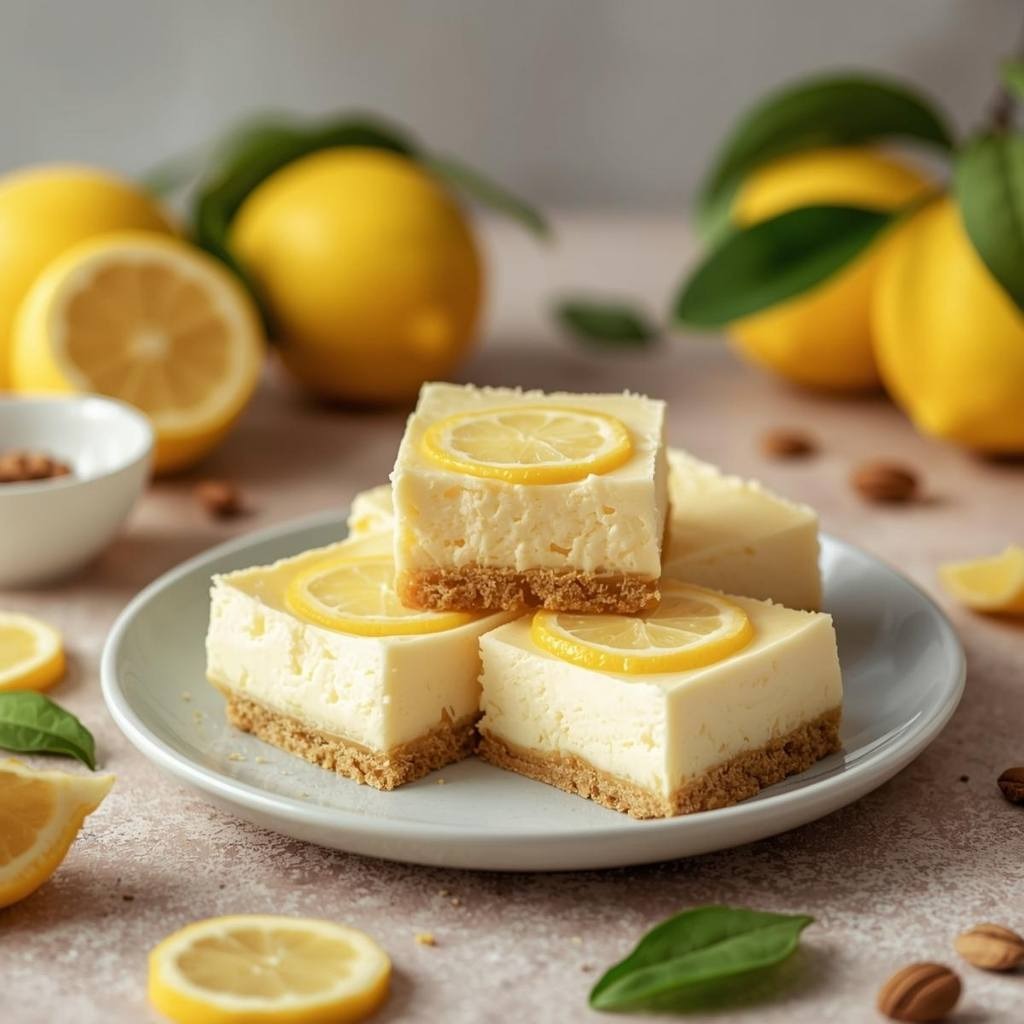
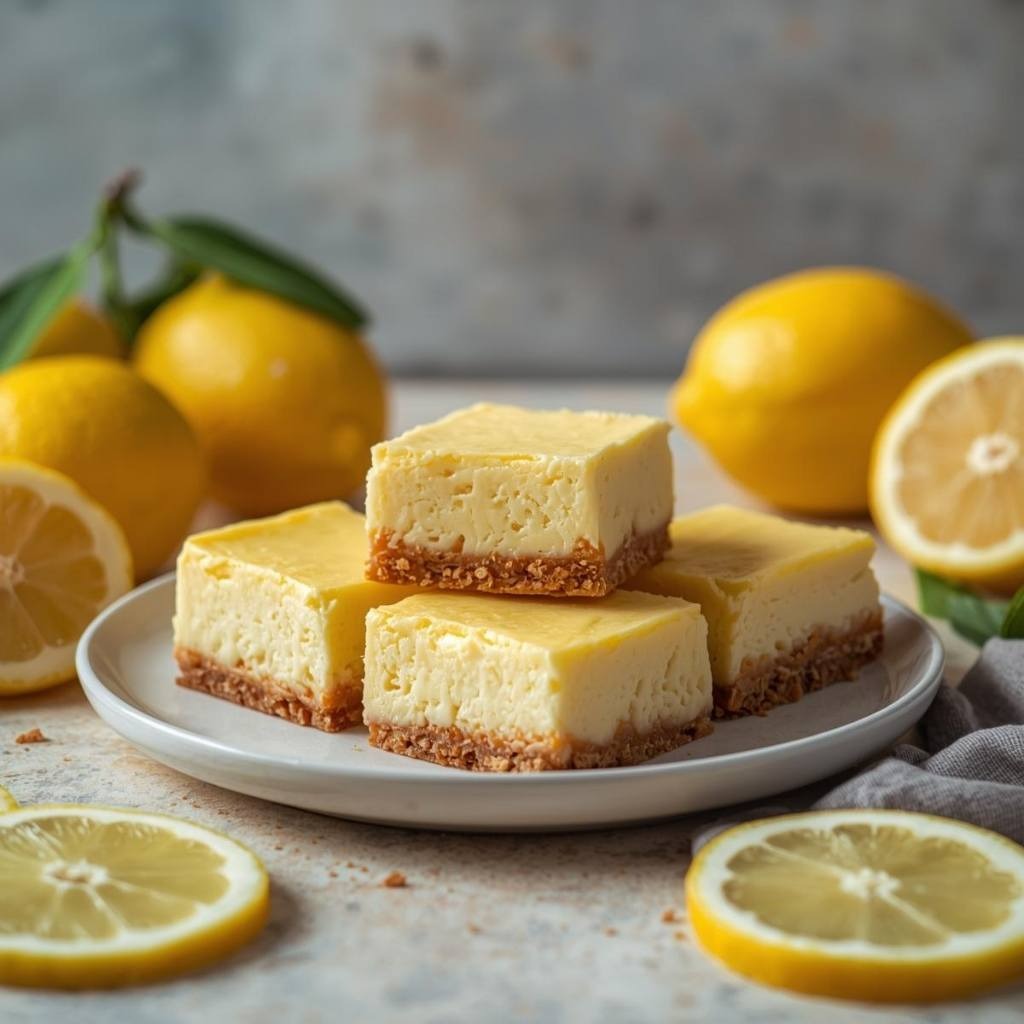
Imagine biting into a dessert that perfectly balances tartness and creaminess, delivering brightness with every single bite. Lemon Cheesecake Bars do exactly that, combining the luxurious texture of creamy cheesecake with the refreshing punch of fresh lemon juice and zest. What makes this recipe truly irresistible is how it brings together the best of both worlds—a buttery shortbread crust that provides satisfying crunch, a velvety cheesecake layer infused with vibrant lemon flavor, and an optional tangy topping that makes these bars absolutely crave-worthy. The beauty of these bars lies in their simplicity and elegance; you don’t need advanced baking skills to create something that tastes like it came straight from a gourmet bakery. Whether you’re preparing for a summer gathering, searching for a treat that won’t leave you feeling overly stuffed, or simply wanting to impress family and friends with minimal effort, these bars deliver every single time. The lemon flavor makes them feel sophisticated and special, yet they’re genuinely easy enough for a beginner baker to master on the very first attempt.
Ingredients
Servings: 16 bars
Shortbread Crust: • 1 1/2 cups all-purpose flour • 1/2 cup powdered sugar • 6 tablespoons cold butter, cubed • 1/4 teaspoon salt • 1 tablespoon fresh lemon zest
Lemon Cheesecake Filling: • 16 ounces cream cheese, room temperature • 3/4 cup granulated sugar • 1/4 cup fresh lemon juice (about 2-3 lemons) • 2 tablespoons lemon zest • 2 large eggs, room temperature • 1 teaspoon vanilla extract • 2 tablespoons cornstarch
Optional Lemon Glaze Topping: • 1 cup powdered sugar • 2-3 tablespoons fresh lemon juice • 1 tablespoon honey
Optional Garnish: • Fresh lemon slices • Additional lemon zest • Candied lemon peel
Step-by-Step Instructions
Prepare Your Pan and Preheat
- Preheat your oven to 350°F and position a rack in the center of the oven.
- Line a 9×13-inch baking pan with parchment paper, allowing some to overhang the sides for easy removal later.
- Lightly grease the parchment paper with cooking spray or a small amount of butter.
Make the Shortbread Crust
- Combine flour, powdered sugar, salt, and lemon zest in a medium mixing bowl, stirring to distribute the zest evenly.
- Add the cold, cubed butter to the flour mixture and use a pastry cutter, two knives, or your fingertips to work the butter into the dry ingredients until the mixture resembles coarse breadcrumbs.
- Press the mixture firmly and evenly into the prepared baking pan, creating a compact, level layer across the entire bottom.
- Bake the crust for 12 to 15 minutes, until the edges are lightly golden but the center remains pale—the crust will continue cooking slightly when the filling bakes on top.
- Remove the pan from the oven and set it aside to cool while you prepare the filling.
Prepare the Lemon Cheesecake Filling
- Beat the softened cream cheese on medium speed for about 2 minutes until it becomes smooth and creamy, stopping occasionally to scrape down the bowl.
- Gradually add the granulated sugar while continuing to beat, mixing for another 2 minutes until the mixture is light and fluffy.
- Stir in the fresh lemon juice and lemon zest, blending until fully incorporated and the mixture is smooth.
- Add the vanilla extract and mix briefly until combined.
- Add the eggs one at a time, beating on low speed after each addition and mixing only until each egg is incorporated—overmixing introduces excess air that can cause cracks.
- Sprinkle the cornstarch over the mixture and gently fold it in using a rubber spatula until just combined, being careful not to overmix.
Assemble and Bake
- Pour the cheesecake filling over the cooled crust, spreading it evenly with an offset spatula or the back of a spoon.
- Smooth the top as much as possible to ensure even baking and a professional appearance.
- Bake for 20 to 25 minutes, until the filling is nearly set but the very center still jigles slightly when you gently shake the pan.
- Turn off the oven and crack the door open about 2 inches, allowing the bars to cool gradually for 30 minutes before removing them from the oven.
Cool Completely
- Transfer the baking pan to a wire cooling rack and allow the bars to cool to room temperature, which will take approximately 45 minutes.
- Once cooled, cover the pan with plastic wrap and refrigerate for at least 4 hours, though overnight chilling is ideal for the best flavor and texture.
Prepare the Optional Glaze
- Whisk together powdered sugar, lemon juice, and honey in a small bowl until you reach a smooth, pourable consistency.
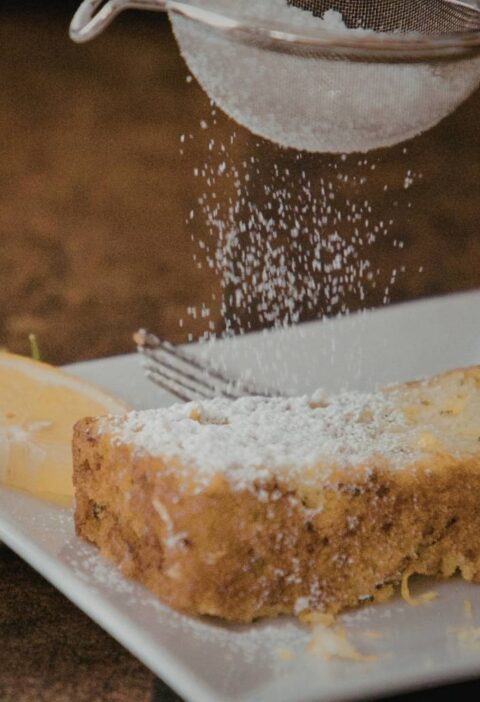
- Drizzle the glaze evenly over the chilled cheesecake bars, allowing it to set for a few minutes before cutting.
Cut and Serve
- Use the parchment paper overhang to lift the entire cheesecake slab from the pan onto a cutting board.
- Cut into 16 bars using a sharp, clean knife, wiping the blade between cuts for clean edges and a professional appearance.
Serving and Storing Tips
Serving Tips
First, remove the lemon cheesecake bars from the refrigerator about 5 to 10 minutes before serving to allow them to reach an ideal eating temperature that’s cool but not quite cold. Next, present them on a beautiful dessert platter alongside fresh whipped cream, which adds a luxurious touch and balances the tartness of the lemon perfectly. Additionally, a sprinkle of fresh lemon zest on top of each bar adds visual appeal and enhances the lemon flavor even further. These bars pair wonderfully with afternoon tea, coffee, or a light dessert wine like a Sauvignon Blanc or Prosecco. Furthermore, they make excellent individual portions for a dessert buffet, as they’re already the perfect single-serving size. Consider garnishing with candied lemon peel or fresh mint leaves for an elegant presentation that’s sure to impress your guests.
Storage Tips
Store your lemon cheesecake bars in an airtight container in the refrigerator for up to 5 days, where they will maintain their perfect creamy texture and bright lemon flavor. However, you can also freeze these bars for extended storage by wrapping each individual bar in plastic wrap and placing them in a freezer-safe container with parchment paper separating each layer. Your frozen bars will keep for up to 3 months without any loss of quality. To thaw, simply transfer them to the refrigerator the night before you plan to serve them, allowing them to thaw slowly and naturally. Alternatively, you can leave them at room temperature for 1 to 2 hours if you’re short on time, though refrigerator thawing produces the most consistent texture. The optional glaze can be applied either before freezing or after thawing, depending on your preference and convenience.
Helpful Notes
Ingredient Substitutions and Variations
The versatility of lemon cheesecake bars means you can easily adapt them to suit your preferences and dietary needs. If you prefer a stronger lemon flavor, increase the lemon juice to 1/3 cup and the zest to 3 tablespoons for an even more pronounced citrus punch. Additionally, those with dairy sensitivities can substitute dairy-free cream cheese for traditional cream cheese, though the texture may be slightly different. For a darker, more buttery crust, replace half the all-purpose flour with whole wheat flour or use crushed shortbread cookies mixed with melted butter. Meanwhile, you can incorporate other citrus flavors by substituting fresh lime juice and zest for half the lemon, creating a delightful lime cheesecake bar variation. For added richness, stir in 1 tablespoon of lemon curd into the filling before pouring it over the crust. Furthermore, adding a layer of lemon curd between the crust and cheesecake filling creates an extra burst of lemon flavor that lemon lovers will absolutely adore.
Common Mistakes to Avoid
One of the most frequent mistakes is overbaking the cheesecake filling, which results in a dense, crumbly texture rather than the silky, creamy consistency these bars are known for. Remove them from the oven when the center still jigles slightly—carryover heat will continue cooking them as they cool. Additionally, using cold cream cheese straight from the refrigerator leads to lumps and an uneven texture, so always allow it to sit at room temperature for at least one hour before baking. Furthermore, skipping the gradual cooling step in the oven causes sudden temperature changes that lead to cracks on the surface. Meanwhile, pressing the crust too lightly results in a crumbly base that doesn’t hold together properly, so apply firm pressure when pressing it into the pan. Finally, rushing the refrigeration process prevents the bars from setting properly, making them difficult to cut cleanly—patience truly pays off with cheesecake.
Time-Saving Tips
To save time on preparation day, make the shortbread crust the day before and store it covered at room temperature—you can even bake it a day ahead and keep it in an airtight container. Next, prepare the cheesecake filling mixture up to 4 hours in advance and refrigerate it in a covered bowl before pouring it over the crust. Additionally, you can prepare the lemon glaze topping several days ahead and store it in a covered container in the refrigerator, then drizzle it on the bars just before serving. Consider baking a double batch when you have the oven on, as these bars freeze beautifully for weeks, providing you with instant desserts for future occasions. Furthermore, since most of the time commitment involves baking and cooling rather than active preparation, these bars are excellent for advance party planning and meal prep.
Professional Baking Tips
The secret to perfectly clean-cut cheesecake bars lies in using a hot, wet knife and wiping it between each cut—this simple technique transforms your presentation from homemade to bakery-quality in seconds. Additionally, allowing the bars to chill overnight rather than just 4 hours ensures they hold their shape better when cut and deliver the most luxurious texture. Meanwhile, using room temperature eggs and cream cheese makes an enormous difference in creating a smooth, lump-free filling that bakes evenly throughout. Furthermore, the cornstarch in the filling helps prevent cracks by absorbing excess moisture, so don’t skip this ingredient even though it seems insignificant.
Frequently Asked Questions
Can I make lemon cheesecake bars without the optional glaze topping? Absolutely—the bars are delicious on their own, and you can skip the glaze if you prefer a less sweet finish or have a citrus overload concern.
How far in advance can I prepare these lemon cheesecake bars? You can prepare them up to 5 days ahead and refrigerate them in an airtight container, or freeze them for up to 3 months for convenient make-ahead desserts.
What should I do if my bars turn out too tart or too sweet? If too tart, dust the top with powdered sugar before serving; if too sweet, serve with unsweetened whipped cream or skip the glaze topping entirely.
Can I use bottled lemon juice instead of fresh? Fresh lemon juice produces the best flavor, but you can use bottled in a pinch—however, the taste won’t be quite as bright and fresh.
Why did my cheesecake bars develop cracks on top? Cracks usually result from overbaking, skipping the gradual cooling step, or using cold ingredients; however, they won’t affect the taste and can be covered with glaze or garnish.
Conclusion
Lemon Cheesecake Bars represent the perfect marriage of bright, refreshing citrus flavor and indulgent creamy texture, making them an ideal dessert for any season or occasion. The combination of a buttery shortbread crust, tangy-sweet cheesecake filling, and optional lemony glaze topping creates a dessert that feels simultaneously elegant and approachable. Whether you’re hosting a summer dinner party, looking for a treat to bring to a potluck, or simply treating yourself and your family to something special, these bars deliver satisfaction in every single bite.
The structured approach outlined in this guide ensures that even first-time cheesecake bakers can achieve restaurant-quality results with minimal stress or confusion. Furthermore, the make-ahead nature of these bars means you can prepare them days in advance, keeping your schedule flexible and your dessert ready whenever you need it. The option to freeze individual bars for later enjoyment makes these an excellent choice for meal prep and pantry stocking.
Next time you’re craving something bright and delicious, or when you want to impress guests with minimal effort, remember that these lemon cheesecake bars deliver premium flavor and presentation without the complexity of a full-sized cheesecake. Your family and friends will be absolutely amazed, and you’ll feel proud knowing you created something truly special from your own kitchen.
If you loved making these lemon cheesecake bars and found this recipe helpful, we’d absolutely love it if you’d save it, pin it to your Pinterest board, or share it with friends and family who might enjoy making it too! Your support and feedback inspire us to keep creating delicious recipes and helpful guides that make home baking approachable and enjoyable. We can’t wait to see how your bars turn out, so please come back and let us know about your experience. Happy baking!