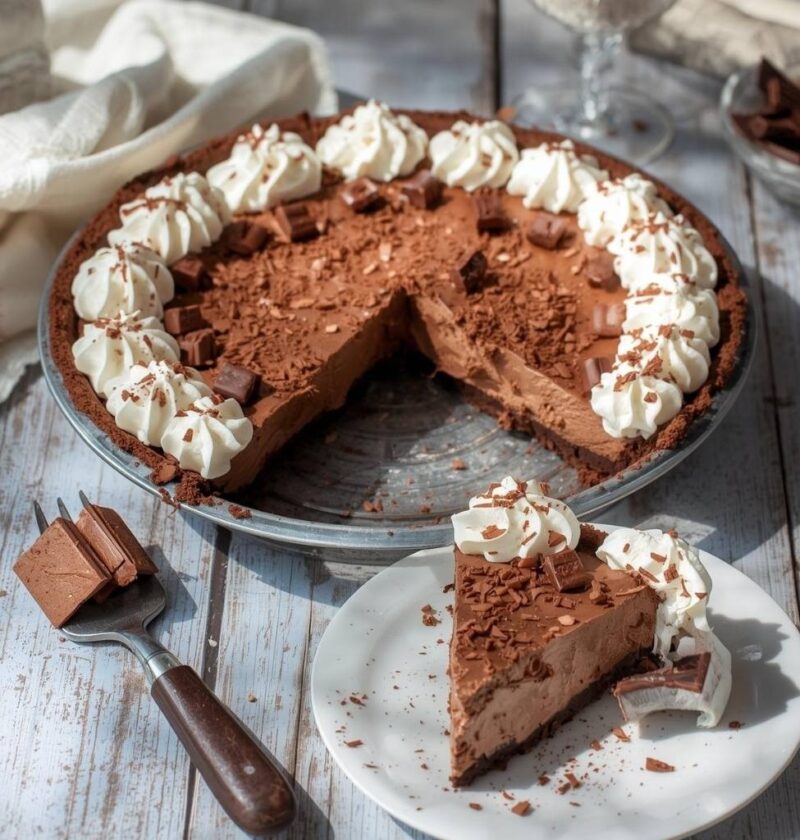
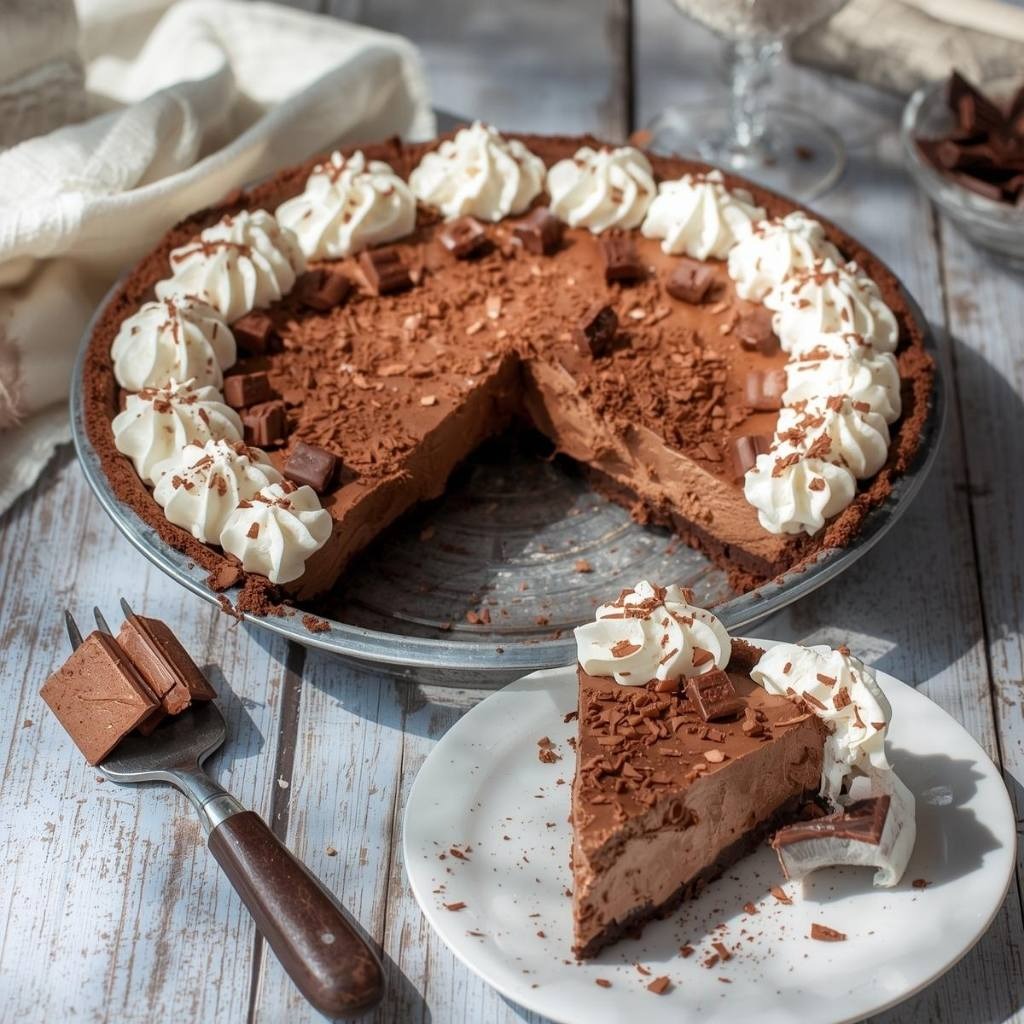
No bake chocolate pie delivers ultimate chocolate indulgence in a stunning dessert that requires zero oven time and comes together in minutes through simple mixing and refrigeration. This luxurious treat features a buttery graham cracker crust topped with silky smooth chocolate filling that’s both rich and surprisingly light, creating a dessert that tastes like it came from an upscale bakery yet requires only basic kitchen equipment. What makes this recipe truly special is the way it transforms chocolate, cream cheese, and whipped cream into an elegant, show-stopping finale that impresses even the most discerning chocolate lovers. The beauty of no bake chocolate pie lies in its foolproof nature and impressive results; anyone can create restaurant-quality desserts without baking experience, special skills, or the stress of oven temperatures and timing. Unlike traditional chocolate pie that demands baking finesse and careful temperature monitoring, this version is wonderfully forgiving and actually improves over time as flavors meld beautifully. Whether you’re entertaining guests, preparing dessert for warm-weather gatherings, or simply craving something rich and creamy with intense chocolate flavor, no bake chocolate pie delivers pure indulgence. The combination of simple ingredients creates a dessert that tastes both homemade and elegantly refined, proving that sometimes the most impressive treats require only patience, not heat.
Ingredients
Serves: 10-12 people
For the Graham Cracker Crust:
- 2 cups graham cracker crumbs (about 14-16 full crackers)
- ¼ cup granulated sugar
- 6 tablespoons unsalted butter, melted
- ¼ teaspoon salt
For the Creamy Chocolate Filling:
- 8 ounces semi-sweet or dark chocolate, chopped into small pieces
- 8 ounces cream cheese, room temperature
- ½ cup powdered sugar, sifted
- ¼ cup unsweetened cocoa powder, sifted
- 1 teaspoon vanilla extract
- 1 tablespoon fresh lemon juice or instant coffee powder (optional)
- 2 cups heavy whipping cream
- 3 tablespoons granulated sugar (for whipping the cream)
For Topping and Decoration:
- Whipped cream for serving
- Chocolate shavings or chocolate curls
- Cocoa powder for dusting
- Fresh berries (raspberries or strawberries)
- Crushed Oreos or chocolate cookies
Step-by-Step Instructions
For the Graham Cracker Crust:
- Line a 9-inch pie dish with parchment paper on the bottom, extending it slightly up the sides for easy slicing and removal if desired.
- Crush graham crackers into fine crumbs by placing them in a food processor and pulsing until you reach a coarse, sandy texture resembling wet sand.
- In a medium bowl, combine the graham cracker crumbs with granulated sugar and salt, whisking gently to distribute both evenly throughout.
- Next, pour the melted butter over the crumb mixture and stir thoroughly with a fork until all the crumbs are moistened and resemble wet sand.
- Press the mixture firmly and evenly into the bottom and sides of your prepared pie dish, using the bottom of a measuring cup to create an even, compact layer.
- Make sure the crust extends to the edges and is packed tightly so it holds together when the pie is sliced; this creates a sturdy foundation for the filling.
- Refrigerate the crust for at least 15 minutes while you prepare the filling, allowing it to set slightly and firm up.
For the Creamy Chocolate Filling:
- Chop the semi-sweet or dark chocolate into small, even pieces using a sharp knife or food processor, ensuring pieces melt evenly and smoothly.
- In a microwave-safe bowl, melt the chopped chocolate in 30-second intervals, stirring well between each interval, until completely melted and smooth; avoid overheating.
- Alternatively, melt the chocolate using a double boiler method by placing a heatproof bowl over gently simmering water, stirring occasionally until fully melted.
- Remove the melted chocolate from heat and allow it to cool slightly for about 2-3 minutes, creating a texture that’s warm but not too hot to handle.
- In a large mixing bowl, beat the room-temperature cream cheese on medium speed for about 2-3 minutes until it becomes smooth, creamy, and light.
- Sift the powdered sugar and cocoa powder directly into the cream cheese mixture to remove any lumps, then beat on low speed until just combined and no streaks remain.
- Add the vanilla extract and fresh lemon juice or instant coffee powder (if using) to the cream cheese mixture, beating on low speed until everything is well incorporated.
- Fold the cooled, melted chocolate into the cream cheese mixture using a rubber spatula with gentle, deliberate strokes, being careful not to overmix and create air bubbles.
- In a separate chilled bowl, pour the heavy whipping cream and add 3 tablespoons granulated sugar.
- Beat the cream on medium speed for 2-3 minutes until soft peaks form, watching carefully to avoid overbeating and transforming the cream into butter.
- Gently fold the whipped cream into the chocolate cream cheese mixture using a large spatula with careful strokes, being mindful not to deflate the whipped cream.
- Pour the combined filling into the prepared crust and smooth the top with a spatula, creating an even, attractive surface.
- Refrigerate the pie for at least 4 hours, though overnight refrigeration is ideal, allowing the filling to set completely and flavors to meld beautifully.
For Finishing and Serving:
- Remove the pie from the refrigerator about 15 minutes before serving, allowing it to soften slightly for easier slicing and better chocolate flavor.
- Top the pie with whipped cream, chocolate shavings, cocoa powder dusting, fresh berries, or crushed cookies for added visual appeal.
- Slice using a hot knife dipped in hot water and wiped clean between cuts, creating neat, attractive slices that hold their shape beautifully.
- Serve chilled, allowing guests to experience the full, creamy richness of this indulgent chocolate dessert.
Why No Bake Chocolate Pie Excels
No bake chocolate pie holds a special place in the dessert world because it delivers everything people love about chocolate pie while eliminating the complications of baking. First, the combination of chocolate and whipped cream creates an incredibly light, mousse-like texture that’s more elegant than dense, baked chocolate pie. Additionally, there’s no oven required, eliminating temperature monitoring and the risk of cracks or uneven baking. Furthermore, the no-bake approach means you can prepare this dessert even in the hottest weather when turning on the oven is undesirable. Moreover, the impressive presentation and professional appearance make guests believe you’ve spent hours perfecting the recipe, when in reality the preparation is simple and stress-free. Finally, the chocolate flavor shines through without being muted by baking, creating intense, satisfying chocolate taste that chocolate lovers adore.
The Power of Pure Chocolate Flavor
The combination of high-quality chocolate with chocolate-infused cream cheese filling creates depth and complexity that’s deeply satisfying. Next, the melted chocolate incorporates smoothly into the filling, ensuring even chocolate distribution throughout every slice. Additionally, the cocoa powder in the cream cheese mixture amplifies the chocolate flavor without adding excessive sweetness. Furthermore, the optional addition of instant coffee powder deepens chocolate flavor, creating sophistication without detectable coffee taste. In contrast to chocolate pie made with chocolate pudding, the cream cheese base creates richness and complexity that elevates the dessert. Finally, fresh chocolate shavings or cocoa powder dusted on top adds visual appeal and a final burst of chocolate flavor that completes the experience.
Serving Tips
Serve no bake chocolate pie chilled directly from the refrigerator, as the cold temperature is essential to the texture and helps slices hold their shape beautifully. Additionally, present slices on elegant dessert plates with whipped cream, chocolate shavings, and fresh berries for a sophisticated presentation. Furthermore, pair servings with coffee, espresso, or dessert wine that complements the rich, intense chocolate flavor profile. For formal dinners, garnish each slice with a chocolate curl and a single fresh raspberry for elegant presentations. You can also serve it with vanilla ice cream on the side for guests who enjoy extra indulgence alongside the chocolate. Additionally, for casual gatherings, offer a selection of topping options and let guests customize their slices according to personal preferences. Finally, present the pie whole at the table initially, creating an impressive visual moment before slicing and serving.
Storage and Make-Ahead Tips
Refrigerator Storage:
No bake chocolate pie keeps beautifully in the refrigerator for up to 5 days when covered loosely with plastic wrap or stored in an airtight container. In fact, the pie tastes better on the second day after assembly, as flavors mellow and deepen significantly. However, avoid storing it longer than 5 days, as the crust gradually absorbs moisture from the filling. Additionally, the chocolate flavor remains consistent throughout the storage period, making this an excellent make-ahead dessert.
Freezing Instructions:
The assembled chocolate pie can be frozen for up to 2 months when wrapped tightly in plastic wrap and aluminum foil, then stored in a freezer-safe container. To use, transfer to the refrigerator and thaw for several hours or overnight, allowing it to thaw slowly and evenly. Additionally, add fresh toppings after thawing rather than before freezing, as whipped cream and chocolate shavings are better applied to the finished pie. Note that the texture may be slightly different after freezing, becoming a touch icier, though the flavor remains delicious.
Make-Ahead Strategy:
Prepare the crust and filling up to 2 days ahead, covering the pie tightly with plastic wrap and refrigerating until ready to serve. Next, refrigerate for at least 4 hours before serving, with overnight being ideal. Furthermore, you can assemble the complete pie up to 2 days ahead without toppings, adding whipped cream, chocolate shavings, or berries just before serving for optimal appearance. This approach allows you to do all the work ahead of time and simply remove from the refrigerator and serve when guests arrive. Finally, individual slices can be plated hours ahead, covered with plastic wrap, and refrigerated until serving, making this perfect for parties where you want to minimize last-minute preparation.
Transport and Gifting:
No bake chocolate pie travels reasonably well for potlucks or gatherings when kept chilled in a cooler with ice packs. Additionally, you can assemble the pie directly on a serving plate or pie server, then cover and transport in a sturdy box, eliminating the need to transfer it after chilling. For gifting, assemble the pie in a disposable aluminum pie tin, cover beautifully with plastic wrap, and include a ribbon and handwritten recipe card for a thoughtful homemade present.

Helpful Tips for Success
Mastering this recipe requires understanding a few key techniques that ensure consistent, perfect results every time. First, ensure all your ingredients, particularly the cream cheese, are at room temperature before beginning; this creates better emulsion and prevents lumps in the filling. Next, melt the chocolate carefully, avoiding overheating, which can cause the chocolate to become grainy or bitter; chocolate should be smooth and glossy when fully melted.
Additionally, cool the melted chocolate slightly before folding it into the cream cheese mixture, as excessively hot chocolate can cause lumps and separation. Furthermore, when folding in the melted chocolate and whipped cream, use a gentle hand and fold just until combined; overmixing deflates the air you’ve worked to incorporate. Additionally, refrigerate for the full recommended time rather than rushing the process; a complete set is essential for proper texture and sliceability. Finally, if the pie filling seems thin or isn’t setting properly after refrigeration, it likely needs more time; trust the process and refrigerate overnight for best results.
Chef Tips
Professional pastry chefs recommend using high-quality chocolate for the best flavor and texture, as lower-quality chocolate can taste waxy or bitter. Additionally, chill your knife under hot water for a few seconds before each slice, creating clean cuts and smooth edges that showcase the creamy, layered texture of the pie beautifully.
Frequently Asked Questions
Can I make this pie without cream cheese? While cream cheese is essential for texture and flavor, you can substitute mascarpone or crème fraîche in equal amounts, creating a slightly different but equally delicious filling.
How do I prevent the pie from leaking from the crust? Ensure the graham cracker crust is firmly pressed and packed into the pie dish; for extra security, brush the crust lightly with a little melted chocolate before adding the filling, creating a seal.
Can I use milk chocolate instead of semi-sweet or dark? Absolutely—milk chocolate works beautifully for a sweeter, less intense chocolate flavor; however, you may want to reduce the granulated sugar slightly to avoid excessive sweetness.
How long does no bake chocolate pie last in the refrigerator? The pie keeps beautifully for up to 5 days when stored covered in the refrigerator, though it’s best eaten within 3 days for optimal texture and freshness.
Can I add flavoring to the chocolate filling? Absolutely—add extracts like almond, peppermint, or bourbon vanilla; you can also add a tablespoon of instant coffee powder to deepen chocolate flavor without detectable coffee taste.
Flavor Variations and Creative Ideas
This no bake chocolate pie serves as a wonderful foundation for creative variations that suit different occasions and preferences. First, consider creating a mocha version by adding instant espresso powder or strong brewed coffee to the filling. Next, try a chocolate mint variation by adding peppermint extract and chocolate shavings, creating a classic combination. Additionally, make a chocolate peanut butter version by layering peanut butter cups into the filling or serving alongside peanut butter whipped cream. Furthermore, create a chocolate raspberry version by layering fresh raspberries or raspberry jam into the filling, adding tartness that balances richness. Finally, experiment with different crusts using crushed Oreos, chocolate cookies, or vanilla wafers, allowing endless customization options.
Why This Recipe Works
No bake chocolate pie succeeds because it combines the rich, creamy indulgence of chocolate pie with the simplicity and reliability of a no-bake formula. The balance of chocolate, cream cheese, and whipped cream creates a texture that’s both luxurious and surprisingly light, satisfying chocolate cravings without feeling heavy. Moreover, the graham cracker crust provides natural sweetness and flavor that complements the chocolate filling perfectly. Additionally, the absence of baking means consistent results every time without the complications that sometimes accompany traditional pie baking.
This recipe appeals to anyone who loves chocolate and appreciates treats that deliver impressive results with minimal effort. Furthermore, the flexibility means you can prepare it days ahead for stress-free entertaining. Additionally, the virtually foolproof nature means even first-time pie makers create impressive results. Finally, the versatility of toppings and flavor variations means you can customize it endlessly to match different occasions and preferences.
Perfect Occasions for No Bake Chocolate Pie
This elegant dessert shines at virtually any gathering where a show-stopping sweet finale would be appreciated. First, serve it at elegant dinner parties as the sophisticated conclusion to a multi-course meal. Next, bring it to potlucks where its impressive appearance and intense chocolate flavor draw admiring comments. Additionally, present it at celebrations, milestone events, and special occasions where guests expect something truly special. Furthermore, serve it at summer gatherings, garden parties, and warm-weather celebrations where a no-bake option prevents heating up the kitchen. Finally, enjoy it simply at home as a special treat, or gift beautifully wrapped to friends and family who appreciate homemade indulgences and chocolate devotion.
Final Thoughts
Making no bake chocolate pie from scratch is a rewarding experience that yields a dessert that looks and tastes far more impressive than the simple, stress-free technique required to create it. Additionally, there’s something deeply satisfying about combining simple ingredients into an elegant, professional-quality dessert without any baking anxiety. This recipe proves that spectacular desserts are entirely within the reach of home cooks who appreciate quality ingredients and simple, foolproof techniques.
Next time you want to impress family and friends with a dessert that tastes indulgent yet feels effortless to make, remember that this no bake chocolate pie delivers sophisticated flavor and beautiful results with straightforward steps. The combination of creamy chocolate filling, buttery crust, and your choice of toppings creates magic on the plate and satisfaction with every spoonful. Whether it’s your first time making it or your hundredth, this versatile dessert never fails to bring delight and admiration to the table.
We’d absolutely love to hear what you think about this no bake chocolate pie recipe! Did you try it? How did your pie turn out? What toppings or flavor variations did you create? Please save this recipe to your favorite collection, pin it to your Pinterest board so you can find it easily when you’re craving elegant, no-fuss chocolate desserts, and share it with friends and family who appreciate homemade indulgences and chocolate perfection. Your feedback and support truly encourage us to keep creating delicious recipes and helpful cooking guidance for you. Thank you for being part of our cooking community!