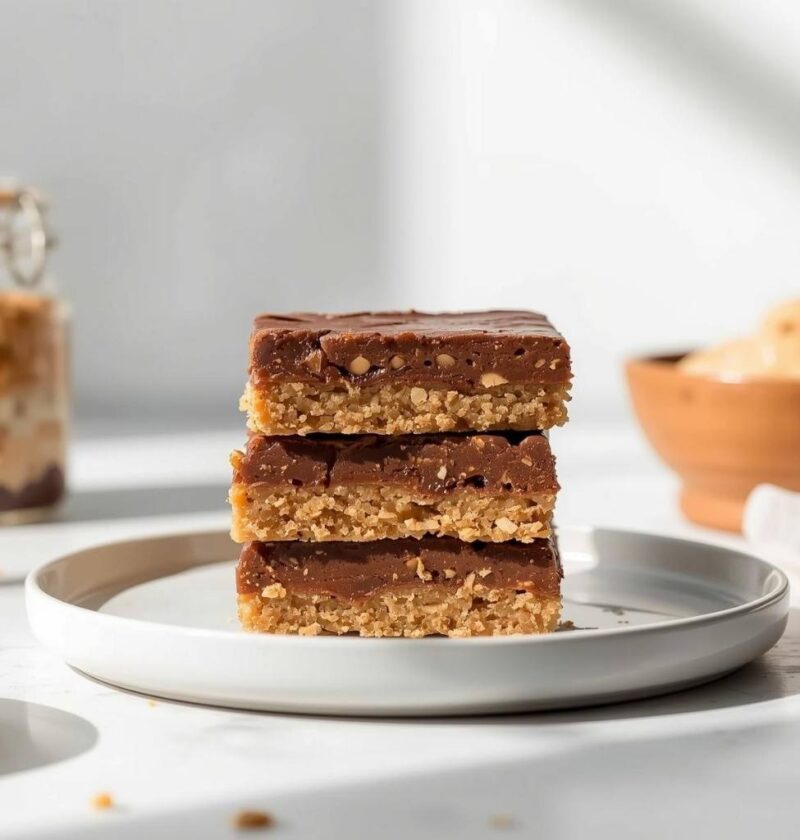
Imagine enjoying a dessert that requires zero oven time, uses ingredients you probably already have in your pantry, and tastes absolutely divine with every single bite. No Bake Peanut Butter Bars deliver exactly that experience, combining rich peanut butter, creamy chocolate, and buttery graham cracker crusts into an irresistible treat that feels far more complicated than it actually is. What makes this recipe truly special is how it celebrates peanut butter and chocolate in their most indulgent form while remaining remarkably simple to prepare. Whether you’re dealing with summer heat that makes turning on the oven unbearable, searching for a quick dessert solution for unexpected guests, preparing treats for a bake sale without any actual baking, or simply craving something delicious without the fuss, these bars deliver every single time. The beauty of this no-bake approach lies in its speed and convenience; you can have these bars ready to serve in less than 30 minutes of active work, plus chilling time. Beyond their delicious taste and impressive presentation, these bars offer the satisfaction of creating something that tastes homemade and gourmet while requiring minimal effort and kitchen skill. From the moment you layer the first component, you’ll understand why this recipe has become a beloved favorite for busy home cooks everywhere.
Ingredients
Servings: 16 bars
Graham Cracker Base: • 1 1/2 cups graham cracker crumbs (about 12 full crackers) • 6 tablespoons unsalted butter, melted • 2 tablespoons granulated sugar • 1/4 teaspoon salt
Peanut Butter Middle Layer: • 1 cup creamy peanut butter • 1/2 cup unsalted butter, softened • 2 cups powdered sugar • 1 teaspoon vanilla extract • 1/4 teaspoon salt
Chocolate Top Layer: • 1 cup semi-sweet or milk chocolate chips • 2 tablespoons coconut oil or shortening • 2 tablespoons unsalted butter
Optional Toppings and Variations: • Chopped peanuts • Sea salt flakes • Drizzle of peanut butter • Mini chocolate chips • Crushed pretzels
Step-by-Step Instructions
Prepare Your Pan
- Line a 9×13-inch baking pan with parchment paper, allowing it to overhang the sides for easy removal later.
- Lightly grease the parchment paper with cooking spray or a small amount of butter to prevent sticking.
- Measure out all ingredients before beginning to ensure smooth preparation without interruptions.
Make the Graham Cracker Base
- Combine graham cracker crumbs, melted butter, granulated sugar, and salt in a medium mixing bowl, stirring until well combined.
- The mixture should resemble wet sand and hold together when pressed.
- Pour the mixture into the prepared baking pan and press it firmly and evenly across the entire bottom.
- Use the bottom of a measuring cup or an offset spatula to create a smooth, compact, level surface.
- Set the pan aside while you prepare the peanut butter layer.
Prepare the Peanut Butter Layer
- Combine the creamy peanut butter and softened unsalted butter in a large mixing bowl.
- Beat the mixture on medium speed for about 1 minute until thoroughly combined and creamy.
- Gradually add the powdered sugar while continuing to beat, mixing until the filling becomes light and fluffy.
- Add the vanilla extract and salt, beating for another 30 seconds until fully incorporated.
- The mixture should be smooth, spreadable, and free of any lumps or dry spots.
- If the mixture seems too thick to spread, add 1 tablespoon of softened butter or milk and mix until you reach the desired consistency.
Spread the Peanut Butter Layer
- Spoon the peanut butter mixture onto the graham cracker base, using an offset spatula to spread it evenly across the entire surface.
- Work from the center outward, using smooth, gentle motions to create an even, professional-looking layer.
- Press the mixture down slightly to ensure it adheres firmly to the graham cracker base below.
- Smooth the top as much as possible, creating a flat surface for the chocolate layer to adhere to.
Prepare the Chocolate Top Layer
- Combine chocolate chips, coconut oil, and unsalted butter in a heat-safe bowl.
- Create a double boiler by placing the bowl on top of a pot with about 2 inches of gently simmering water.
- Ensure the bottom of the bowl doesn’t touch the water, allowing steam to gently heat the mixture.
- Stir occasionally with a rubber spatula until the chocolate is completely melted and smooth.
- This typically takes 3 to 5 minutes depending on the chocolate quantity and your stove temperature.
- Remove the bowl from the heat and allow the chocolate to cool for about 1 minute before pouring.
- The chocolate should be warm but not hot, as overly hot chocolate may soften the peanut butter layer below.
Pour and Spread the Chocolate Layer
- Carefully pour the melted chocolate over the peanut butter layer, starting from the center.
- Using an offset spatula or the back of a spoon, spread the chocolate evenly across the entire surface.
- Work gently to avoid disturbing the peanut butter layer beneath, using smooth, deliberate motions.
- Spread the chocolate all the way to the edges, creating a complete, even coating.
- If desired, add optional toppings like crushed peanuts, sea salt flakes, or mini chocolate chips while the chocolate is still wet.
Chill and Set
- Place the pan on a stable shelf in your refrigerator and allow the bars to chill for at least 2 hours until the chocolate is completely firm.
- For best results, chill overnight, which allows all layers to set properly and makes cutting much cleaner.
- Avoid the freezer, as rapid temperature changes can cause the chocolate to crack and become dull.
Cut and Serve
- Remove the pan from the refrigerator and allow it to sit at room temperature for about 5 minutes.
- Using the parchment paper overhang, lift the entire bar slab from the pan onto a cutting board.
- Using a sharp, greased knife, cut the bars into 16 squares of equal size.
- Wipe the knife blade with a damp cloth between cuts for clean edges and a professional appearance.
- Serve the bars at room temperature or slightly chilled, depending on your preference.
Serving and Storing Tips
Serving Tips
First, serve these bars at room temperature or slightly chilled for the most enjoyable texture and optimal peanut butter flavor. Next, present them on a beautiful platter, arranging them with intention for visual appeal that makes them look almost too good to eat. Additionally, you can serve them in individual paper liners or on a tiered dessert stand for a more formal presentation that feels special and gourmet. These bars pair wonderfully with cold milk, hot coffee, or a glass of sweet tea, making them ideal for breakfast, afternoon snacks, or dessert after dinner. Furthermore, they work beautifully as additions to dessert platters alongside other treats, or as the star of a potluck contribution that always garners compliments. For gift-giving, wrap individual bars in colorful cellophane with ribbons for thoughtful, homemade presents that rival store-bought chocolates. Consider serving them with a small fork or napkin, as the combination of peanut butter and chocolate can be delightfully messy in the best possible way.
Storage Tips
Store your no-bake peanut butter bars in an airtight container in the refrigerator for up to 7 days, maintaining their perfect texture and flavor throughout the week. Meanwhile, you can place parchment paper between layers to prevent the bars from sticking together and making them easier to grab individually. Additionally, these bars freeze beautifully for up to 2 months when wrapped individually in plastic wrap and stored in a freezer-safe container with parchment paper separating each layer. To thaw frozen bars, simply transfer them to the refrigerator the night before serving, allowing them to thaw slowly and naturally. Alternatively, you can eat them directly from the freezer for a chilled, almost fudgy texture that’s equally delicious. Furthermore, do not store these bars at room temperature for extended periods, as the chocolate may soften and the bars can become sticky in warm environments. If the chocolate coating becomes slightly soft after storage, you can refresh it by placing the bars in a cool room or briefly in the refrigerator before serving.
Helpful Notes
Ingredient Substitutions and Variations
The versatility of this recipe allows for countless creative adaptations that match your preferences and dietary needs. First, you can substitute natural peanut butter for creamy peanut butter, though you may need to adjust the powdered sugar slightly as natural peanut butter has less oil. Next, almond butter or cashew butter create delicious variations with slightly different flavor profiles that peanut butter lovers will appreciate. Meanwhile, those avoiding dairy can use vegan butter in place of traditional butter, and dairy-free chocolate chips with coconut oil work wonderfully. Additionally, you can create a chocolate peanut butter variation by adding 2 tablespoons of cocoa powder to the peanut butter layer for enhanced chocolate flavor. For those who prefer less sweetness, reduce the powdered sugar in the peanut butter layer to 1.5 cups and add an extra tablespoon of peanut butter. Furthermore, you can experiment with white chocolate instead of milk chocolate for a sweet, creamy top layer, or use dark chocolate for a more sophisticated, less sweet coating.
Topping and Flavor Variations
These bars provide an excellent foundation for creative variations and flavor combinations that keep them from becoming boring. For a salted peanut variation, sprinkle sea salt flakes over the wet chocolate coating to create a sweet and salty combination that’s absolutely addictive. Additionally, crushed pretzels mixed into the peanut butter layer or sprinkled on top add satisfying crunch that contrasts beautifully with the creamy layers. Meanwhile, chopped peanuts pressed into the wet chocolate create a fancy appearance and add texture. For a decadent touch, drizzle additional peanut butter over the set chocolate layer using a squeeze bottle for elegant lines. Furthermore, mini chocolate chips sprinkled onto the wet chocolate coating create visual interest and extra bursts of chocolate throughout. Consider creating holiday variations by using festive colors of chocolate or adding crushed candy canes for a peppermint peanut butter bar perfect for winter celebrations.
Common Mistakes to Avoid
One of the most frequent mistakes is spreading the peanut butter layer too quickly and carelessly, which can disturb the graham cracker base and create an uneven result. Work gently and deliberately, using smooth, confident motions to spread the peanut butter evenly. Additionally, pouring chocolate that’s too hot onto the peanut butter layer can soften and melt it, creating layers that blend together rather than remaining distinct. Always allow the melted chocolate to cool for at least 1 minute before pouring. Furthermore, chilling the bars for insufficient time results in bars that are difficult to cut cleanly and don’t maintain their shape when lifted from the pan. Plan for at least 2 hours of chilling, though overnight is ideal. Meanwhile, using softened butter rather than melted butter for the peanut butter mixture is crucial, as cold butter won’t combine properly and will result in a lumpy texture. Finally, cutting the bars while still very cold directly from the freezer can crack the chocolate coating and create uneven edges.
Time-Saving and Make-Ahead Tips
These bars are perfect for advance preparation, as they can be made up to 3 days ahead and stored in the refrigerator. First, you can prepare the graham cracker base the day before and store it covered at room temperature, then add the peanut butter and chocolate layers the next day. Next, you can complete the entire recipe the morning of your event, giving you one less thing to worry about on the day itself. Additionally, all three layers can be prepared while the bars are chilling, so you can multitask and work on other preparations simultaneously. For maximum convenience, freeze the bars after wrapping individual pieces, allowing you to grab single servings anytime the craving strikes. Furthermore, the entire recipe from start to finish (excluding chilling time) takes less than 15 minutes of active preparation, making it ideal for unexpected entertaining or last-minute dessert needs. You can also prepare the chocolate layer separately and store it in an airtight container for up to 5 days, melting and applying it whenever you’re ready to finish the bars.
Professional Tips for Perfect Results
The secret to clean-cut, professional-looking bars lies in using a sharp, greased knife and wiping it between each cut, just as with any multi-layered dessert. Additionally, allowing the pan to sit at room temperature for a few minutes before removing it from the refrigerator prevents the bars from being too cold and brittle when cutting. Meanwhile, using the parchment paper overhang to lift the entire bar slab from the pan ensures clean edges and prevents crumbling. Furthermore, keeping your knife warm and wet creates smoother cuts through the chocolate layer, resulting in a beautiful presentation. Finally, serving the bars at room temperature rather than straight from the refrigerator enhances the flavor of both the peanut butter and chocolate layers, allowing them to shine through without the dulling effect of cold temperatures.
Frequently Asked Questions
Can I make these bars without a double boiler for melting the chocolate? Yes, you can melt chocolate in the microwave in 30-second intervals, stirring between each interval until smooth, or use a heat-safe bowl over simmering water without the pot.
Why is my peanut butter layer too thick or too thin, and how can I fix it? If too thick, add 1 tablespoon of softened butter or milk and mix; if too thin, add more powdered sugar; consistency should be spreadable but still hold its shape.
How can I prevent the chocolate layer from cracking when I cut it? Allow the bars to thaw slightly at room temperature before cutting, wipe your knife between cuts, and use a sharp, greased blade for clean edges.
Can I use old peanut butter that has oil separated on top, or should I mix it back in? Yes, mix the separated oil back into the peanut butter before measuring—this is natural in many peanut butter brands and won’t affect the recipe.
What should I do if the peanut butter layer is too soft and doesn’t hold up when I try to add the chocolate? Refrigerate the peanut butter layer for 30 minutes before adding the chocolate coating to allow it to set and firm up properly.
Conclusion
No Bake Peanut Butter Bars represent the ultimate combination of convenience, flavor, and impressive results, proving that you don’t need hours in the kitchen or a functioning oven to create desserts that taste absolutely sensational. The remarkable simplicity of three distinct layers—crunchy graham cracker base, creamy peanut butter middle, and silky chocolate top—creates a treat that feels gourmet yet remains approachable for cooks of any skill level. Whether you’re avoiding the heat during summer months, seeking a quick solution for entertaining, preparing homemade gifts, or simply craving something absolutely delicious, these bars never disappoint.
The versatility of this recipe opens endless possibilities for creative variations and flavor combinations, allowing you to adapt them to your preferences while maintaining the beloved peanut butter and chocolate combination. Furthermore, the make-ahead nature of these bars means you can prepare them days in advance, keeping your schedule flexible while always having an impressive dessert available for unexpected guests or personal enjoyment. The minimal active preparation time combined with maximum flavor impact makes this one of the most efficient and rewarding recipes in your dessert collection.
Next time you’re craving peanut butter and chocolate, want to impress without spending hours in the kitchen, or need a dessert that works beautifully for any occasion, remember that these no-bake bars are always the perfect choice. Your family and friends will be absolutely amazed that something so delicious came together so quickly, and you’ll love the confidence that comes from creating restaurant-quality treats from your own kitchen.
If you loved making these No Bake Peanut Butter Bars and found this recipe helpful, we’d absolutely love it if you’d save it, pin it to your Pinterest board, or share it with friends and family who might enjoy making it too! Your support and feedback inspire us to keep creating convenient, delicious recipes and helpful guides that make homemade desserts accessible to busy home cooks everywhere. We can’t wait to hear about your experience making these bars, so please come back and let us know if you tried any fun variations or creative topping combinations. Happy no-baking!