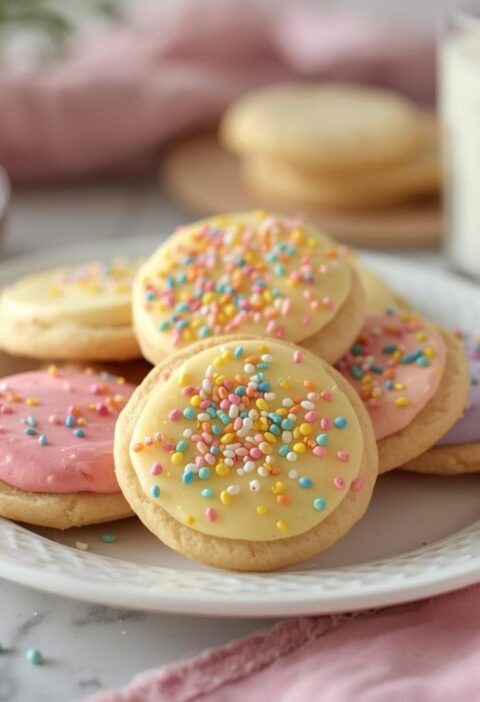
There’s something delightfully magical about freshly baked sugar cookies adorned with vibrant springtime colors and cheerful decorations that celebrate the season’s renewal and beauty. These classic treats have enchanted bakers and cookie lovers for generations, serving as edible art that transforms simple ingredients into treasured memories and moments of pure joy. What makes this recipe truly special is how it delivers a buttery, tender cookie with just the right amount of sweetness, topped with colorful royal icing that allows your creativity to flourish without limits. First, the simplicity of the ingredient list belies the incredible results you’ll achieve, proving that sometimes the most beloved recipes rely on quality and balance rather than complexity or technique. Additionally, these cookies hold their shape beautifully during baking, making them perfect canvases for decorative royal icing that transforms them into springtime masterpieces. Moreover, once you master this reliable cookie dough and royal icing, the decorating possibilities become virtually endless, allowing you to create personalized treats for any occasion throughout the season.
Ingredients
This recipe makes 24-30 cookies (depending on size)
For the Cookies
• 2 3/4 cups all-purpose flour • 1 teaspoon baking soda • 1/2 teaspoon salt • 1 cup unsalted butter, softened to room temperature • 1 1/2 cups granulated sugar • 1 large egg, room temperature • 1 teaspoon vanilla extract • 1/2 teaspoon almond extract (optional, for subtle complexity)
For the Royal Icing
• 3 cups confectioners’ sugar • 2-3 tablespoons egg white powder mixed with 6 tablespoons water (or 2-3 fresh egg whites) • 1/2 teaspoon vanilla extract • Pinch of salt • Gel food coloring in spring shades (pastel pink, light green, pale yellow, lavender, mint) • Water for thinning (as needed for consistency)
For Decorating
• Edible pearl dust or shimmer dust • Pastel sprinkles, pearl nonpareils, or sugar crystals • Fresh edible flowers (optional, for garnish) • Spring-themed cookie cutters (flowers, butterflies, bunnies, eggs, birds)
Step-by-Step Instructions
- In a small mixing bowl, whisk together the all-purpose flour, baking soda, and salt, ensuring all dry ingredients are evenly distributed throughout. Set this mixture aside and make sure there are no lumps of baking soda remaining that could affect the texture of your finished cookies.
- In a large mixing bowl, cream together the softened butter and granulated sugar using an electric mixer on medium speed. Beat for approximately 3-4 minutes until the mixture becomes light, fluffy, and pale in color—this crucial step incorporates air and creates cookies with a tender, delicate texture that melts in your mouth.
- Add the egg to the butter mixture and beat well until fully incorporated and the mixture is smooth. Next, pour in the vanilla extract and almond extract (if using), and beat until everything is well combined and the batter appears uniform throughout.
- Reduce the mixer speed to low and gradually add the dry flour mixture, stirring until just combined and no dry streaks of flour remain visible. Be careful not to overmix at this stage, as this will result in tough cookies rather than tender, delicate ones.
- Divide the dough into two portions, wrap each in plastic wrap, and refrigerate for at least 2-3 hours or overnight. First, chilling the dough is essential because it prevents the cookies from spreading too much during baking and helps them maintain their shape beautifully.
- Preheat your oven to 375°F (190°C) and position the rack in the center of the oven for even, consistent baking. Meanwhile, prepare baking sheets by lining them with parchment paper or silicone baking mats for easy cleanup and even baking.
- Remove one portion of dough from the refrigerator and let it sit at room temperature for about 5 minutes to soften slightly, making it easier to roll and cut. Next, roll the dough to approximately 1/4-inch thickness on a lightly floured surface using a rolling pin.
- Cut out shapes using spring-themed cookie cutters such as flowers, butterflies, bunnies, Easter eggs, or birds, placing each cookie onto the prepared baking sheets. Additionally, leave about 2 inches between cookies to allow room for slight expansion during baking without cookies touching each other.
- Bake in the preheated 375°F oven for 8-11 minutes, or until the cookie edges are just beginning to turn golden brown while the centers remain light in color. The cookies should not be dark brown; they’ll continue to firm up as they cool and can become tough if overbaked.
- Remove the baking sheets from the oven and allow the cookies to cool on the pan for about 2-3 minutes. First, this brief cooling period allows them to set slightly while still soft enough to transfer without breaking.
- Transfer the cookies to a wire cooling rack and let them cool completely to room temperature before decorating. However, you can refrigerate the cookies briefly to speed up cooling if you’re eager to begin the decorating process.
- Repeat steps 7-11 with the remaining dough portion, or refrigerate it for later use up to 5 days in advance.
Royal Icing Recipe and Technique
Creating Perfect Royal Icing
- Place the confectioners’ sugar in a medium mixing bowl and create a well in the center.
- Pour the egg white mixture and vanilla extract into the well, then beat using an electric mixer on medium-low speed. Next, begin mixing slowly to incorporate the egg white into the sugar, then gradually increase speed as the mixture combines.
- Beat for approximately 3-5 minutes until the icing becomes thick, glossy, and reaches stiff peaks—the icing should be smooth and hold its shape when piped. Additionally, if the icing seems too thin, add more confectioners’ sugar one tablespoon at a time until you reach the correct consistency.
- Divide the icing into separate bowls and add gel food coloring in spring shades, stirring well to distribute the color evenly and create beautiful pastel hues. Next, tint portions in soft pinks, greens, yellows, lavenders, and mints for a coordinated springtime palette.
- For flooding consistency (which covers larger areas smoothly), thin some of the icing with drops of water until it reaches the consistency of heavy cream. Meanwhile, keep other portions at stiff peak consistency for piping outlines and decorative details.
Decorating Techniques
First, pipe an outline around the edge of each cookie using thick royal icing in a contrasting or coordinating color. Next, thin some of the same color icing and flood the interior smoothly using a piping bag fitted with a round tip or a squeeze bottle. Additionally, you can create beautiful effects by piping thin lines of contrasting icing onto the wet flood icing and dragging a toothpick through them to create marbled or feathered patterns. Furthermore, add edible pearl dust, sprinkles, or nonpareils to wet icing before it dries for decorative details that catch light beautifully.
Serving and Storing Tips
Serving Suggestions
These delightful spring sugar cookies are perfect for countless occasions and celebrations throughout the season. Serve them at Easter brunches, spring garden parties, or baby showers as a charming dessert that guests will absolutely adore. Next, package them in decorative boxes tied with ribbons as thoughtful gifts for neighbors, teachers, friends, and family members who appreciate homemade treats. Additionally, arrange them on tiered cake stands at tea parties, bridal showers, or casual family gatherings for a visually stunning display that doubles as dessert. Furthermore, these cookies pair beautifully with cold milk, hot coffee, or spring-themed beverages like lemonade or herbal tea, making them appropriate for snacking throughout the day.
Storage Tips
To keep your spring sugar cookies fresh and preserve the beautiful royal icing decorations, store them in an airtight container at room temperature for up to 1 week once the icing has completely hardened. However, if you want to extend their shelf life even further, place them in an airtight container with parchment paper between layers and refrigerate them for up to 2 weeks. For longer-term storage, wrap undecorated baked cookies individually in plastic wrap and place them in a freezer-safe bag, freezing them for up to 3 months. Additionally, undecorated, unfrosted cookie dough can be frozen for up to 2 months, making it convenient to bake fresh cookies whenever the craving strikes or you need decorated cookies for an upcoming celebration.
Helpful Notes and Substitutions
Making It Your Own
There are numerous ways to customize this recipe to create spring sugar cookies that perfectly reflect your personal style and preferences. First, if you’d like to add spring flavoring, consider adding 1 teaspoon of lemon zest or 1/2 teaspoon of orange extract to the dough for a bright, fresh note. Next, you can substitute 1/2 teaspoon of the vanilla extract with maple or coconut extract for subtle flavor variations. Additionally, edible flowers like violets, pansies, or rose petals can be pressed gently onto wet royal icing for a natural, elegant touch.
Troubleshooting Tips
If your cookies spread too much during baking, your dough wasn’t cold enough before baking—always chill dough for the recommended time. Meanwhile, if your cookies are too cakey rather than tender, you may have added too much flour or overmixed the dough, so use a kitchen scale for accuracy. Furthermore, if your royal icing cracks as it dries, it’s too thick, so add water one drop at a time until you reach the correct consistency. Additionally, if your icing is too thin and doesn’t hold its shape when piped, add more confectioners’ sugar one tablespoon at a time.
Common Mistakes to Avoid
One of the most frequent errors home bakers make is overbaking sugar cookies, which results in hard, crispy cookies rather than tender ones that remain slightly soft in the center. Instead, remove cookies from the oven when edges are just beginning to turn golden while centers remain light in color. Additionally, skipping the crucial dough chilling step results in flat, spread-out cookies that lack the proper shape and structure. Furthermore, rushing the royal icing application before it’s completely hardened can cause smudging, so plan ahead and allow adequate drying time between decorating steps.
Chef Tips
Room temperature ingredients are absolutely essential for this recipe because they blend together more smoothly and create cookies with a more tender, delicate texture. Additionally, using a kitchen scale for measuring flour and sugar ensures consistency from batch to batch, eliminating the variables that can affect results. Furthermore, investing in high-quality gel food coloring in true pastel shades makes an enormous difference in achieving the soft, springtime color palette that defines beautiful spring sugar cookies.
Frequently Asked Questions
How far in advance can I bake spring sugar cookies? You can bake cookies up to 1 week in advance and store them in an airtight container at room temperature, then decorate them a few days before serving for the freshest appearance and flavor.
Can I freeze the decorated cookies? Yes, once the royal icing has completely hardened, place decorated cookies in a freezer-safe container with parchment between layers and freeze for up to 1 month for best quality.
What’s the best way to achieve smooth royal icing? Sift confectioners’ sugar before mixing to remove lumps, use fresh or quality egg white powder, and beat the icing for the full recommended time to achieve smoothness and proper consistency.
Can I use meringue powder instead of egg white powder? Yes, meringue powder is a safe alternative that produces excellent results; use 2 tablespoons of meringue powder mixed with 3 tablespoons of water to replace 2-3 fresh egg whites.
How do I prevent my cookies from spreading too much? Always chill the dough for at least 2-3 hours before rolling and cutting, and don’t skip this step as it’s essential for maintaining shape and achieving proper texture.
Why This Recipe Works
The combination of butter and sugar creamed together creates a light, fluffy base that produces tender, delicate cookies with an almost melt-in-your-mouth quality. Moreover, the single egg provides just enough moisture and binding without making the cookies cakey or heavy. Additionally, the ratio of flour to fat is carefully balanced to create cookies that hold their shape beautifully during baking while remaining tender. Furthermore, the baking temperature of 375°F is precisely calibrated to brown the edges slightly while keeping centers light and soft.
First, chilling the dough is absolutely crucial because cold dough spreads less during baking, allowing cookies to maintain their decorative shapes. Next, the royal icing sets to a hard shell that protects the cookies and looks absolutely beautiful. Meanwhile, the combination of stiff peak icing for outlines and flood icing for interiors allows you to create professional-looking decorations that impress everyone who sees them.
Decorating Inspiration and Ideas
Flower Designs
Create beautiful floral patterns by piping delicate lines onto wet royal icing or using thin piping tips to add botanical details. Next, consider piping tiny leaves and stems to create garden-inspired designs that celebrate springtime. Additionally, pressing edible flowers gently into wet icing creates a natural, elegant look that feels sophisticated and seasonal.
Butterfly and Bird Designs
For butterfly-shaped cookies, use two-color wings with contrasting patterns and details piped onto each half. Meanwhile, for bird-shaped cookies, create feather details using thin piping lines and add small beads or sprinkles for eyes. Furthermore, experimenting with metallic gel colors creates shimmery, eye-catching birds that feel special and festive.
Ombre and Gradient Effects
Create stunning color gradients by mixing multiple shades of the same color and piping them side by side on the icing. Next, use a toothpick to feather the colors together, creating beautiful blended effects. Additionally, arrange cookies by color intensity on your serving platter for a visually stunning display.
Minimalist Modern Designs
Sometimes less is more; consider simple designs using just two colors in clean, geometric patterns. Meanwhile, bold outlined shapes with contrasting interiors create a modern, sophisticated look. Furthermore, negative space—leaving some of the cookie base visible—can create stunning visual impact.
Flavor Variation Ideas
Once you’ve perfected the classic vanilla version, numerous flavor variations await your experimentation. For instance, add 1 tablespoon of fresh lemon juice and lemon zest to the dough for a bright, citrusy cookie perfect for springtime. Additionally, substituting 1/2 teaspoon of vanilla with orange extract creates a subtle spring flavor. Meanwhile, adding 1/2 teaspoon of cardamom or ground ginger creates warmth and depth. Furthermore, a touch of rosewater or almond extract adds sophistication and elegance to your spring sugar cookies.
Gift-Giving and Presentation Ideas
Spring sugar cookies make absolutely wonderful gifts that people treasure far more than store-bought treats. First, arrange cookies in a single layer in decorative boxes lined with tissue paper for a professional presentation. Next, tie the box with a beautiful ribbon, add a handwritten label, and present them as heartfelt gifts. Additionally, create cookie assortments using different spring designs and colors for visual variety. Furthermore, pairing cookies with herbal tea, coffee, or gourmet beverages creates a thoughtful gift basket that feels special and celebrates the season.
Conclusion
Spring sugar cookies represent the perfect celebration of the season’s arrival—versatile, beautiful, and endlessly customizable to suit any style or occasion. These tender cookies topped with colorful royal icing become edible art that delights both eyes and taste buds, creating memorable moments with everyone who enjoys them. Now that you have this comprehensive recipe, decorating techniques, and creative inspiration, you’ll find yourself creating these wonderful springtime treats year after year, building cherished traditions that bring joy and sweetness to every celebration.
Did you absolutely love creating these beautiful spring sugar cookies? Please save this recipe to your recipe collection, pin it to your favorite Pinterest board, and share it with friends and family who would enjoy making these festive treats! Your support and enthusiasm mean the world to us and encourage us to keep creating more amazing recipes and helpful decorating ideas for your celebrations. We’d genuinely love to hear about your baking and decorating experience in the comments below—tell us which cookie shapes you created, what spring colors you chose, and how your friends and family loved these homemade springtime treats!