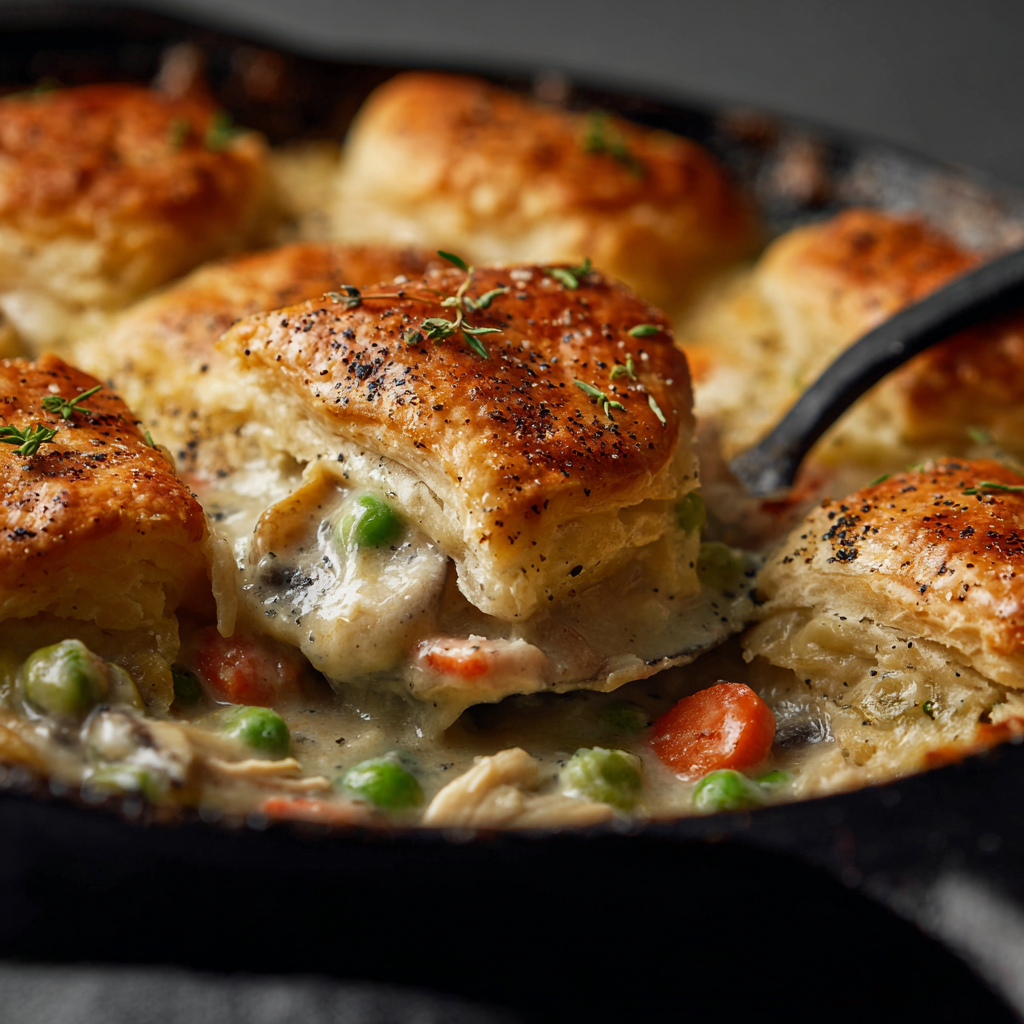
Imagine cutting into a golden, flaky pie crust to reveal creamy, chicken-filled filling loaded with tender vegetables and rich sauce that tastes like pure comfort. This winter chicken pot pie recipe delivers that ultimate comfort food that feels like a warm hug on a cold winter day, with buttery crust and luxurious filling that tastes restaurant-quality yet comes together more easily than traditional pie. What makes this recipe truly special is how it combines a simple creamy sauce with tender chicken and vegetables, topped with either homemade or store-bought puff pastry that bakes into golden, crispy perfection. Each forkful delivers tender chicken, perfectly cooked vegetables, silky sauce, and that satisfying crust that makes chicken pot pie genuinely memorable and worth mastering. Whether you’re seeking impressive meals for entertaining, wanting to impress family with homemade comfort food, seeking quick weeknight dinners despite looking complicated, or simply craving genuine soul-warming comfort, this winter chicken pot pie accomplishes all four with results that taste like you spent all day cooking.
Ingredients
Servings: 6-8
For the Filling:
- 3 tablespoons butter
- 1 medium yellow onion, diced
- 3 cloves garlic, minced
- 2 carrots, peeled and sliced into rounds
- 2 celery stalks, chopped
- 8 ounces mushrooms, sliced
- 3 cups cooked chicken, shredded or cubed
- 3 tablespoons all-purpose flour
- 3 cups chicken broth
- 1 cup heavy cream or half-and-half
- 1 cup frozen peas
- 2 bay leaves
- 1 teaspoon dried thyme
- 1 teaspoon dried parsley
- 1/2 teaspoon black pepper
- 1 teaspoon sea salt (adjust to taste)
- Juice of one-half lemon
- 1/4 teaspoon crushed red pepper flakes (optional)
For the Crust:
- 1 sheet frozen puff pastry (thawed) or homemade pie dough
- 1 egg yolk mixed with one tablespoon water (egg wash)
- Sea salt and black pepper for seasoning
Why Chicken Pot Pie Brings Ultimate Winter Comfort
First, the combination of creamy filling with tender chicken and vegetables creates textures that feel luxurious and deeply satisfying. Meanwhile, the flaky pastry crust provides textural contrast that makes each bite interesting. However, the real magic lies in how simple ingredients combine to create something that tastes far more sophisticated than the effort required. Additionally, the aroma while baking fills your home with unmistakable comfort food fragrance that triggers positive emotions. As a result, chicken pot pie delivers both physical warmth and emotional comfort that makes it genuinely perfect for winter gatherings.
Step-by-Step Instructions
1. Prepare your ingredients before cooking begins. To begin, ensure your chicken is cooked and shredded into bite-sized pieces. Next, peel and chop all vegetables into uniform pieces. Additionally, slice your mushrooms into half-inch thick slices. Meanwhile, having ingredients prepped streamlines cooking and prevents scrambling mid-process. However, don’t worry about perfect cuts—consistent sizing matters more than perfection. Furthermore, removing ingredients from the refrigerator 15 minutes before cooking helps them cook more evenly.
2. Preheat your oven to 400 degrees Fahrenheit. Set your oven to 400 degrees Fahrenheit and allow it to fully preheat. Next, proper temperature ensures the pastry bakes to golden perfection. Meanwhile, preheating takes about 15 minutes. Additionally, having your oven ready streamlines the baking process. However, ensure your oven rack is in the middle position for even baking. Furthermore, some ovens vary slightly in temperature, so use an oven thermometer if available.
3. Melt your butter in a large pot over medium heat. Pour three tablespoons of butter into a large pot or Dutch oven. Next, place it over medium heat and allow it to melt completely. Meanwhile, the melted butter becomes the base for your creamy sauce. Additionally, melted butter distributes more evenly than cold. However, avoid browning the butter—you want it pale and foamy. Furthermore, melted butter is ready when it stops sizzling.
4. Sauté your vegetables until softened and fragrant. Add your diced onion to the melted butter. Next, stir occasionally for about three to four minutes until the onion becomes soft and translucent. Afterward, add your minced garlic and cook for about one minute until fragrant. Meanwhile, this sautéing step develops deeper flavor. Additionally, you’ll notice the kitchen filling with wonderful aromatic vegetable fragrances. However, avoid burning vegetables—they should soften and become fragrant, not char.
5. Add your remaining vegetables. Add your sliced carrots, chopped celery, and sliced mushrooms to the pot. Next, stir frequently for about seven to eight minutes until all vegetables become soft. Meanwhile, the vegetables release their moisture and begin breaking down. Additionally, the mushrooms will darken and release their flavors. However, avoid overcooking vegetables—they should be tender but not falling apart. Furthermore, the pan will become crowded initially but vegetables reduce as they cook.
6. Sprinkle your flour over the vegetables. Sprinkle your flour over the softened vegetables. Next, using a wooden spoon, stir constantly for about two minutes. Meanwhile, this cooking step cooks out the raw flour taste while creating a roux that will thicken your sauce. Additionally, the flour will become golden and fragrant. However, avoid burning—keep heat at medium and stir constantly. Furthermore, proper flour cooking is essential for silky sauce without lumps.
7. Pour in your chicken broth slowly while stirring. Pour your chicken broth into the pot while stirring constantly. Next, add the broth slowly to prevent lumps from forming. Meanwhile, the mixture will begin thickening immediately. Additionally, stirring constantly ensures a smooth sauce. However, don’t add all the broth at once—do it gradually over about one minute. Furthermore, constant stirring prevents flour from clumping on the pot bottom.
8. Add your cream and seasonings. Pour your heavy cream or half-and-half into the pot. Next, add your bay leaves, dried thyme, dried parsley, black pepper, and sea salt. Additionally, add your optional crushed red pepper flakes if using. Using a wooden spoon, stir everything together. Meanwhile, the cream creates that luxurious, silky filling. Additionally, the seasonings will distribute throughout. However, taste at this point and adjust seasonings to your preference.
9. Add your chicken and cook gently. Add your cooked, shredded chicken to the pot. Next, stir gently to distribute throughout the creamy sauce. Meanwhile, the chicken will heat through gently. Additionally, stirring gently prevents shredding the chicken into tiny pieces. However, cooking the chicken in the filling for a few minutes allows it to absorb flavors. Furthermore, chicken is already cooked, so you’re just heating it through.
10. Add frozen peas and final seasoning. Add your frozen peas directly to the pot—no need to thaw them first. Next, stir gently to distribute throughout. Meanwhile, the peas will thaw quickly in the warm sauce. Additionally, squeeze in your lemon juice for brightness. However, add lemon juice cautiously—taste before adding more. Furthermore, lemon juice prevents the filling from tasting flat or one-dimensional.
11. Simmer briefly to allow flavors to meld. Allow your filling to simmer gently for about five to seven minutes. Next, this simmering time allows flavors to meld and develop. Meanwhile, the sauce thickens slightly as it simmers. Additionally, the filling will smell absolutely delicious. However, avoid vigorous boiling—you want gentle simmering. Furthermore, watch the pot to prevent boiling over.
12. Transfer filling to your baking dish carefully. Pour your hot filling into a large baking dish or pie dish. Next, spread it evenly in the dish. Meanwhile, it’s helpful to use a Dutch oven or similar oven-safe pot to keep the filling hot. Additionally, if your filling isn’t in an oven-safe container, transfer it to a baking dish. However, be careful with the hot filling—it can cause serious burns. Furthermore, work carefully and steadily when transferring hot liquid.
13. Prepare your puff pastry for topping. Remove your puff pastry from the refrigerator. Next, allow it to come to room temperature for about five minutes—this makes it easier to work with. Meanwhile, if using homemade pie dough, roll it out to cover your baking dish. Additionally, if your pastry is square, cut it to fit the dimensions of your baking dish. However, exact fit isn’t crucial—a slightly larger sheet can hang over the edges. Furthermore, thawed puff pastry should be cold but pliable.
14. Top your filling with pastry carefully. Carefully lay your puff pastry sheet over the hot filling. Next, press gently around the edges to seal slightly. Meanwhile, the pastry will partially deflate and settle. Additionally, if edges hang over, simply fold them under or leave them draped. However, folding under creates a more finished appearance. Furthermore, don’t worry about perfection—rustic looking pot pies are absolutely charming.
15. Cut steam vents into the pastry. Using a sharp knife, cut several small vents into the pastry top—about one-quarter inch long. Next, these vents allow steam to escape during baking. Meanwhile, venting prevents excessive pressure buildup that can cause the pastry to pop open. Additionally, the vents create an attractive presentation. However, don’t cut too large or steam will escape excessively. Furthermore, small, decorative cuts work beautifully.
16. Apply your egg wash for golden color. Using a pastry brush, brush your egg wash (egg yolk mixed with water) over the pastry surface. Next, the egg wash creates that beautiful golden-brown color. Meanwhile, brush lightly without soaking the pastry. Additionally, sprinkle a pinch of sea salt and black pepper over the egg wash if desired. However, egg wash is optional but highly recommended for impressive appearance. Furthermore, the egg wash should coat evenly but not pool.
17. Bake until golden brown and crispy. Place your pot pie into your preheated 400-degree oven. Next, bake for about 25-35 minutes until the pastry is golden brown and puffed. Meanwhile, the pastry will rise significantly as it bakes. Additionally, the kitchen will fill with incredible aromas. However, baking time varies depending on your oven, pastry thickness, and filling temperature. Furthermore, the pastry should be crispy and golden, not pale or undercooked. As a result, watch carefully during the final minutes.
18. Cool briefly before serving. Remove your pot pie from the oven. Next, allow it to cool for about five to ten minutes before serving. Meanwhile, this cooling prevents the filling from being too hot to eat safely. Additionally, cooling allows the filling to set slightly, making it easier to serve. However, serve while still warm—pot pie is best enjoyed hot. Furthermore, brief cooling prevents burns from the extremely hot filling inside.
19. Serve with pride and enjoy immediately. Using a serving spoon, carefully portion your chicken pot pie into serving bowls. Next, serve immediately while warm and aromatic. Meanwhile, the pastry will remain crispy if served promptly. Additionally, pour any filling that’s still in the baking dish generously over each portion. However, some filling inevitably stays in the pan—that’s completely normal. Furthermore, serve with bread, salad, or vegetables if desired, though pot pie is absolutely complete on its own.
Serving and Storage Tips
How to Serve Your Winter Chicken Pot Pie
First, serve your pot pie hot in bowls with generous portions of creamy filling and crispy pastry. Next, simple salad with vinaigrette provides light contrast to the rich filling. Additionally, crusty bread for soaking up sauce works beautifully. However, pot pie is absolutely satisfying and complete on its own. Furthermore, this pot pie works equally well for quick weeknight dinners and impressive entertaining. As a result, serve whenever you want maximum comfort and impressive presentation.
Proper Storage and Extended Shelf Life
To begin, store leftover chicken pot pie in an airtight container in the refrigerator for up to four days. Next, the flavors remain delicious when stored properly. Additionally, leftover pot pie reheats beautifully in a 350-degree oven for about 15-20 minutes, covered with foil to prevent the pastry from burning. However, avoid microwaving if possible, as this makes pastry soggy rather than crispy. Furthermore, baked pot pie freezes less successfully than unbaked—the pastry becomes soggy upon thawing. However, you can freeze the filling and unbaked pastry separately, then assemble and bake when ready. In contrast to many dishes, pot pie is best enjoyed fresh.
Helpful Notes and Tips for Success
Understanding key techniques ensures your winter chicken pot pie turns out absolutely delicious every single time. First, using cooked chicken speeds up preparation significantly. Meanwhile, you can use rotisserie chicken, leftover cooked chicken, or specially poached chicken. However, quality chicken affects the final pie—use flavorful chicken. Additionally, shredding rather than cubing creates better texture distribution. As a result, shredded chicken incorporates more evenly throughout the filling.
Next, the vegetables should be cut into uniform pieces for even cooking. Additionally, mushrooms add umami and earthiness. Meanwhile, carrots and celery create the traditional flavor base. However, you can substitute or add other vegetables you prefer. Furthermore, frozen peas are convenient and taste excellent—fresh peas aren’t necessary. As a result, don’t feel obligated to use fresh peas.
Furthermore, the filling should be thick but pourable—thick enough to hold together but liquid enough to flow. To begin, the flour roux thickens the filling naturally. Meanwhile, proper flour-to-liquid ratio ensures ideal consistency. However, if filling seems too thick, add more broth. Additionally, if it seems too thin, mix cornstarch with cold water and stir in. As a result, consistency adjustments are simple.
Additionally, puff pastry is convenient and produces excellent results. To begin, frozen puff pastry requires thawing before use. Meanwhile, thawed pastry is easy to work with. However, homemade pie dough produces equally excellent results. Furthermore, either option bakes to golden, crispy perfection. As a result, use whichever you prefer or have available.
Finally, proper egg wash creates that beautiful golden-brown color that makes pot pie visually impressive. To begin, egg wash should be thin—one egg yolk mixed with water. Meanwhile, brushing lightly creates even coating. However, egg wash is optional but highly recommended. Furthermore, a pinch of salt and pepper on the egg wash adds visual interest. As a result, egg wash is worth the minimal effort.
Common Mistakes to Avoid
To begin, one frequent error is lumpy sauce from insufficient stirring when adding broth. Meanwhile, constant stirring prevents lumps. However, lumpy sauce can be fixed with an immersion blender if it happens. Additionally, another mistake involves overcooking vegetables before adding the broth, making them mushy. In contrast, vegetables should be tender but maintain some structure. Furthermore, some people add the pastry before the filling cools sufficiently, causing it to become soggy.
Finally, baking at too high a temperature can burn the pastry before the filling becomes hot. Meanwhile, 400 degrees Fahrenheit is ideal. As a result, proper temperature management ensures success.
Chef Tips
Professional chefs recommend making chicken pot pie in individual dishes rather than one large pie—this creates an impressive presentation and allows for easier serving and portion control. Additionally, for extra richness and elegance, add one-quarter cup of dry white wine to the filling alongside the broth, which adds subtle complexity and sophistication.

Frequently Asked Questions
Can I make this pot pie ahead and bake it later? Absolutely. Prepare the filling, cool it completely, then top with pastry. Cover and refrigerate for up to 24 hours before baking. Add about five minutes to baking time since the filling will be cold.
Can I use store-bought rotisserie chicken? Absolutely. Use about three cups of shredded rotisserie chicken. This saves significant cooking time while maintaining excellent flavor and texture.
Is there a vegetarian version of this recipe? Yes, omit the chicken and increase vegetables—add extra mushrooms, potatoes, or your preferred vegetables. The filling remains delicious without chicken.
What’s the best way to reheat leftover pot pie? Reheat in a 350-degree oven covered with foil for about 15-20 minutes until heated through. This maintains crispy pastry better than microwaving.
Can I freeze unbaked pot pie? Yes, you can freeze unbaked pot pie for up to three months. Bake directly from frozen, adding about 10-15 minutes to baking time. Cover loosely with foil if pastry browns too quickly.
Why This Winter Chicken Pot Pie Becomes a Beloved Recipe
First, the combination of creamy filling with crispy pastry creates textures that feel luxurious and deeply satisfying. Next, the relatively quick preparation means you can have impressive pot pie on the table in about one hour. Meanwhile, the familiar flavors and aromas trigger positive memories and emotions. Additionally, the impressive presentation makes it suitable for entertaining. Furthermore, because it reheats beautifully, you can prepare ahead for convenient weekday meals.
As a result, this winter chicken pot pie bridges the gap between convenience and genuine quality perfectly. In contrast to frozen pot pie filled with preservatives, homemade versions taste noticeably superior. However, homemade pot pie requires minimal additional effort beyond basic cooking skills. Additionally, once you master this basic recipe, you’ll find yourself making variations with different vegetables or proteins. Therefore, this recipe deserves a permanent place in your winter meal rotation.
The Bottom Line
Winter chicken pot pie represents the ideal solution for those seeking impressive comfort food that nourishes body and soul. Next, whether you’re seeking impressive meals for entertaining, wanting to impress family, craving genuine comfort, or pursuing simple yet elegant meals, this recipe delivers professional results every single time. Additionally, the combination of creamy filling, tender chicken, soft vegetables, and crispy pastry creates something genuinely memorable and worth making regularly.
To begin your chicken pot pie journey, gather quality chicken broth and puff pastry this week. Afterward, set aside about an hour on your next cold day to create your first pot pie. Furthermore, as you serve your golden, crispy pot pie and watch guests enjoy the creamy, chicken-filled interior, you’ll understand why pot pie remains a beloved comfort food for generations. The golden pastry, luxurious filling, impressive presentation, and remarkable flavor combine to create something truly special that transforms cold winter days into moments of genuine comfort and togetherness.
Did you adore this winter chicken pot pie recipe? We’d absolutely love to hear about it! Please save this recipe for your next entertaining occasion or comfort food craving, pin it to your Pinterest board for easy access, and share it with friends and family who deserve impressive, delicious homemade pot pie. Your love and support mean everything to us—every save, share, and pin encourages us to create more delicious recipes and helpful cooking content. Thank you for being part of our warm, welcoming culinary community!