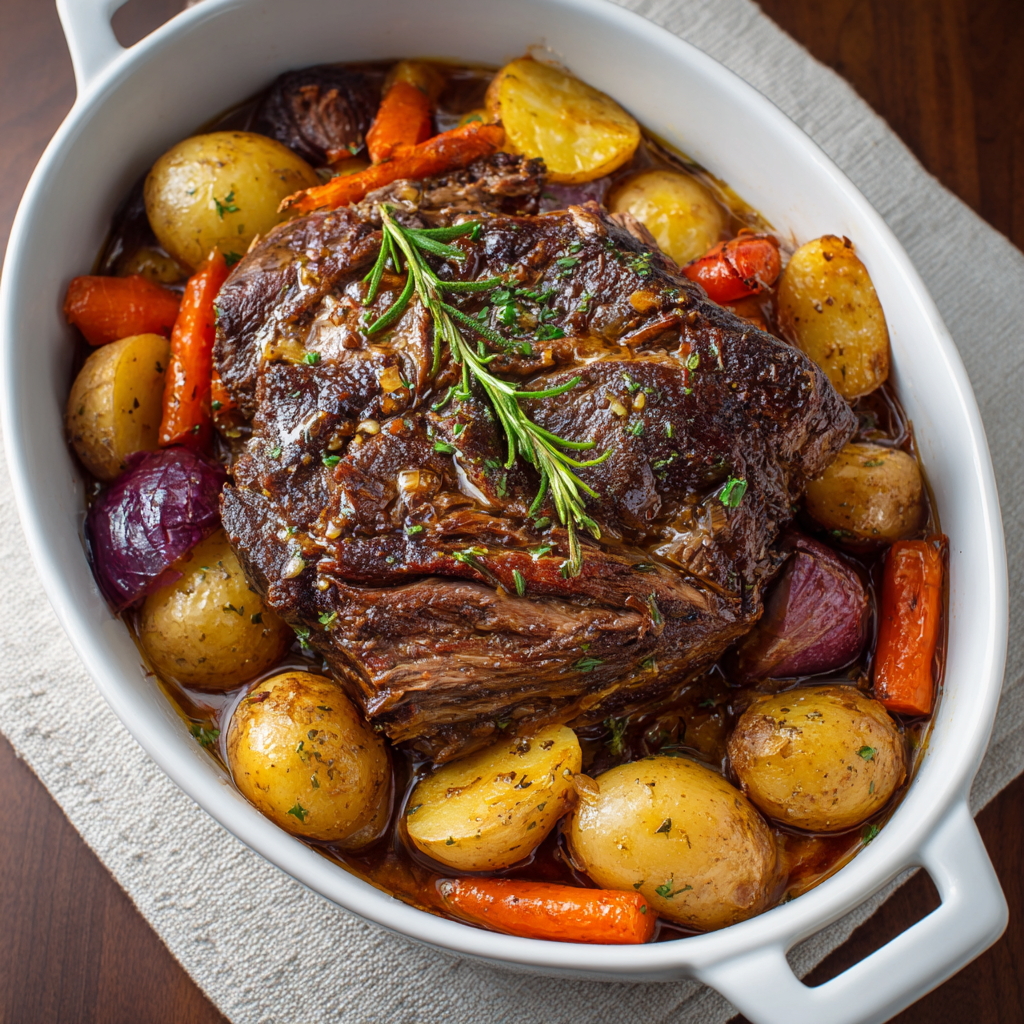
When winter settles in and you need a meal that fills your home with mouthwatering aromas and feeds your family with pure comfort, nothing satisfies quite like a tender pot roast braised slowly with vegetables and savory gravy. This classic Sunday dinner combines fork-tender beef, perfectly cooked vegetables, and rich, flavorful sauce into a one-pot meal that makes everything feel right with the world. What makes this recipe truly exceptional is how it transforms an affordable cut of beef into something so tender and delicious through simple braising techniques that require minimal hands-on time. The combination of properly seared meat, aromatic vegetables, and long, slow cooking creates layers of flavor that make this humble dish taste like something from a fine restaurant. Whether you’re feeding your family on a snowy evening, preparing Sunday dinner for generations gathered around the table, or making comfort food that provides leftovers all week, this pot roast delivers soul-warming satisfaction that defines winter cooking. Best of all, most of the cooking happens unattended in the oven or slow cooker, freeing you to relax while your house fills with incredible aromas that build anticipation for the delicious meal ahead.
Ingredients
This recipe makes 8 servings.
For the Roast:
- 4 to 5 pounds beef chuck roast
- 2 tablespoons vegetable oil
- 2 teaspoons salt
- 1 teaspoon black pepper
- 2 teaspoons garlic powder
- 1 teaspoon onion powder
- 1 teaspoon dried thyme
- 1 teaspoon paprika
For the Vegetables and Braising Liquid:
- 2 large yellow onions, cut into wedges
- 6 cloves garlic, smashed
- 4 large carrots, peeled and cut into 2-inch pieces
- 1 pound baby potatoes, halved (or regular potatoes cut into chunks)
- 3 celery stalks, cut into 2-inch pieces
- 8 ounces mushrooms, halved
- 3 cups beef broth
- 1 cup red wine (or additional beef broth)
- 3 tablespoons tomato paste
- 2 tablespoons Worcestershire sauce
- 2 bay leaves
- 4 sprigs fresh thyme (or 1 teaspoon dried)
- 3 sprigs fresh rosemary (or 1 teaspoon dried)
- 2 tablespoons fresh parsley, chopped
For the Gravy:
- 3 tablespoons unsalted butter, softened
- 3 tablespoons all-purpose flour
- Salt and pepper to taste
Instructions
- Remove the chuck roast from the refrigerator 30 minutes before cooking to bring it to room temperature.
- Preheat your oven to 325°F and position the rack in the lower third.
- Pat the roast completely dry with paper towels on all sides.
- Combine the salt, pepper, garlic powder, onion powder, thyme, and paprika in a small bowl.
- Rub the spice mixture generously all over the roast, coating every surface.
- Heat the vegetable oil in a large Dutch oven over medium-high heat until it shimmers.
- Carefully place the seasoned roast in the hot pot and sear for 4 to 5 minutes per side.
- Turn the roast to sear all sides until deeply browned and crusty.
- Remove the seared roast to a plate and set aside while you prepare the vegetables.
- Reduce heat to medium and add the onion wedges and smashed garlic to the pot.
- Sauté for 3 to 4 minutes, scraping up any browned bits from the bottom.
- Stir in the tomato paste and cook for 1 minute until it darkens slightly.
- Pour in the red wine and bring to a simmer, scraping the pot bottom thoroughly.
- Add the beef broth and Worcestershire sauce, stirring to combine.
- Return the seared roast to the pot along with any accumulated juices.
- Add the bay leaves, fresh thyme sprigs, and rosemary sprigs around the roast.
- Bring the liquid to a simmer, then cover the pot with a tight-fitting lid.
- Transfer the covered pot to the preheated oven.
- Braise for 2 hours, turning the roast over halfway through if possible.
- After 2 hours, add the carrots, potatoes, celery, and mushrooms around the roast.
- Cover and return to the oven for another 1 to 1.5 hours until the meat is fork-tender.
- Check that the roast shreds easily with a fork and vegetables are tender.
- Remove the pot from the oven and transfer the roast and vegetables to a serving platter.
- Tent with foil to keep warm while you make the gravy.
- Discard the bay leaves and herb sprigs from the braising liquid.
- Skim excess fat from the surface of the liquid using a spoon or fat separator.
- Place the pot over medium-high heat and bring the liquid to a simmer.
- Mash together the softened butter and flour to create a paste (beurre manié).
- Whisk the butter-flour paste into the simmering liquid bit by bit.
- Cook for 3 to 5 minutes, whisking frequently, until the gravy thickens.
- Taste and adjust seasonings with salt and pepper as needed.
- Slice or shred the pot roast and arrange on the platter with vegetables.
- Pour some gravy over the meat and vegetables, serving extra gravy on the side.
- Garnish with fresh parsley and serve immediately while hot.
Choosing and Preparing the Perfect Cut
Chuck roast provides the ideal balance of flavor, marbling, and affordability that makes it perfect for braising. This well-exercised shoulder cut contains enough connective tissue and fat to stay moist during long cooking while becoming incredibly tender as collagen breaks down into gelatin. Additionally, chuck roast offers rich, beefy flavor that stands up to long cooking times without tasting bland or washed out. Other suitable cuts include brisket, bottom round, or shoulder roast, though chuck remains the most reliable choice.
Bringing the meat to room temperature before searing ensures more even cooking and better crust development. Cold meat hits the hot pan and drops the temperature dramatically, preventing proper browning and creating steamed rather than seared surfaces. This 30-minute rest also allows the meat to relax, which helps it cook more evenly throughout. Furthermore, thoroughly drying the surface with paper towels removes moisture that would prevent browning and create steam instead of the deep, flavorful crust you want.
The generous seasoning applied before searing penetrates the meat’s exterior and creates a flavorful crust that adds complexity to every bite. Don’t be shy with the spices—this large roast needs substantial seasoning to taste properly flavored throughout. The combination of salt, pepper, garlic powder, onion powder, thyme, and paprika creates savory depth without overwhelming the natural beef flavor. This seasoned crust also contributes to the final gravy, enriching it with concentrated flavors developed during searing.
The Critical Importance of Proper Searing
Searing the roast before braising creates the foundation of flavor that makes great pot roast exceptional. High heat triggers the Maillard reaction, creating hundreds of new flavor compounds that add depth, complexity, and that characteristic “roasted” taste. Additionally, searing creates a flavorful crust that stays intact during braising, contributing concentrated beef flavor to every slice. Skipping this step results in pale, bland pot roast that lacks the depth great versions provide.
Getting a proper sear requires patience and high heat—don’t move the meat around or check it too frequently. Let each side sit undisturbed for 4 to 5 minutes, allowing the crust to develop fully before turning. The meat should release easily from the pan when it’s ready to flip; if it sticks, it needs more time. Additionally, searing in batches or using a large enough pot ensures the meat browns rather than steams from overcrowding. These technical details separate amateur cooking from professional-quality results.
The browned bits (fond) left in the pot after searing contain concentrated flavor that shouldn’t be wasted. Deglazing with wine or broth dissolves these flavorful deposits and incorporates them into the braising liquid, enriching the entire dish. Scraping the pot bottom thoroughly with a wooden spoon releases all those delicious browned bits that would otherwise burn during long cooking. This technique, called deglazing, captures every bit of flavor you worked to develop through proper searing.
Building Rich Braising Liquid
The braising liquid forms the foundation of your final gravy while keeping the meat moist during cooking. Red wine adds acidity that helps tenderize the meat while contributing complex, sophisticated flavor that makes pot roast taste restaurant-quality. The wine also deglazes the pan effectively, capturing all those precious browned bits. For those avoiding alcohol, additional beef broth with a splash of red wine vinegar provides similar acidity and flavor complexity without the wine.
Beef broth provides the savory base that amplifies the meat’s natural flavors and creates rich gravy. Using quality broth—whether homemade or store-bought—makes noticeable difference in final taste. Low-sodium versions give you control over final salt levels, which matters since the liquid reduces and concentrates during cooking. Additionally, the combination of wine and broth creates balanced flavor that’s neither too acidic nor too heavy.
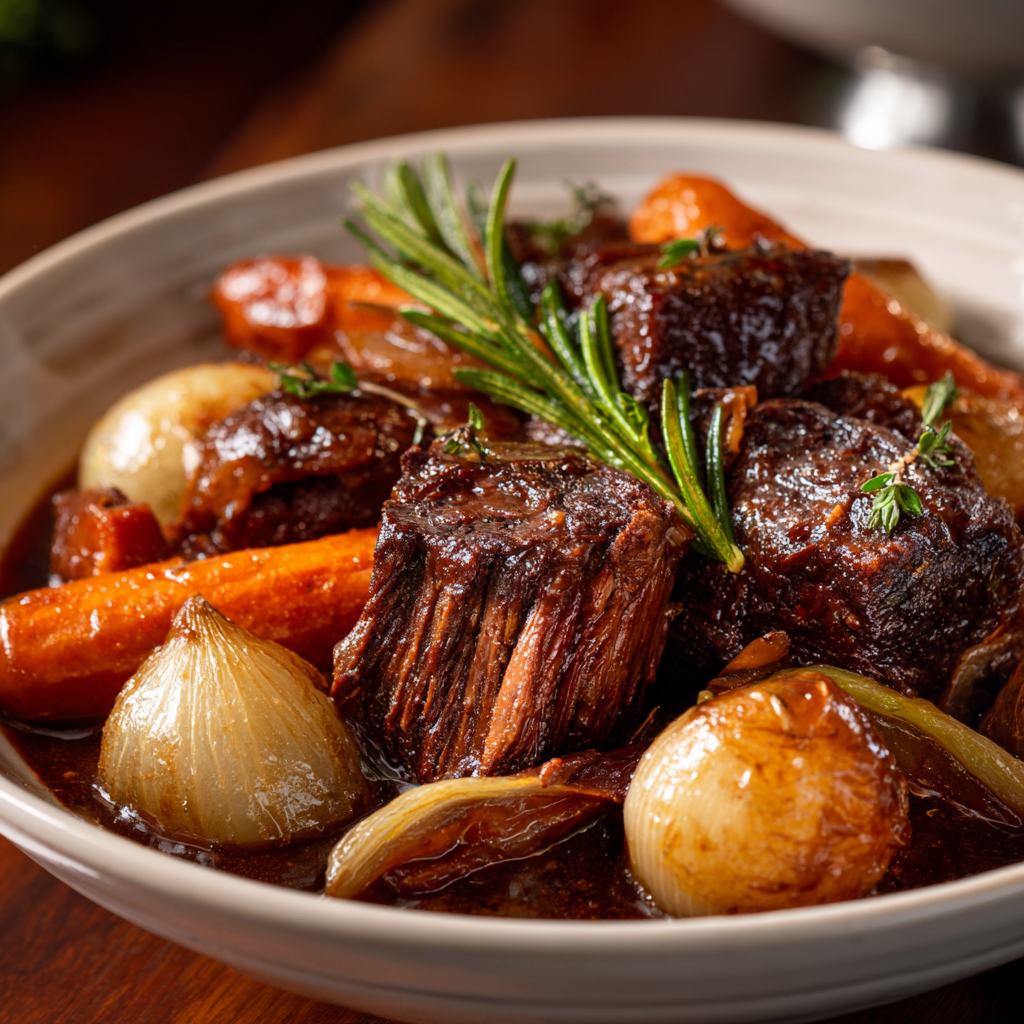
Tomato paste, Worcestershire sauce, and fresh herbs contribute layers of umami richness and aromatic complexity. Tomato paste adds subtle sweetness and depth while contributing body to the braising liquid. Worcestershire sauce provides fermented, savory notes that enhance meatiness. Meanwhile, fresh thyme and rosemary infuse the liquid with aromatic herbal notes that make the entire house smell incredible. Together, these ingredients transform simple broth into complex, flavorful braising liquid that becomes luxurious gravy.
Mastering Low and Slow Braising
Braising at low temperature in a covered pot creates the tender, fall-apart texture that defines great pot roast. The 325°F oven temperature provides gentle, even heat that breaks down tough connective tissue without drying out the meat. Additionally, the covered pot traps moisture, creating a steamy environment that keeps everything moist while the collagen slowly converts to gelatin. This transformation takes time—there’s no rushing the process without sacrificing tenderness.
The meat goes through distinct stages during braising that affect final texture. Initially, it firms up and can seem tough as proteins contract and release moisture. After about 2 hours, the connective tissue begins breaking down and the meat starts becoming tender. Finally, after 3 to 3.5 hours total, the roast reaches that perfect fork-tender consistency where it practically falls apart. Understanding this progression prevents panic when the meat seems tough at the 1-hour mark.
Adding vegetables partway through cooking rather than at the beginning ensures they finish perfectly tender without becoming mushy. Root vegetables like carrots and potatoes need 60 to 90 minutes to become tender, while the meat needs 3 to 4 hours total. Adding them after the roast has cooked for 2 hours ensures everything finishes simultaneously. This timing creates vegetables that are tender and flavorful but still hold their shape rather than disintegrating into mush.
Serving and Storing Tips
Serving Tips
Serve this pot roast family-style on a large platter with the vegetables arranged around the sliced or shredded meat. Pour some of the rich gravy over everything before bringing it to the table, serving additional gravy in a gravy boat for those who want extra. This generous presentation creates visual impact and makes the meal feel special and abundant. Garnishing with fresh parsley adds color and freshness that balances the rich, hearty flavors.
Classic pot roast needs little accompaniment beyond perhaps crusty bread for soaking up gravy, though mashed potatoes, egg noodles, or rice make excellent additions for stretching the meal further. A simple green salad or steamed green beans provides color contrast and light freshness that balances the richness. Additionally, pickled vegetables or a tangy relish cuts through the richness and adds complexity. These simple sides allow the magnificent pot roast to remain the star while creating a complete, satisfying meal.
Leftovers transform beautifully into various second meals throughout the week. Shredded pot roast makes incredible sandwiches with gravy for dipping, fills tacos or burritos with southwestern flair, or tops loaded baked potatoes for hearty lunches. The meat and gravy also create fantastic shepherd’s pie filling or can be stirred into pasta for quick dinners. This versatility makes pot roast one of the most valuable recipes in your winter cooking repertoire.
Storage Tips
Store leftover pot roast and vegetables in airtight containers with plenty of gravy to keep everything moist in the refrigerator for up to 4 days. The meat actually improves overnight as it continues absorbing the flavorful gravy, making leftovers arguably better than the original meal. Store the gravy separately if you prefer, though keeping everything together maintains better moisture and flavor. Reheat gently on the stovetop or in the microwave, adding splashes of broth if needed to restore moisture.
For meal prep or longer storage, shred the meat and portion it with vegetables and gravy into individual containers. This approach provides ready-made lunches or quick dinners that just need reheating—perfect for busy weeknights when you don’t want to cook from scratch. Single portions also thaw and reheat more quickly than large containers, providing maximum convenience when you need a fast, satisfying meal.

Freezing pot roast works exceptionally well for up to 3 months and provides incredible convenience. Cool everything completely before transferring to freezer-safe containers, leaving some headspace for expansion. The meat and gravy freeze and reheat beautifully, maintaining excellent texture and flavor. Thaw overnight in the refrigerator before reheating gently on the stovetop, adding liquid if needed. Frozen pot roast tastes remarkably close to fresh, making it perfect for batch cooking when you have time to prepare multiple meals at once.
Helpful Notes
Using a slow cooker adapts this recipe beautifully for hands-off cooking that fits busy schedules. Sear the meat on the stovetop first for best flavor, then transfer everything to the slow cooker and cook on low for 8 to 10 hours or high for 5 to 6 hours. Add vegetables during the last 2 to 3 hours to prevent overcooking. The long, gentle cooking creates incredibly tender results, though the gravy may need thickening at the end since less evaporation occurs in slow cookers.
For those wanting to reduce the cooking time, an Instant Pot or pressure cooker creates tender pot roast in about 90 minutes. Sear the meat using the sauté function, then pressure cook on high for 60 to 70 minutes with natural release. Add vegetables and cook for an additional 10 minutes on high pressure. While faster, this method produces slightly different texture—still tender and delicious but not quite as fall-apart as traditional braising. Both methods work wonderfully depending on your available time.
Customizing the vegetables based on preferences or what you have available keeps pot roast interesting across multiple preparations. Parsnips, turnips, or sweet potatoes provide variation from standard carrots and potatoes. Pearl onions instead of wedges create more elegant presentation. Adding frozen peas during the last 5 minutes contributes color and sweetness. These variations use the same basic technique while creating different flavor profiles that prevent boredom.
Common mistakes that ruin pot roast include not searing properly, cooking at too high a temperature, or not cooking long enough. Always take time to develop a good crust, maintain low oven temperature for gentle cooking, and be patient—the meat will seem tough until collagen breaks down around the 2.5-hour mark. Additionally, don’t skip the resting period before slicing, which allows juices to redistribute and makes carving easier. These precautions ensure tender, juicy results every time.
Chef Tips
Professional chefs know that resting the finished roast for 10 to 15 minutes before slicing allows the meat to reabsorb juices and makes it easier to carve neat slices. Slicing immediately after removing from heat causes juices to run out, creating drier meat and a pool of liquid on the cutting board. This brief patience pays enormous dividends in juiciness and presentation quality. Cover the meat loosely with foil during resting to maintain temperature without trapping so much steam that the surface becomes soggy.
Another expert technique involves making the gravy using beurre manié (butter-flour paste) rather than a separate roux. This method creates silky-smooth gravy without lumps since the butter coats the flour particles and prevents clumping when whisked into hot liquid. Additionally, this technique allows you to thicken the gravy gradually to your preferred consistency rather than committing to a specific thickness upfront. For even richer gravy, stir in a tablespoon of cold butter at the end for glossy, luxurious finish.
Frequently Asked Questions
Can I cook pot roast on the stovetop instead of the oven? Yes, simmer on the lowest heat with the pot covered, checking occasionally and adding liquid if needed; oven provides more even heat but stovetop works fine.
Why is my pot roast tough? It hasn’t cooked long enough; connective tissue needs 3+ hours to break down, so continue cooking until fork-tender even if it seems done earlier.
Can I use a different cut of beef? Yes, brisket, bottom round, or rump roast all work; choose well-marbled cuts with connective tissue that become tender through braising.
How do I prevent vegetables from getting mushy? Add them halfway through cooking rather than at the beginning, and cut them into larger pieces that hold up better to extended cooking.
Why is my gravy too thin? Simmer it uncovered to reduce and concentrate, or thicken with butter-flour paste (beurre manié) or cornstarch slurry whisked in gradually.
Creating Sunday Dinner Traditions
Few meals capture the essence of home and family quite like a tender pot roast emerging fragrant from the oven on a cold Sunday afternoon. This recipe represents more than dinner—it’s the kind of meal that gathers generations around the table, creates lasting memories, and provides comfort that extends beyond the food itself. When you serve generous portions of fork-tender beef with vegetables and rich gravy, you’re offering more than sustenance; you’re creating an experience of abundance and care that makes everyone feel loved and thoroughly satisfied.
The practical advantages of pot roast extend beyond comfort to include remarkable economy and efficiency. This dish transforms an affordable cut of beef into something spectacular through simple technique and patience. Furthermore, pot roast requires minimal hands-on time despite the long cooking—you can prepare other tasks, spend time with family, or simply relax while the oven does the work. This efficiency makes pot roast perfect for busy weekends when you want impressive results without constant kitchen attention.
As you make pot roast repeatedly through winter months, you’ll develop your own signature touches and family traditions. Perhaps you’ll adjust the herb blend, experiment with different vegetables, or create special occasions around this beloved meal. These personal adaptations transform a basic recipe into your family’s tradition—something that becomes anticipated across generations, creating continuity and comfort that defines what home means.
The simple ritual of preparing pot roast—seasoning the meat with care, listening to the sizzle as it sears, checking occasionally on the aromatic braising—becomes a meditation on nourishment and love. These acts of patient cooking create satisfaction beyond the eating itself, making pot roast day something special that everyone looks forward to when winter demands warmth and togetherness. Pot roast isn’t just food—it’s edible love that transforms cold Sundays into cherished family memories.
Did this Winter Pot Roast become your new Sunday dinner staple? If you loved how tender and flavorful it turned out, how it filled your home with incredible aromas, and how everyone asked for seconds and thirds, we’d be thrilled if you could save this recipe for regular rotation, pin it to your comfort food Pinterest board, or share it with friends who appreciate classic home cooking done right. Your support and enthusiasm inspire us to continue creating and sharing recipes that bring warmth, abundance, and deliciousness to your table. Tell us in the comments what you served alongside your pot roast and whether it’s become a family tradition—we love hearing about the Sunday dinners you’re creating!