Imagine a dessert so elegant, so undeniably festive, that it becomes the showstopper of every holiday gathering you attend. First, the Yule Log Cake embodies centuries of holiday tradition wrapped in a tender chocolate sponge that melts on your tongue. This magnificent creation, inspired by the ancient tradition of burning a Yule log to bring warmth and light during winter’s darkest days, transforms humble cake and cream into something genuinely magical. What makes this recipe truly special is that despite its impressive appearance, it’s surprisingly achievable for home bakers of moderate skill levels. Additionally, the satisfaction of creating something this beautiful with your own hands cannot be overstated. From the moment you place this gorgeous cake on your holiday table, guests will gasp at its rustic elegance and artisanal charm. Furthermore, the combination of moist chocolate cake, silky cream filling, and dusted cocoa powder creates a symphony of flavors that defines festive indulgence. Whether you’re a seasoned baker looking for a new challenge or an enthusiastic beginner ready to impress, this Yule Log welcomes you into its warm, chocolatey embrace.
Ingredients
Serves 10-12
For the Chocolate Sponge Cake:
- 5 large eggs, separated into yolks and whites
- ⅓ cup granulated sugar, divided
- ¼ cup unsweetened cocoa powder
- ¼ cup all-purpose flour
- ¼ teaspoon cream of tartar
- Pinch of sea salt
- 1 teaspoon vanilla extract
- 2 tablespoons hot water
- Powdered sugar for dusting
For the Chocolate Filling:
- 1 cup heavy whipping cream
- 6 ounces semi-sweet chocolate, finely chopped
- 2 tablespoons unsalted butter
- 2 tablespoons granulated sugar
- 1 teaspoon vanilla extract
- Pinch of sea salt
For the Frosting:
- ½ cup unsalted butter, softened
- ¾ cup unsweetened cocoa powder
- 1½ cups powdered sugar, sifted
- ¼ cup heavy whipping cream
- 1 teaspoon vanilla extract
- Pinch of sea salt
For Garnish:
- Fresh rosemary sprigs
- Powdered sugar for dusting
- Optional: gold leaf, cinnamon sticks, or fresh cranberries
Understanding the Yule Log Technique
Creating a Yule Log cake requires understanding the fundamental technique of rolling a delicate sponge cake without breaking it. Next, the key lies in rolling the cake while it’s still warm and pliable, before the structure sets completely. Additionally, this sponge cake differs from traditional layer cakes because it contains no butter, creating a uniquely light texture perfect for rolling. Meanwhile, the filling provides moisture and richness that balances the cake’s airy crumb. Understanding these principles before beginning ensures success throughout the process.
Step-by-Step Instructions
- Preheat your oven to 375°F and position the rack to the center, allowing proper heat circulation during baking. Subsequently, line a 15-by-10-inch jelly roll pan with parchment paper, ensuring it extends above the edges for easy removal later.
- In a small bowl, whisk together cocoa powder and all-purpose flour, sifting them together twice to eliminate lumps and aerate the mixture. This preparation ensures even distribution throughout the delicate sponge.
- Separate your eggs carefully, ensuring no yolk enters the whites, as even a tiny amount of fat prevents proper whipping. First, place egg yolks in one medium bowl and whites in a large bowl for beating.
- Beat egg yolks with ⅙ cup of granulated sugar on medium-high speed until pale and thick, approximately 3-4 minutes. Additionally, add vanilla extract and hot water to this mixture, beating briefly to combine.
- Fold the cocoa-flour mixture gently into the egg yolk mixture using a rubber spatula, being careful not to deflate the mixture. Work slowly and methodically, folding until no visible flour streaks remain.
- In your large bowl, beat egg whites with cream of tartar and sea salt on high speed until soft peaks form, approximately 2-3 minutes. Next, gradually add the remaining ⅙ cup of granulated sugar while continuing to beat until stiff peaks form and the meringue becomes glossy.
- Fold one-third of the meringue into the chocolate mixture first to lighten it, then fold in the remaining meringue in two additions. Fold gently using a spatula, maintaining as much volume as possible with each stroke.
- Pour the batter evenly onto your prepared pan, smoothing the top gently with a spatula. Tap the pan lightly against the counter to release air pockets.
- Bake for 12-15 minutes until a toothpick inserted in the center comes out clean and the cake springs back lightly when touched. However, avoid overbaking, as this dries out the delicate sponge.
- Remove the cake from the oven and immediately dust the surface generously with powdered sugar. Subsequently, place a clean kitchen towel over the cake and carefully flip the entire pan onto the towel.
- Gently peel away the parchment paper from the now-exposed underside of the cake. Meanwhile, starting from the short end closest to you, begin rolling the cake tightly with the towel, creating a cylinder shape. Allow the cake to cool in this rolled position for at least 30 minutes, preferably up to one hour.
- While the cake cools, prepare the chocolate filling by heating heavy whipping cream until it just begins to steam. Pour the hot cream over finely chopped chocolate and allow it to sit undisturbed for one minute, then whisk until smooth and glossy. Subsequently, stir in butter, sugar, vanilla, and salt until fully incorporated. Allow this ganache to cool to a spreadable consistency, approximately 15-20 minutes.
- Prepare the frosting by beating softened butter with unsweetened cocoa powder on medium speed until combined. Next, gradually add sifted powdered sugar, beating well after each addition. Subsequently, add heavy cream one tablespoon at a time, along with vanilla and salt, beating until light and fluffy.
- Carefully unroll the cooled cake, removing the towel gently. Subsequently, spread the chocolate filling evenly over the entire surface of the cake, leaving a ½-inch border around the edges.
- Roll the cake tightly but gently, this time without the towel, starting from the same short end. Place the rolled cake seam-side down on your serving plate or cake board.
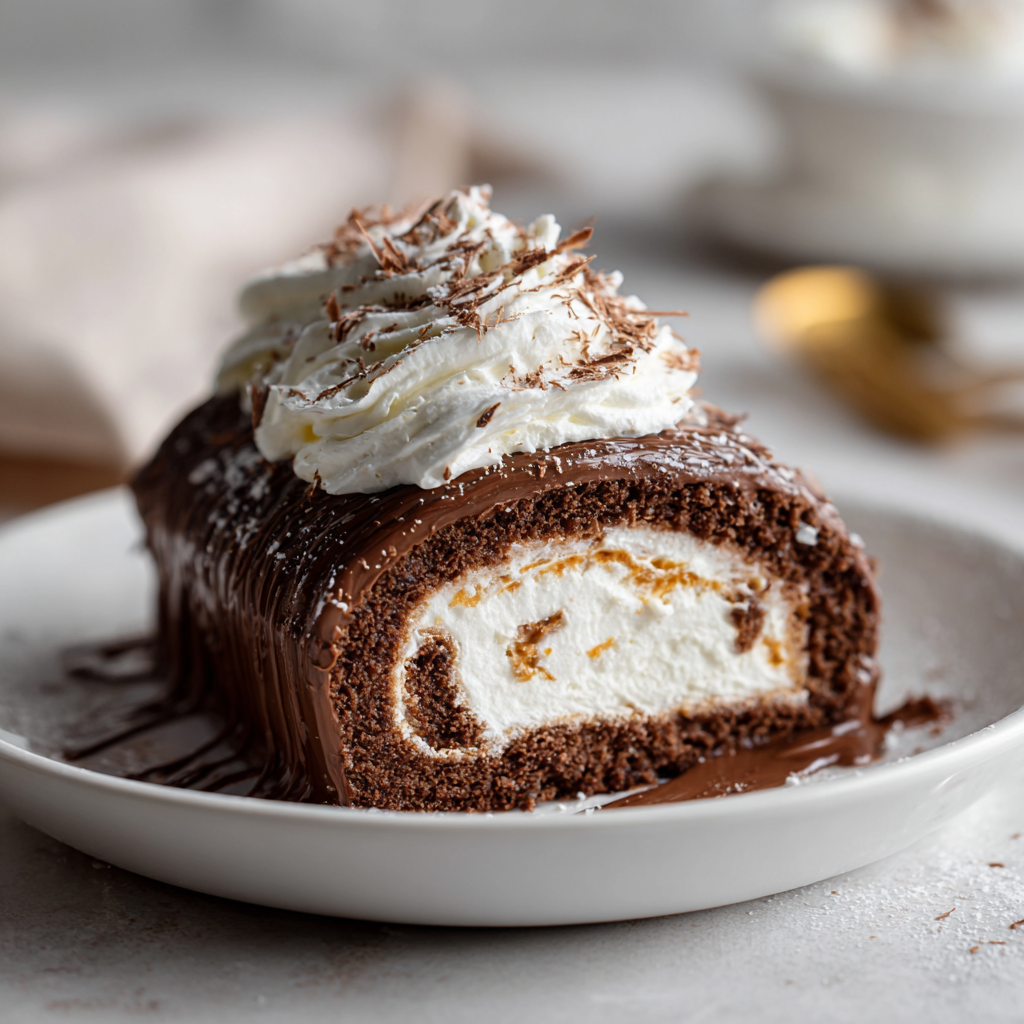
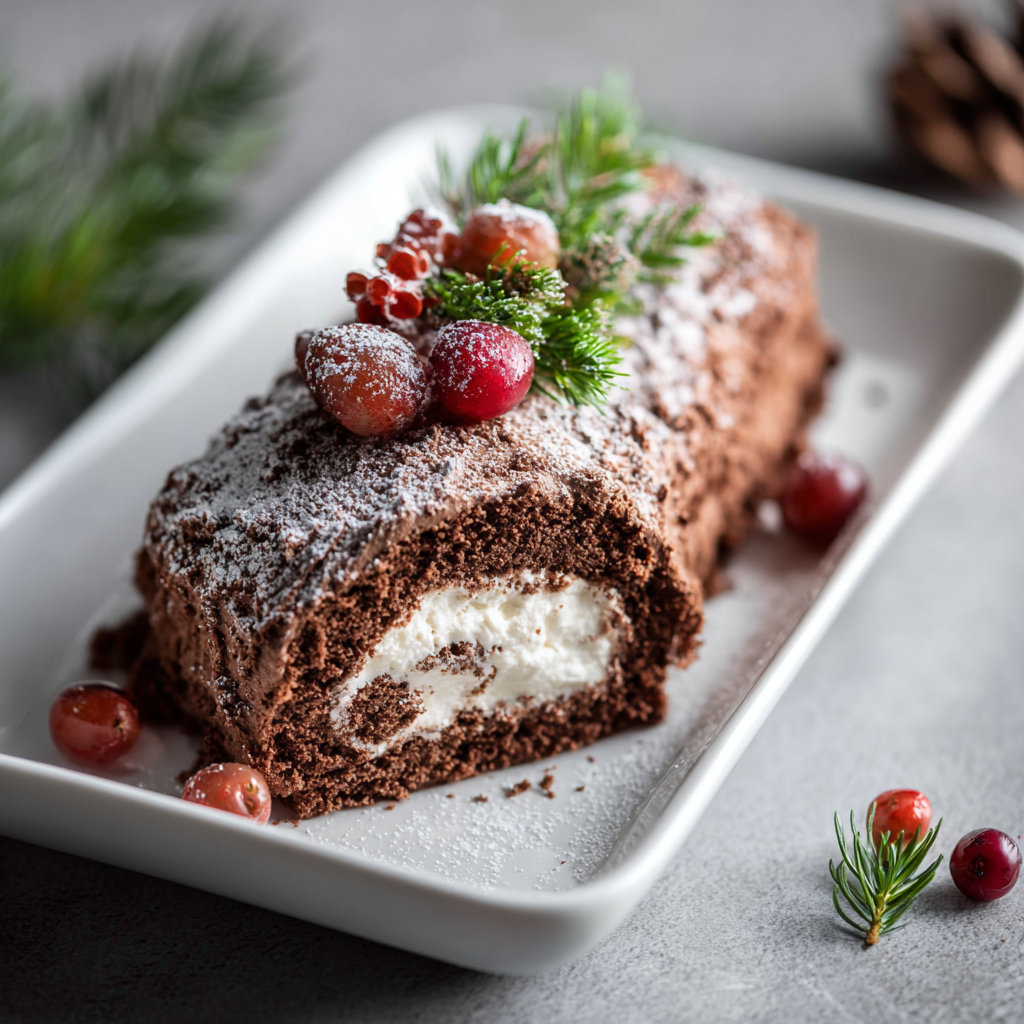
- Frost the outside of your Yule Log generously with the chocolate frosting, creating rustic, bark-like texture using the back of a fork or spatula. Make horizontal lines across the top and sides to mimic actual bark.
- Cut off a 2-3 inch piece from one end of the log at a slight angle and position it against the side to resemble a branch growing from the main log. Frost this piece as well to create seamless integration.
- Dust the finished cake generously with powdered sugar to resemble fresh snow, then garnish with fresh rosemary sprigs, gold leaf, cinnamon sticks, or fresh cranberries as desired.
Perfecting Your Rolling Technique
The rolling process intimidates many bakers, yet mastering it opens doors to countless other rolled cake recipes. First, roll while the cake is still warm because the structure remains pliable and forgiving. Additionally, the parchment paper beneath the cake prevents sticking and makes handling much easier. Meanwhile, don’t worry about perfect appearance at this stage because the frosting later covers any imperfections beautifully.
Serving and Storing Tips
Serving Suggestions
Present your stunning Yule Log as the grand finale to your holiday meal, allowing guests to admire its rustic beauty before slicing. First, use a sharp, thin-bladed knife dipped in hot water between cuts for clean slices that showcase the elegant spiral interior. Additionally, serve at room temperature rather than chilled so the cake’s delicate crumb shines and flavors develop fully. Pair each slice with hot coffee, espresso, or a rich hot chocolate for the ultimate comfort experience. Furthermore, a dollop of whipped cream or a scoop of vanilla ice cream provides cool contrast to the warm, rich chocolate.
Storage Tips
Store your completed Yule Log in an airtight container at cool room temperature for up to 2 days, keeping it fresh without drying out. However, if your kitchen runs warm or you live in a humid climate, refrigerate the cake loosely covered for up to 3 days. The cold actually improves the texture and makes slicing cleaner. To freeze, wrap the unfrosted rolled cake tightly in plastic wrap and aluminum foil, storing it in the freezer for up to one month. Subsequently, thaw overnight in the refrigerator before frosting and decorating. Alternatively, you can freeze the completed Yule Log for up to two weeks, though frosting and decorations may show minor cracks when thawed.
Helpful Notes and Variations
Understanding how to customize this recipe ensures it suits your preferences and dietary considerations perfectly. Next, if you prefer milk chocolate over semi-sweet, simply substitute equal amounts in both the filling and frosting. Meanwhile, those with coffee appreciation can add one tablespoon of instant espresso powder to the frosting for deeper chocolate flavor. Additionally, substituting half the heavy cream with sour cream in the filling creates subtle tartness that balances richness beautifully.
The frosting consistency directly impacts your ability to create that rustic bark texture. For thicker frosting, reduce the heavy cream by one tablespoon. In contrast, if your frosting seems too stiff, warm it gently over a double boiler while stirring constantly. Subsequently, some bakers prefer adding one tablespoon of light corn syrup to the frosting for additional shine and moisture.

Common mistakes occur when bakers skip the cooling period after the first roll, attempting to unroll a cake that’s too warm and sticky. Instead, patience at this stage prevents tears and frustration. Furthermore, overbeating the meringue creates a grainy texture that doesn’t fold smoothly into the chocolate mixture. Stop beating when stiff peaks form, not beyond. Additionally, using too-warm filling makes the cake layers separate or slip around; ensure the ganache reaches spreadable consistency before applying it.
Chef Tips for Flawless Execution
First, keep your work surface clean and have all materials within reach before beginning the rolling process. Subsequently, room temperature ingredients mix more smoothly and create lighter, more stable meringue that holds its volume better during folding than cold ingredients.
Frequently Asked Questions
Can I make the Yule Log cake a day ahead? Yes, you can prepare the cake and filling one day ahead, refrigerate separately, then assemble and frost the morning of serving for freshest appearance and best texture.
What’s the best way to slice the Yule Log without it falling apart? Use a long, thin-bladed knife dipped in hot water and wiped clean between each cut; this prevents the frosting from dragging and maintains clean edges.
Can I use all-purpose chocolate instead of separating cocoa powder and flour? No, the specific ratio of cocoa powder to flour creates the proper texture; chocolate liqueur or melted chocolate would significantly alter the sponge’s structure and weight.
Is there a dairy-free alternative for the filling and frosting? Yes, use coconut cream as a one-to-one replacement for heavy whipping cream, and substitute dairy-free butter for the butter in the frosting.
How far in advance can I decorate the Yule Log? Frost and decorate no more than a few hours ahead of serving, as powdered sugar absorbs moisture from the air and decorations may wilt if sitting too long.
Exploring Flavor Variations
This classic formula welcomes creative interpretations that keep the dessert interesting year after year. Next, adding one tablespoon of cherry liqueur or brandy to the chocolate filling creates sophisticated festive notes. Meanwhile, some bakers replace half the chocolate filling with raspberry jam for bright tartness against rich chocolate. Additionally, incorporating crushed peppermint candy into the frosting creates a festive twist perfect for holiday tables. Furthermore, a mocha filling using strong espresso with the chocolate offers depth for coffee enthusiasts.
The History Behind Your Creation
Understanding the Yule Log’s heritage connects you to centuries of holiday tradition spanning European cultures. First, the original Yule Log was an actual wooden log burned in fireplaces to celebrate the winter solstice and encourage the sun’s return. Subsequently, as culinary traditions evolved, French patissiers created the Bûche de Noël, translating this ancient custom into an edible dessert. Additionally, this chocolate version represents how traditions adapt and transform while maintaining their essential spirit and meaning. Creating this cake in your own kitchen honors that legacy while establishing new memories for your loved ones.
Mastering Rolled Cakes
The Yule Log serves as an excellent introduction to the world of rolled cakes because the chocolate sponge offers more forgiveness than lighter varieties. Next, once comfortable with this technique, you can explore Swiss rolls, pumpkin rolls, and other rolled creations. Meanwhile, the confidence gained from successfully rolling your first Yule Log opens avenues to advanced baking techniques. Additionally, many professional bakers cite rolled cakes as foundational skills that led them toward pastry arts as a career.
Conclusion
Your Yule Log Cake awaits creation, ready to transform your holiday table into something genuinely spectacular and memorable. This elegant dessert proves that showstopping results don’t require professional training or complicated techniques. Through patient preparation, careful folding, and attention to detail, you’ll create something restaurant-quality that tastes even better than it looks. Gather your ingredients, follow these steps methodically, and prepare yourself for the joy of revealing a perfect spiral when you slice into your creation.
Did you love this Yule Log Cake recipe? Please save this recipe to your collection, pin it to your Pinterest board, and share it with friends and family who deserve to experience this stunning holiday dessert. Your support means everything and encourages us to keep creating more extraordinary recipes that transform your kitchen into a festive celebration space!